Azure – Landing Zone

An Azure Landing Zone is the “plumbing and wiring” of your cloud environment. It is a set of best practices, configurations, and governance rules that ensure a subscription is ready to host workloads securely and at scale.

If you think of a workload (like a website or database) as a house, the Landing Zone is the city blockβ€”it provides the electricity, water, roads, and security so the house can function.


πŸ›οΈ The Conceptual Architecture

A landing zone follows a Hub-and-Spoke design, ensuring that common services (like firewalls and identity) aren’t repeated for every single application.

1. The Management Group Hierarchy

Instead of managing one giant subscription, you organize them into “folders” called Management Groups:

  • Platform: Contains the “Engine Room” (Identity, Management, and Connectivity).
  • Workloads (Landing Zones): Where your actual applications live (Production, Development, Sandbox).
  • Decommissioned: Where old subscriptions go to die while retaining data for audit.

πŸ—οΈ The 8 Critical Design Areas

When you build a landing zone, you must make decisions in these eight categories:

  1. Enterprise Agreement (EA) & Tenants: How you bill and manage the top-level account.
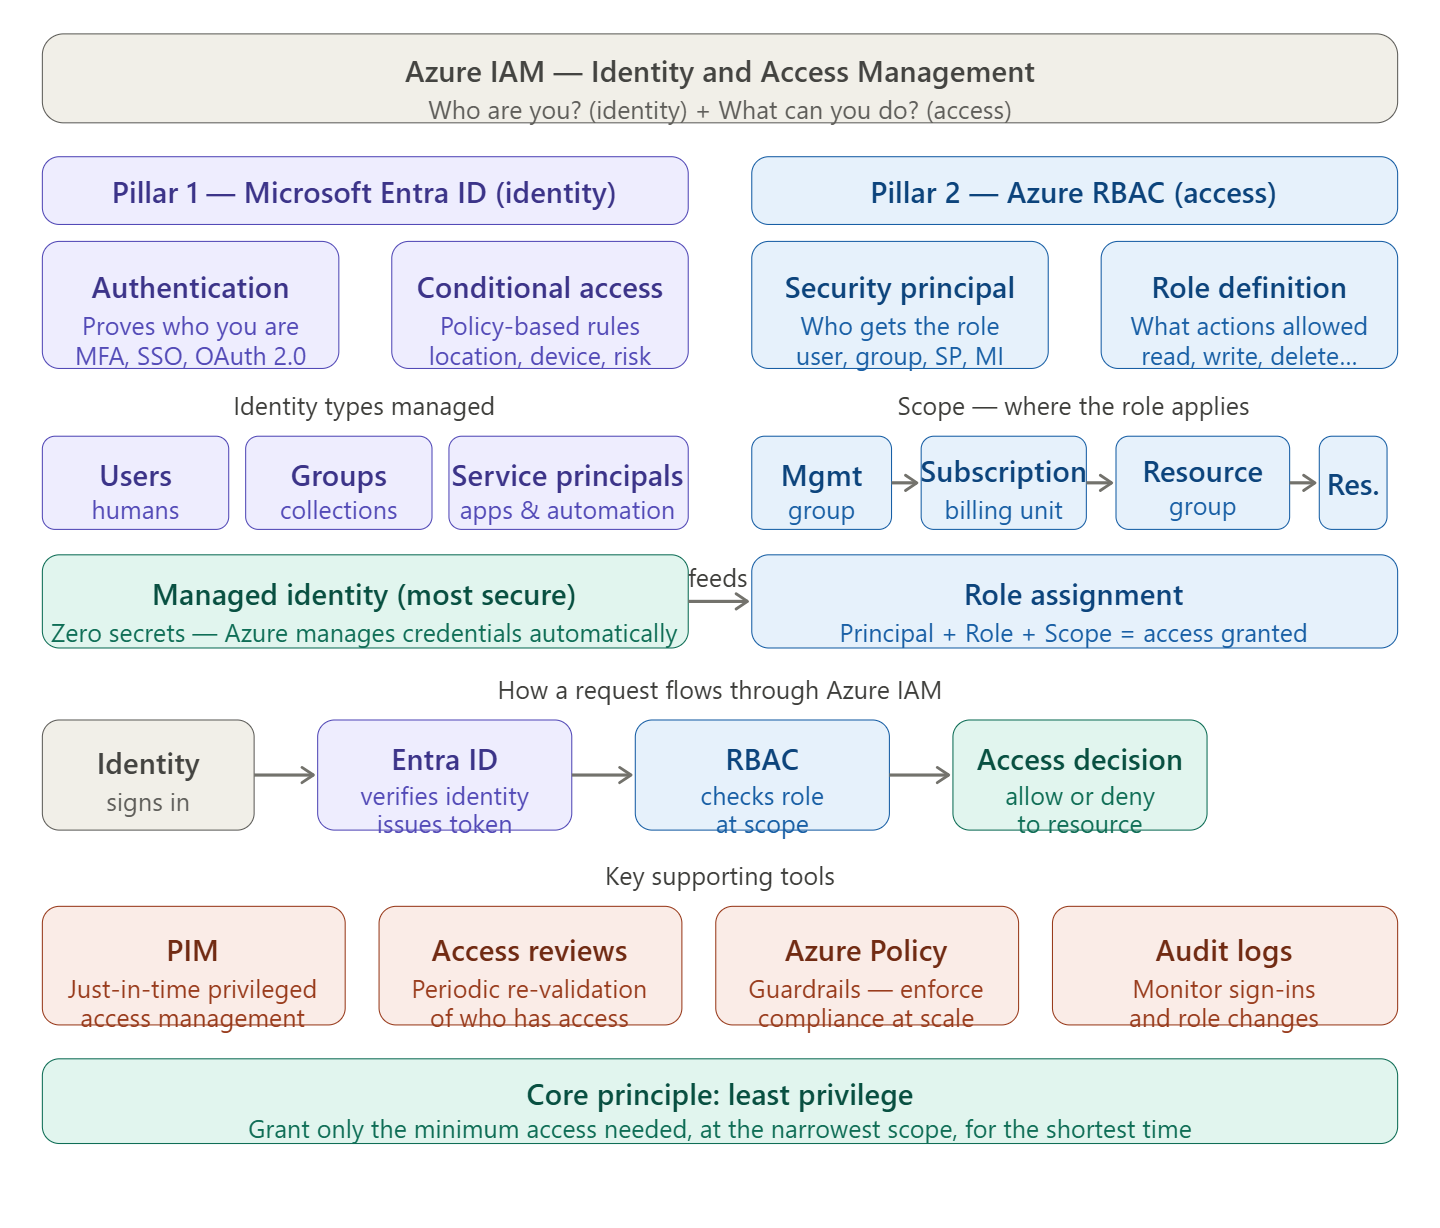
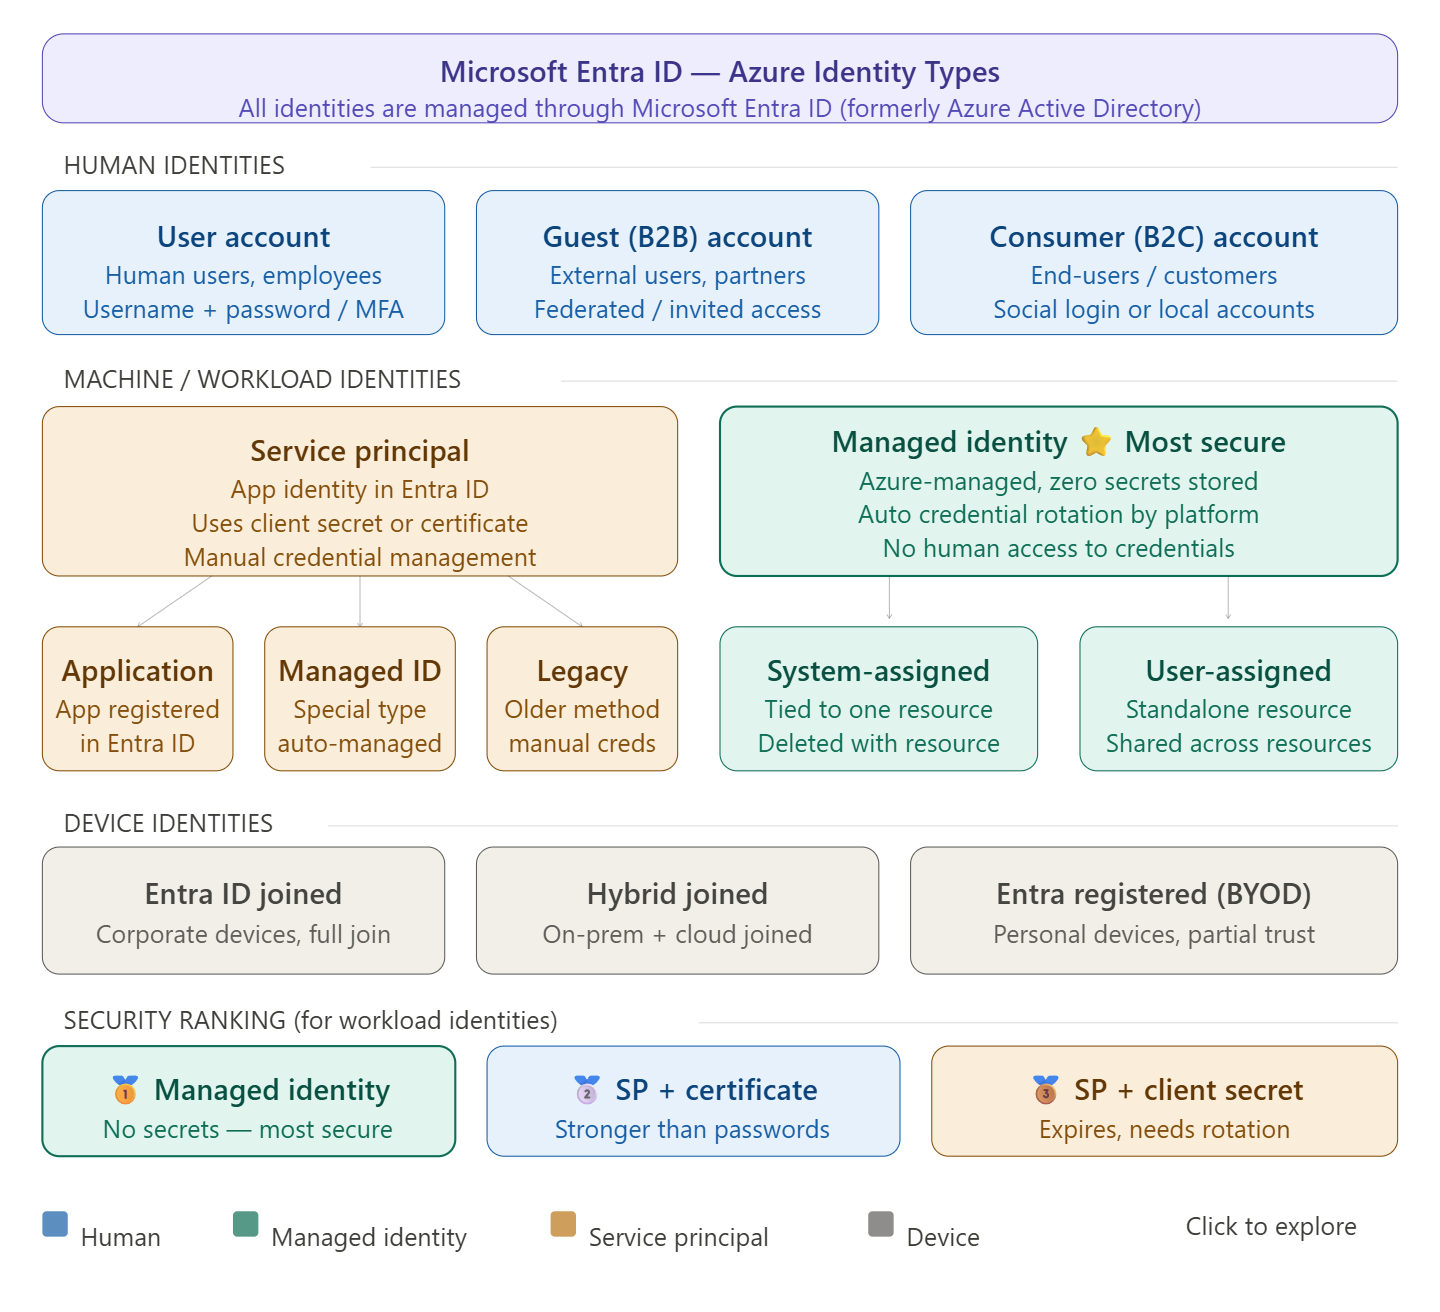
  2. Identity & Access Management (IAM): Setting up Microsoft Entra ID and RBAC.
  3. Network Topology: Designing the Hub-and-Spoke, VNet peering, and hybrid connectivity (VPN/ExpressRoute).
  4. Resource Organization: Establishing a naming convention and tagging strategy.
  5. Security: Implementing Defender for Cloud and Azure Policy.
  6. Management: Centralizing logging in a Log Analytics Workspace.
  7. Governance: Using Azure Policy to prevent “shadow IT” (e.g., “No VMs allowed outside of East US”).
  8. Deployment: Using Infrastructure as Code (Terraform, Bicep, or Pulumi) to deploy the environment.

πŸš€ Two Main Implementation Paths

A. “Platform” Landing Zone (The Hub)

This is the central infrastructure managed by your IT/Cloud Platform team.

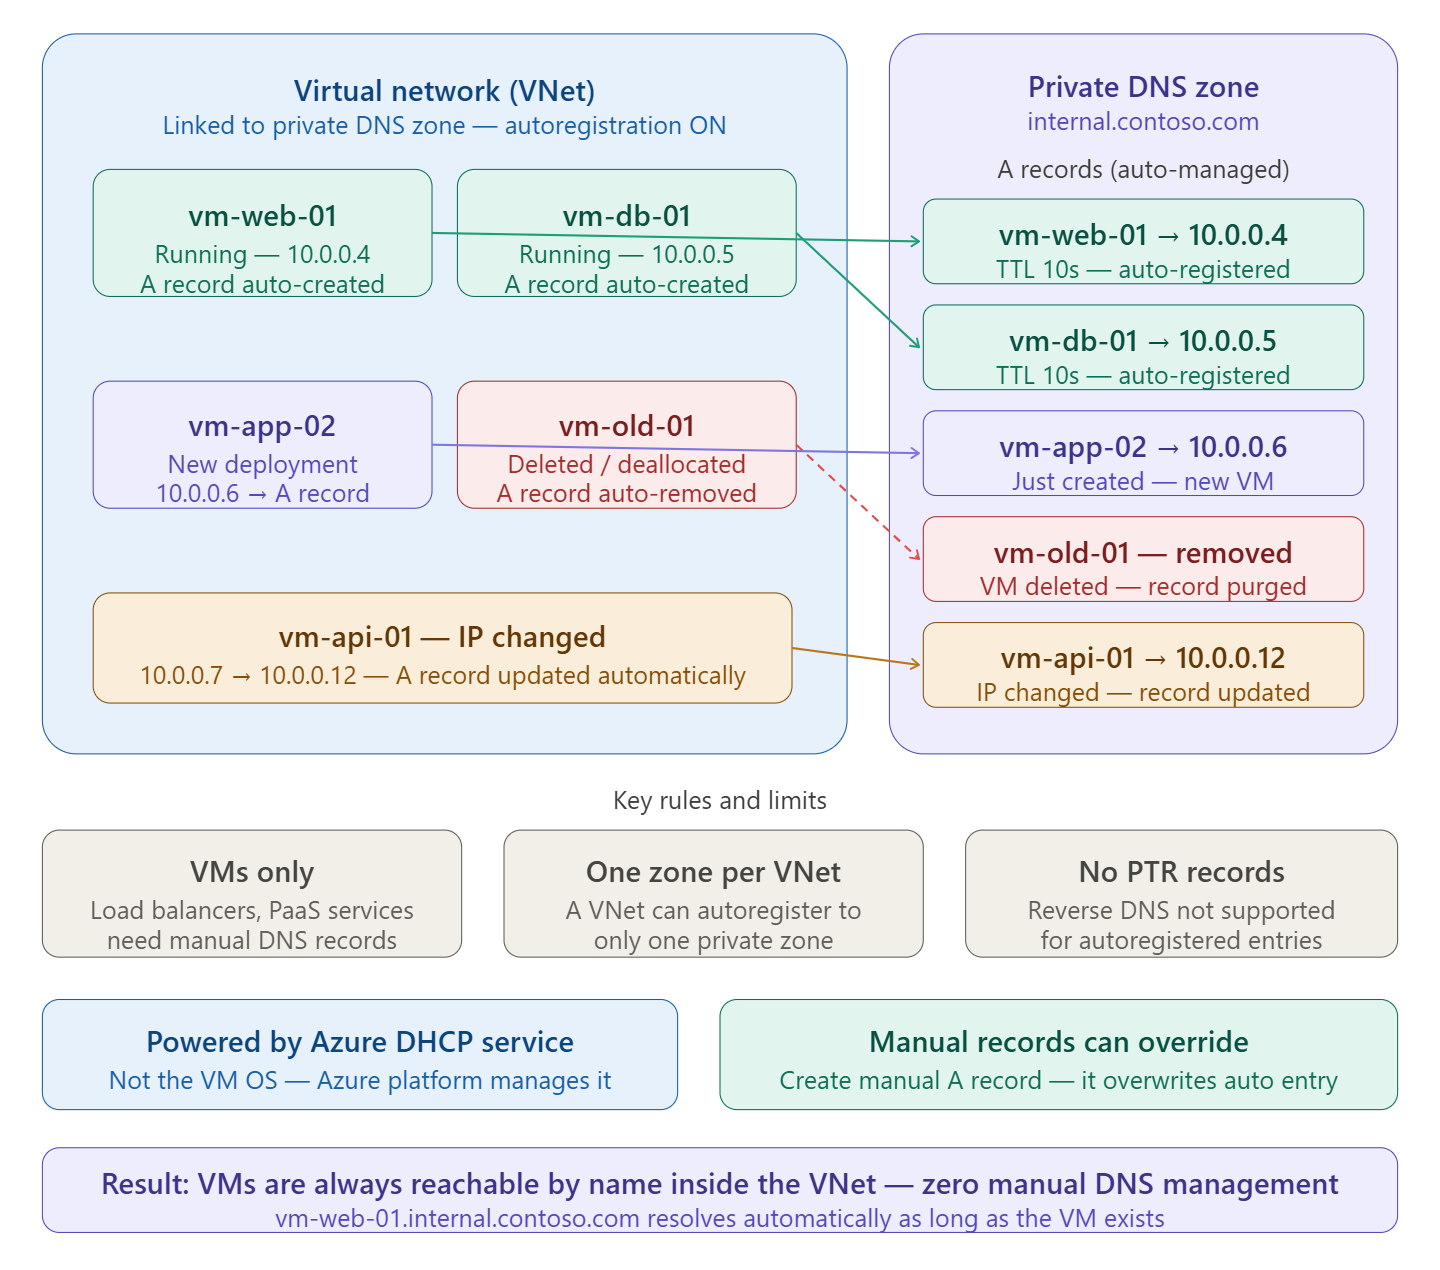
  • Connectivity Hub: Contains Azure Firewall, VPN Gateway, and Private DNS Zones.
  • Identity: Dedicated subscription for Domain Controllers or Entra Domain Services.
  • Management: Centralized Log Analytics and Automation accounts.

B. “Application” Landing Zone (The Spoke)

This is a subscription handed over to a development team.

  • It comes pre-configured with network peering back to the Hub.
  • It has Policies already applied (e.g., “Encryption must be enabled on all disks”).
  • The dev team has “Contributor” rights to build their app, but they cannot break the underlying network or security rules.

πŸ› οΈ How do you actually deploy it?

Microsoft provides the “Accelerator”β€”a set of templates that allow you to deploy a fully functional enterprise-scale environment in a few clicks or via code.

  1. Portal-based: Use the “Azure Landing Zone Accelerator” in the portal.
  2. Bicep/Terraform: Use the official Azure/Terraform-azurerm-caf-enterprise-scale modules.

βœ… Why do it?

  • Scalability: You can add 100 subscriptions without manual setup.
  • Security: Guardrails are “baked in” from day one.
  • Cost Control: Centralized monitoring stops “orphan” resources from running up the bill.

Azure DNZ zone with autoregistration enabled,

Here’s what it means in plain terms:

The short version

When you link a Virtual Network to a Private DNS Zone with autoregistration enabled, Azure automatically maintains DNS records for every VM in that VNet. You don’t touch the DNS zone manually β€” Azure handles it for you.

What happens at each VM lifecycle event

When you link a virtual network with a private DNS zone with this setting enabled, a DNS record gets created for each virtual machine deployed in the virtual network. For each virtual machine, an address (A) record is created.

If autoregistration is enabled, Azure Private DNS updates DNS records whenever a virtual machine inside the linked virtual network is created, changes its IP address, or is deleted.

So the three automatic actions are:

  • VM created β†’ A record added (vm-web-01 β†’ 10.0.0.4)
  • VM IP changes β†’ A record updated automatically
  • VM deleted or deallocated β†’ A record removed from the zone

What powers it under the hood

The private zone’s records are populated by the Azure DHCP service β€” client registration messages are ignored. This means it’s the Azure platform doing the work, not the VM’s operating system. If you configure a static IP on the VM without using Azure’s DHCP, changes to the hostname or IP won’t be reflected in the zone.

Important limits to know

A specific virtual network can be linked to only one private DNS zone when automatic registration is enabled. You can, however, link multiple virtual networks to a single DNS zone.

Autoregistration works only for virtual machines. For all other resources like internal load balancers, you can create DNS records manually in the private DNS zone linked to the virtual network.

Also, autoregistration doesn’t support reverse DNS pointer (PTR) records.

The practical benefit

In a classic setup without autoregistration, every time a VM is deployed or its IP changes, someone has to go manually update the DNS zone. With autoregistration on, your VMs are always reachable by a friendly name like vm-web-01.internal.contoso.com from anywhere inside the linked VNet β€” with zero manual effort, and no stale records left behind after deletions.

AZ – IAM

Azure IAM is best understood as two interlocking systems working together. Let me show you the big picture first, then how a request actually flows through it.Azure IAM is built around one question answered in two steps: who are you? and what are you allowed to do? Those two steps map to two distinct systems that work together.


Pillar 1 β€” Microsoft Entra ID (formerly Azure Active Directory): identity

This is the authentication layer. It answers “who are you?” by verifying credentials and issuing a token. It manages every type of identity in Azure: human users, guest accounts, groups, service principals (for apps and automation), and managed identities (the zero-secret identity type where Azure owns the credential). It also enforces Conditional Access policies β€” rules that say things like “only allow login from compliant devices” or “require MFA when signing in from outside the corporate network.”

Pillar 2 β€” Azure RBAC (Role-Based Access Control): access

This is the authorization layer. It answers “what can you do?” once identity is proven. RBAC works through three concepts combined into a role assignment:

  • A security principal β€” the identity receiving the role (user, group, service principal, or managed identity)
  • A role definition β€” what actions are permitted (e.g., Owner, Contributor, Reader, or a custom role)
  • A scope β€” where the role applies, which follows a hierarchy: Management Group β†’ Subscription β†’ Resource Group β†’ individual Resource

A role assigned at a higher scope automatically inherits down. Give someone Reader on a subscription and they can read everything inside it.

The supporting tools

Three tools round out a mature IAM setup. PIM (Privileged Identity Management) implements just-in-time access β€” instead of being a permanent Owner, you request elevation for 2 hours, do the work, and the permission expires automatically. Access Reviews let you periodically re-validate who still needs access, cleaning up stale assignments. Azure Policy enforces guardrails at scale β€” for example, preventing anyone from assigning Owner at the subscription level without an approval workflow.

The core principle threading through all of it

Least privilege: grant the minimum role, at the narrowest scope, for the shortest duration. This is what PIM, custom roles, and resource-group-level assignments all support β€” shrinking the blast radius if any identity is ever compromised.

AZ : Managed Identity vs Service Principal

Here’s the core mental model: both are identities for apps and services β€” not humans. The difference is who manages the credentials and where the workload runs.

Managed Identity is Azure saying: “I’ll handle the identity for you β€” no passwords, no secrets, no expiry dates.” You just enable it on your resource (a VM, App Service, Function, etc.), assign it an RBAC role, and your code authenticates automatically. Nobody β€” not even you β€” ever sees the underlying credential. Microsoft rotates it silently in the background.

Service Principal is the more traditional model: you register an application in Microsoft Entra ID, generate a client secret or certificate, store that secret somewhere (like Key Vault), and your app uses it to authenticate. You own the full lifecycle β€” rotation, expiry monitoring, access revocation. It’s more flexible but carries more risk and operational overhead.

The simple rule of thumb is:

  • Running inside Azure? β†’ Use Managed Identity, always.
  • Running outside Azure (GitHub Actions, on-prem server, another cloud)? β†’ You have to use a Service Principal, since Managed Identity only works on Azure-hosted resources.

One nuance worth knowing: Managed Identity is actually implemented as a special type of Service Principal under the hood β€” it’s just one where Azure controls the credential lifecycle instead of you. So they’re not completely different systems, just different levels of management responsibility.

Types of ID are in Azure

Here’s the full breakdown:


πŸ† Most secure identity: Managed Identity

What makes managed identities uniquely secure is that no one knows the credentials β€” they are automatically created by Azure, including the credentials themselves. This eliminates the biggest risk in cloud security: leaked or hardcoded secrets. Managed identity replaces secrets such as access keys or passwords, and can also replace certificates or other forms of authentication for service-to-service dependencies.


How many identity types are there in Azure?

At a high level, there are two types of identities: human and machine/non-human identities. Machine/non-human identities consist of device and workload identities. In Microsoft Entra, workload identities are applications, service principals, and managed identities.

Breaking it down further, Azure has 4 main categories with several sub-types:

1. Human identities

  • User accounts (employees, admins)
  • Guest/B2B accounts (external partners)
  • Consumer/B2C accounts (end-users via social login)

2. Workload/machine identities

  • Managed Identity β€” most secure; no secrets to manage
    • System-assigned: tied to the lifecycle of an Azure resource; when the resource is deleted, Azure automatically deletes the service principal.
    • User-assigned: a standalone Azure resource that can be assigned to one or more Azure resources β€” the recommended type for Microsoft services.
  • Service Principal β€” three main types exist: Application service principal, Managed identity service principal, and Legacy service principal.

3. Device identities

  • Entra ID joined (corporate devices)
  • Hybrid joined (on-prem + cloud)
  • Entra registered / BYOD (personal devices)

Why prefer Managed Identity over Service Principal?

Microsoft Entra tokens expire every hour, reducing exposure risk compared to Personal Access Tokens which can last up to one year. Managed identities handle credential rotation automatically, and there is no need to store long-lived credentials in code or configuration. Service principals, by contrast, require you to manually rotate client secrets or certificates β€” a 2025 report highlighted that 23.77 million secrets were leaked on GitHub in 2024 alone, underscoring the risks of hardcoded credentials.

The rule of thumb: use Managed Identity whenever your workload runs inside Azure. Use a Service Principal only when you need to authenticate from outside Azure (CI/CD pipelines, on-premises systems, multi-cloud).

How to investigate spike in azure


Quick Decision Tree First

Do you know which service spiked?

  • Yes β†’ Skip to Step 3
  • No β†’ Start at Step 1

Step 1: Pinpoint the Spike in Cost Management

  • Azure Portal β†’ Cost Management β†’ Cost Analysis
  • Set view to Daily to find the exact day
  • Group by Service Name first β†’ tells you what spiked
  • Then group by Resource β†’ tells you which specific resource

Step 2: Narrow by Dimension

Keep drilling down by:

  • Resource Group
  • Resource type
  • Region (unexpected cross-region egress is a common hidden cost)
  • Meter (very granular β€” shows exactly what operation you’re being charged for)

Step 3: Go to the Offending Resource

Once you know what it is:

ServiceWhere to look
VM / VMSSCheck scaling events, uptime, instance count
StorageCheck blob transactions, egress, data written
Azure SQL / SynapseQuery history, DTU spikes, long-running queries
ADF (Data Factory)Pipeline run history β€” loops, retries, backfills
DatabricksCluster history β€” was a cluster left running?
App ServiceScale-out events, request volume
Azure FunctionsExecution count β€” was something stuck in a loop?

Step 4: Check Activity Log

  • Monitor β†’ Activity Log
  • Filter by the spike timeframe
  • Look for:
    • New resource deployments
    • Scaling events
    • Config changes
    • Who or what triggered it (user vs service principal)

This answers “what changed?”


Step 5: Check Azure Monitor Metrics

  • Go to the specific resource β†’ Metrics
  • Look at usage metrics around the spike time:
    • CPU / memory
    • Data in/out (egress is often the culprit)
    • Request count
    • DTU / vCore usage

Correlate the metric spike timeline with the cost spike timeline.


Step 6: Check Logs (Log Analytics / KQL)

If you have Log Analytics workspace connected:

// Example: Find expensive or long-running operations
AzureActivity
| where TimeGenerated between (datetime(2026-04-01) .. datetime(2026-04-11))
| where ActivityStatusValue == "Success"
| summarize count() by OperationNameValue, ResourceGroup
| order by count_ desc
// Check for VM scaling events
AzureActivity
| where OperationNameValue contains "virtualMachines"
| where TimeGenerated > ago(7d)
| project TimeGenerated, Caller, OperationNameValue, ResourceGroup

Step 7: Check for Common Culprits

These are the most frequent causes of unexpected spikes:

  • πŸ” Pipeline/job stuck in a loop (ADF, Functions, Logic Apps)
  • πŸ’Ύ Unexpected data egress (cross-region or internet-bound traffic)
  • πŸ“ˆ Auto-scaling that didn’t scale back down
  • πŸ—„οΈ Full table scan or bad query in SQL/Synapse
  • πŸ–₯️ VM or cluster left running after a job
  • πŸ“¦ Historical data backfill triggered accidentally
  • πŸ”„ Snapshot or backup policy changed

The Mental Model

Cost Analysis (when + what?)
β†’ Drill by dimension (which resource?)
β†’ Activity Log (what changed?)
β†’ Metrics (how did usage behave?)
β†’ Logs/KQL (why did it happen?)

AZ- VM types of “stress”: CPU, Memory, and I/O

If you need to put load on an Azure VM for testing (like checking if your Azure Monitor Alerts or Autoscale settings are working), using a Perl script is a classic, lightweight way to do it.

Below are three scripts tailored for different types of “stress”: CPU, Memory, and I/O.


1. CPU Load Script

This script performs high-intensity mathematical calculations in a loop to pin the processor.

Perl

#!/usr/bin/perl
# CPU Stress Test
use strict;
use warnings;
print "Starting CPU Load... Press Ctrl+C to stop.\n";
# This will run on one core.
# To stress multiple cores, run this script multiple times in the background.
while (1) {
my $x = sqrt(rand(1000000)) * sin(rand(1000000));
}
  • Pro Tip: If your VM has 4 cores and you want to hit 100% total CPU, run this 4 times: perl cpu_load.pl & perl cpu_load.pl & perl cpu_load.pl & perl cpu_load.pl &

2. Memory (RAM) Load Script

This script creates a massive string and keeps adding to it to consume available RAM. Warning: Be careful with this; if it consumes all RAM, the Linux OOM (Out of Memory) killer might crash the VM.

Perl

#!/usr/bin/perl
# Memory Stress Test
use strict;
use warnings;
print "How many MB of RAM should I consume? ";
my $mb_to_hit = <STDIN>;
chomp($mb_to_hit);
my $data = "";
my $chunk = "A" x (1024 * 1024); # 1MB string chunk
print "Allocating memory...\n";
for (1..$mb_to_hit) {
$data .= $chunk;
print "Currently holding approx $_ MB\n" if $_ % 100 == 0;
}
print "Memory allocated. Press Enter to release memory and exit.";
<STDIN>;

3. I/O (Disk) Load Script

This script continuously writes and deletes a file to stress the Virtual Machine’s disk IOPS (Input/Output Operations Per Second).

Perl

#!/usr/bin/perl
# Disk I/O Stress Test
use strict;
use warnings;
my $filename = "test_load_file.tmp";
print "Starting Disk I/O load... Press Ctrl+C to stop.\n";
while (1) {
open(my $fh, '>', $filename) or die "Could not open file: $!";
print $fh "This is a stress test line\n" x 10000;
close $fh;
unlink($filename); # Deletes the file immediately to repeat the write
}

πŸ’‘ The “Cloud Native” Alternative: stress-ng

While Perl scripts are great, most Azure Engineers use a tool called stress-ng. It is purpose-built for this and gives you much more granular control over exactly how many cores or how much RAM you hit.

To install and run (Ubuntu/Debian):

Bash

sudo apt update && sudo apt install stress-ng -y
# Stress 2 CPUs for 60 seconds
stress-ng --cpu 2 --timeout 60s
# Stress 1GB of RAM
stress-ng --vm 1 --vm-bytes 1G --timeout 60s

πŸ›‘ Important Reminder

When putting load on a VM, keep a separate window open with the command top or htop (if installed) to monitor the resource usage in real-time. If you are testing Azure Autoscale, remember that it usually takes 5–10 minutes for the Azure portal to reflect the spike and trigger the scaling action!

The CIDR (Classless Inter-Domain Routing)

The CIDR (Classless Inter-Domain Routing) notation tells you two things: the starting IP address and the size of your network.

The number after the slash (e.g., /16, /24) represents how many bits are “locked” for the network prefix. Since an IPv4 address has 32 bits in total, you subtract the CIDR number from 32 to find how many bits are left for your “hosts” (the actual devices).


πŸ“ The “Rule of 32”

To calculate how many IPs you get, use this formula: $2^{(32 – \text{prefix})}$.

  • Higher number = Smaller network: /28 is a small room.
  • Lower number = Larger network: /16 is a massive warehouse.

Common Azure CIDR Sizes

CIDRTotal IPsAzure Usable IPs*Common Use Case
/1665,53665,531VNet Level: A massive space for a whole company’s environment.
/221,0241,019VNet Level: Good for a standard “Hub” network.
/24256251Subnet Level: Perfect for a standard Web or App tier.
/273227Service Subnet: Required for things like SQL Managed Instance.
/281611Micro-Subnet: Used for small things like Azure Bastion or Gateways.
/2983Minimum Size: The smallest subnet Azure allows.

🚫 The “Azure 5” (Critical)

In every subnet you create, Azure automatically reserves 5 IP addresses. You cannot use these for your VMs or Apps.

If you create a /28 (16 IPs), you only get 11 usable addresses.

  1. x.x.x.0: Network Address
  2. x.x.x.1: Default Gateway
  3. x.x.x.2 & x.x.x.3: Azure DNS mapping
  4. x.x.x.255: Broadcast Address

πŸ’‘ How to choose for your VNet?

When designing your Azure network, follow these two golden rules:

  1. Don’t go too small: It is very difficult to “resize” a VNet once it’s full of resources. It’s better to start with a /16 or /20 even if you only need a few IPs today.
  2. Plan for Peering: If you plan to connect VNet A to VNet B (Peering), their CIDR ranges must not overlap. If VNet A is 10.0.0.0/16, VNet B should be something completely different, like 10.1.0.0/16.

Pro Tip: Think of it like a T-shirt sizing guide.

  • Small: /24 (256 IPs)
  • Medium: /22 (1,024 IPs)
  • Large: /20 (4,096 IPs)
  • Enterprise: /16 (65,536 IPs)

AZ – Service Endpoints and Private Endpoints

While both Service Endpoints and Private Endpoints are designed to secure your traffic by keeping it on the Microsoft backbone network, they do so in very different ways.

The simplest way to remember the difference is: Service Endpoints secure a public entrance, while Private Endpoints build a private side door.


πŸ› οΈ Service Endpoints

Service Endpoints “wrap” your virtual network identity around an Azure service’s public IP.

  • The Connection: Your VM still talks to the Public IP of the service (e.g., 52.x.x.x), but Azure magically reroutes that traffic so it never leaves the Microsoft network.
  • Granularity: It is broad. If you enable a Service Endpoint for “Storage,” your subnet can now reach any storage account in that region via the backbone.
  • On-Premise: Does not work for on-premise users. A user in your office cannot use a Service Endpoint to reach a database over a VPN.
  • Cost: Completely Free.

πŸ”’ Private Endpoints (Powered by Private Link)

Private Endpoints actually “inject” a specific service instance into your VNet by giving it a Private IP address from your own subnet.

  • The Connection: Your VM talks to a Private IP (e.g., 10.0.0.5). To the VM, the database looks like just another server in the same room.
  • Granularity: Extremely high. The IP address is tied to one specific resource (e.g., only your “Production-DB”). You cannot use that same IP to reach a different database.
  • On-Premise: Fully supports on-premise connectivity via VPN or ExpressRoute. Your office can reach the database using its internal 10.x.x.x IP.
  • Cost: There is a hourly charge plus a fee for data processed (roughly $7-$8/month base + data).

πŸ“Š Comparison Table

FeatureService EndpointPrivate Endpoint
Destination IPPublic IP of the ServicePrivate IP from your VNet
DNS ComplexityNone (Uses public DNS)High (Requires Private DNS Zones)
GranularitySubnet to All Services in RegionSubnet to Specific Resource
On-Prem AccessNoYes (via VPN/ExpressRoute)
Data ExfiltrationPossible (if not restricted)Protected (bound to one instance)
CostFreePaid (Hourly + Data)

πŸš€ Which one should you use?

Use Service Endpoints if:

  • You have a simple setup and want to save money.
  • You only need to connect Azure-to-Azure (no on-premise users).
  • You don’t want to deal with the headache of managing Private DNS Zones.

Use Private Endpoints if:

  • Security is your #1 priority (Zero Trust).
  • You need to reach the service from your on-premise data center.
  • You must strictly prevent “Data Exfiltration” (ensuring employees can’t copy data from your VNet to their own personal storage accounts).
  • You are in a highly regulated industry (Finance, Healthcare, Government).

Expert Tip: In 2026, most enterprises have moved toward Private Endpoints as the standard. While they are more expensive and harder to set up (DNS is the biggest hurdle), they offer the “cleanest” security architecture for a hybrid cloud environment.

Azure Virtual Network (VNet) or its subnets are out of IP addresses

This is a classic “architectural corner” that many engineers find themselves in. When an Azure Virtual Network (VNet) or its subnets are out of IP addresses, you cannot simply “resize” a subnet that has active resources in it.

Here is the hierarchy of solutions, from the easiest to the most complex.


πŸ› οΈ Option 1: The “Non-Disruptive” Fix (Add Address Space)

In 2026, Azure allows you to expand a VNet without taking it down. You can add a Secondary Address Space to the VNet.

  1. Add a New Range: Go to the VNet > Address space and add a completely new CIDR block (e.g., if you used 10.0.0.0/24, add 10.1.0.0/24).
  2. Create a New Subnet: Create a new subnet (e.g., Subnet-2) within that new range.
  3. Deploy New Workloads: Direct all new applications or VMs to the new subnet.
  4. Sync Peerings: If this VNet is peered with others, you must click the Sync button on the peering configuration so the other VNets “see” the new IP range.

πŸ”„ Option 2: The “Migration” Fix (VNet Integration)

If your existing applications need more room to grow (scaling up) but their current subnet is full:

  1. Create a Parallel Subnet: Add a new, larger subnet to the VNet (assuming you have space in the address range).
  2. Migrate Resources: For VMs, you can actually change the subnet of a Network Interface (NIC) while the VM is stopped.
  3. App Services: If you are using VNet Integration for App Services, simply disconnect the integration and reconnect it to a new, larger subnet.

🌐 Option 3: The “Expansion” Fix (VNet Peering)

If you cannot add more address space to your current VNet (perhaps because it would overlap with your on-prem network), you can “spill over” into a second VNet.

  1. Create VNet-B: Set up a brand new VNet with its own IP range.
  2. Peer them: Use VNet Peering to connect VNet-A and VNet-B.
  3. Routing: Use Internal Load Balancers or Private Endpoints to bridge the gap between applications in both networks.

⚠️ Important “Gotchas” to Remember

  • The “Azure 5”: Remember that Azure reserves 5 IP addresses in every subnet (the first four and the last one). If you create a /29 subnet, you think you have 8 IPs, but you actually only have 3 usable ones.
  • Subnet Resizing: You cannot resize a subnet if it has any resources in it (even one dormant NIC). You must delete the resources or move them first.
  • NAT Gateway: In 2026, if you are running out of Public IPs for outbound traffic, attach an Azure NAT Gateway to your subnet. This allows up to 64,000 concurrent flows using a single public IP, preventing “SNAT Port Exhaustion.”

πŸ’‘ The “Pro” Recommendation:

If this is a production environment, use Option 1. Add a secondary address space (like 172.16.0.0/16 or 100.64.0.0/10 if you’re out of 10.x.x.x space) and start a new subnet. It’s the only way to get more IPs without a “stop-everything” maintenance window.