---
- name: Encrypt multiple disks with LUKS
  hosts: all
  become: yes
  vars:
    luks_disks:            # List of disks to encrypt
      - /dev/sdb
      - /dev/sdc
    luks_password: secret_password  # Replace or use a vault/encrypted variable
    mount_points:          # List of mount points corresponding to the disks
      - /mnt/disk1
      - /mnt/disk2

  tasks:
    - name: Ensure required packages are installed
      ansible.builtin.yum:
        name:
          - cryptsetup
        state: present

    - name: Create LUKS encryption on disks
      ansible.builtin.command:
        cmd: "echo {{ luks_password }} | cryptsetup luksFormat {{ item }} -q"
      loop: "{{ luks_disks }}"
      ignore_errors: no

    - name: Open LUKS-encrypted disks
      ansible.builtin.command:
        cmd: "echo {{ luks_password }} | cryptsetup luksOpen {{ item }} luks_{{ item | regex_replace('/dev/', '') }}"
      loop: "{{ luks_disks }}"

    - name: Format the LUKS-encrypted devices with ext4 filesystem
      ansible.builtin.command:
        cmd: "mkfs.ext4 /dev/mapper/luks_{{ item | regex_replace('/dev/', '') }}"
      loop: "{{ luks_disks }}"

    - name: Create mount points
      ansible.builtin.file:
        path: "{{ item }}"
        state: directory
      loop: "{{ mount_points }}"

    - name: Mount the LUKS devices to mount points
      ansible.builtin.mount:
        path: "{{ item.1 }}"
        src: "/dev/mapper/luks_{{ item.0 | regex_replace('/dev/', '') }}"
        fstype: ext4
        state: mounted
      loop: "{{ luks_disks | zip(mount_points) | list }}"

    - name: Add entries to /etc/crypttab
      ansible.builtin.lineinfile:
        path: /etc/crypttab
        line: "luks_{{ item | regex_replace('/dev/', '') }} {{ item }} none luks"
      loop: "{{ luks_disks }}"
      create: yes

    - name: Add entries to /etc/fstab
      ansible.builtin.lineinfile:
        path: /etc/fstab
        line: "/dev/mapper/luks_{{ item.0 | regex_replace('/dev/', '') }} {{ item.1 }} ext4 defaults 0 0"
      loop: "{{ luks_disks | zip(mount_points) | list }}"
      create: yes
a

## output

Processing /dev/sdc...
Encrypting /dev/sdc...

WARNING!
========
This will overwrite data on /dev/sdc irrevocably.

Are you sure? (Type 'yes' in capital letters): YES
Opening /dev/sdc...
Device luks_disk_0 already exists.
Creating filesystem on /dev/mapper/luks_disk_0...
mke2fs 1.46.5 (30-Dec-2021)
/dev/mapper/luks_disk_0 is mounted; will not make a filesystem here!
Adding /dev/sdc to /etc/fstab...
Mounting /mnt/disk2...
mount: (hint) your fstab has been modified, but systemd still uses
       the old version; use 'systemctl daemon-reload' to reload.
Processing /dev/sdd...
Encrypting /dev/sdd...

WARNING!
========
This will overwrite data on /dev/sdd irrevocably.

Are you sure? (Type 'yes' in capital letters): YES
Opening /dev/sdd...
Creating filesystem on /dev/mapper/luks_disk_1...
mke2fs 1.46.5 (30-Dec-2021)
Creating filesystem with 2617344 4k blocks and 655360 inodes
Filesystem UUID: d0bb5504-abf9-4e00-8670-59d8fa92b883
Superblock backups stored on blocks:
        32768, 98304, 163840, 229376, 294912, 819200, 884736, 1605632

Allocating group tables: done
Writing inode tables: done
Creating journal (16384 blocks): done
Writing superblocks and filesystem accounting information: done

Adding /dev/sdd to /etc/fstab...
Mounting /mnt/disk3...
mount: (hint) your fstab has been modified, but systemd still uses
       the old version; use 'systemctl daemon-reload' to reload.
All disks have been encrypted and mounted.
technology
Steps to install HPE Ezmeral 7.x on Linux cluster
Installing HPE Ezmeral Data Fabric (formerly MapR) version 7.x on a 12-node Linux cluster requires planning and configuration. Here are the detailed steps to install and configure the cluster:
Step 1: Prerequisites
- System Requirements:
- 64-bit Linux (RHEL/CentOS 7 or 8, or equivalent).
- Minimum hardware for each node:
- Memory: At least 16GB RAM.
- CPU: Quad-core or higher.
- Disk: Minimum of 500GB of storage.
- Network Configuration:
- Assign static IP addresses or hostnames to all 12 nodes.
- Configure DNS or update /etc/hosts with the IP and hostname mappings.
- Ensure nodes can communicate with each other via SSH.
- Users and Permissions:
- Create a dedicated user for HPE Ezmeral (e.g., mapr).
- Grant the user passwordless SSH access across all nodes.
- Firewall and SELinux:
- Disable or configure the firewall to allow required ports.
- Set SELinux to permissive mode:
sudo setenforce 0
sudo sed -i ‘s/^SELINUX=.*/SELINUX=permissive/’ /etc/selinux/config
- Java Installation:
- Install Java (OpenJDK 11 recommended):
sudo yum install java-11-openjdk -y
Step 2: Download HPE Ezmeral Data Fabric Software
- Obtain Software:
- Download the HPE Ezmeral 7.x installation packages from the official HPE Ezmeral website.
- Distribute Packages:
- Copy the packages to all 12 nodes using scp or a similar tool.
Step 3: Install Core Services
- Install the Core Packages:
- On each node, install the required packages:
sudo yum install mapr-core mapr-fileserver mapr-cldb mapr-webserver -y
- Install Additional Services:
- Based on your use case, install additional packages (e.g., mapr-zookeeper, mapr-nodemanager, etc.).
Step 4: Configure ZooKeeper
- Select ZooKeeper Nodes:
- Choose three nodes to run the ZooKeeper service (e.g., node1, node2, node3).
- Edit the ZooKeeper Configuration:
- Update the ZooKeeper configuration file (/opt/mapr/zookeeper/zookeeper-<version>/conf/zoo.cfg) on the ZooKeeper nodes:
tickTime=2000
dataDir=/var/mapr/zookeeper
clientPort=2181
initLimit=5
syncLimit=2
server.1=node1:2888:3888
server.2=node2:2888:3888
server.3=node3:2888:3888
- Initialize ZooKeeper:
- On each ZooKeeper node, create a myid file:
echo “1” > /var/mapr/zookeeper/myid # Replace with 2 or 3 for other nodes
- Start ZooKeeper:
sudo systemctl start mapr-zookeeper
Step 5: Configure the Cluster
- Initialize the Cluster:
- Run the cluster initialization command from one node:
/opt/mapr/server/configure.sh -C node1,node2,node3 -Z node1,node2,node3
- Replace node1,node2,node3 with the actual hostnames of the CLDB and ZooKeeper nodes.
- Verify Installation:
- Check the cluster status:
maprcli cluster info
- Add Nodes to the Cluster:
- On each additional node, configure it to join the cluster:
/opt/mapr/server/configure.sh -N <cluster_name> -C node1,node2,node3 -Z node1,node2,node3
Step 6: Start Core Services
- Start CLDB:
- Start the CLDB service on the designated nodes:
sudo systemctl start mapr-cldb
- Start FileServer and WebServer:
- Start the file server and web server services on all nodes:
sudo systemctl start mapr-fileserver
sudo systemctl start mapr-webserver
- Start Node Manager:
- If using YARN, start the Node Manager service on all nodes:
sudo systemctl start mapr-nodemanager
Step 7: Post-Installation Steps
- Access the Web Interface:
- Open a browser and go to the web interface of your cluster:
http://<CLDB-node-IP>:8443
- Log in using the mapr user credentials.
- Add Storage:
- Add storage disks to the cluster using the web interface or CLI:
maprcli disk list
maprcli disk add -all
- Secure the Cluster:
- Enable Kerberos or LDAP integration for authentication.
- Configure SSL/TLS for secure communication.
Step 8: Verify the Cluster
- Check Services:
- Verify that all services are running:
maprcli node list -columns svc
- Run a Test:
- Create a directory in the file system and test file creation:
hadoop fs -mkdir /test
hadoop fs -put /path/to/local/file /test
How to generate a ticket in MapR – HPE Ezmeral
How to generate a ticket in MapR
To generate a MapR user ticket, you can use the maprlogin command. Here’s a step-by-step guide:
Steps to Generate a MapR User Ticket
- Open Terminal: Open your terminal window.
- Run the Command: Use the maprlogin password command to generate a user ticket. This command will prompt you for the user’s password1.
maprlogin password
For example:
maprlogin password [Password for user ‘yourusername’ at cluster ‘your.cluster.com’: ]
- Generate the Ticket: The command will generate a ticket file and store it in the /tmp directory by default. The ticket file will be named maprticket_<UID>.
Example
Let’s say you want to generate a ticket for the user juser on the cluster my.cluster.com:
maprlogin password [Password for user ‘juser’ at cluster ‘my.cluster.com’: ]
MapR credentials of user ‘juser’ for cluster ‘my.cluster.com’ are written to ‘/tmp/maprticket_1000’
Verify the Ticket
To verify the ticket, you can use the maprlogin print command:
maprlogin print
This command will display the ticket details, including the user, creation time, expiration time, and renewal information.
Renewing ticket
To renew a MapR user ticket, you can use the maprlogin command with the -renewal option. Here’s how you can do it:
Steps to Renew a MapR User Ticket
- Open Terminal: Open your terminal window.
- Generate a New Ticket: Use the maprlogin command with the -renewal option to renew the ticket. You’ll need to specify the duration for the renewed ticket1.
maprlogin password -renewal <duration>
Replace <duration> with the desired duration for the renewed ticket (e.g., 30:0:0 for 30 days).
Example
Let’s say you want to renew the ticket for 30 days:
maprlogin password -renewal 30:0:0
Verify the Renewed Ticket
To verify that the ticket has been renewed, you can use the maprlogin print command:
maprlogin print
This command will display the ticket details, including the new expiration date.
Managing Tickets
Managing MapR tickets involves creating, renewing, and revoking user tickets that are required for authentication and authorization in a MapR cluster. Here are the key aspects of ticket management:
1. Generating a Ticket
- Create a User Ticket: Use the maprlogin command to generate a ticket:
maprlogin password
This will prompt you to enter the user’s password and generate a ticket file.
2. Viewing Ticket Information
- Check Ticket Details: Use the maprlogin print command to display the current ticket details:
maprlogin print
This shows the user, creation time, expiration time, and other details of the ticket.
3. Renewing a Ticket
- Renew the Ticket: If your ticket is about to expire, you can renew it using:
maprlogin password -renewal <duration>
Replace <duration> with the desired duration for the renewed ticket (e.g., 30:0:0 for 30 days).
4. Revoking a Ticket
- Revoke a Ticket: To revoke a ticket, you can use the maprcli command:
maprcli session delete -type service -user <username>
Replace <username> with the name of the user whose ticket you want to revoke.
5. Managing Ticket Expiration
- Set Ticket Lifetime: You can set the lifetime of a ticket using the maprcli config save command:
maprcli config save -values { “ticket.lifetime” : “24:0:0” }
This sets the default ticket lifetime to 24 hours.
6. Checking Ticket Validity
- Validate Ticket: To check if a ticket is still valid, you can use the maprlogin command:
maprlogin info
This command provides information on the validity and expiration of the ticket.
Best Practices
- Regular Renewal: Ensure tickets are renewed regularly to avoid authentication issues.
- Monitor Expiration: Keep track of ticket expiration times and set reminders if necessary.
- Secure Storage: Store ticket files securely and restrict access to authorized users only.
- Use Service Tickets: For applications and services, use service tickets that have appropriate lifetimes and permissions.
By following these steps and best practices, you can effectively manage MapR user tickets and ensure smooth operation of your MapR cluster.
Securing an HPE Ezmeral Data Fabric
Security
Securing an HPE Ezmeral Data Fabric (formerly MapR) Hadoop cluster involves implementing a multi-layered security strategy that covers authentication, authorization, encryption, and monitoring. Below is a comprehensive guide to securing your HPE Ezmeral Hadoop cluster:
1. Authentication
Implement strong authentication mechanisms to ensure that only authorized users and applications can access the cluster.
- Kerberos Integration:
- Use Kerberos for secure authentication of users and services.
- Configure Kerberos key distribution centers (KDCs) and set up service principals for all Hadoop components.
- LDAP/AD Integration:
- Integrate the cluster with LDAP or Active Directory (AD) for centralized user authentication.
- Use Pluggable Authentication Modules (PAM) to synchronize user credentials.
- Token-based Authentication:
- Enable token-based authentication for inter-service communication to enhance security and reduce Kerberos dependency.
2. Authorization
Implement role-based access control (RBAC) to manage user and application permissions.
- Access Control Lists (ACLs):
- Configure ACLs for Hadoop Distributed File System (HDFS), YARN, and other services.
- Restrict access to sensitive data directories.
- Apache Ranger Integration:
- Use Apache Ranger for centralized authorization management.
- Define fine-grained policies for HDFS, Hive, and other components.
- Group-based Permissions:
- Assign users to appropriate groups and define group-level permissions for ease of management.
3. Encryption
Protect data at rest and in transit to prevent unauthorized access.
- Data-at-Rest Encryption:
- Use dm-crypt/LUKS for disk-level encryption of storage volumes.
- Enable HDFS Transparent Data Encryption (TDE) for encrypting data blocks.
- Data-in-Transit Encryption:
- Configure TLS/SSL for all inter-service communication.
- Use certificates signed by a trusted certificate authority (CA).
- Key Management:
- Implement a secure key management system, such as HPE Ezmeral Data Fabric’s built-in key management service or an external solution like HashiCorp Vault.
4. Network Security
Restrict network access to the cluster and its services.
- Firewall Rules:
- Limit inbound and outbound traffic to required ports only.
- Use network segmentation to isolate the Hadoop cluster.
- Private Networking:
- Deploy the cluster in a private network (e.g., VPC on AWS or Azure).
- Use VPN or Direct Connect for secure remote access.
- Gateway Nodes:
- Restrict direct access to Hadoop cluster nodes by using gateway or edge nodes.
5. Auditing and Monitoring
Monitor cluster activity and audit logs to detect and respond to security incidents.
- Log Management:
- Enable and centralize audit logging for HDFS, YARN, Hive, and other components.
- Use tools like Splunk, Elasticsearch, or Fluentd for log aggregation and analysis.
- Intrusion Detection:
- Deploy intrusion detection systems (IDS) or intrusion prevention systems (IPS) to monitor network traffic.
- Real-time Alerts:
- Set up alerts for anomalous activities using monitoring tools like Prometheus, Grafana, or Nagios.
6. Secure Cluster Configuration
Ensure that the cluster components are securely configured.
- Hadoop Configuration Files:
- Disable unnecessary services and ports.
- Set secure defaults for core-site.xml, hdfs-site.xml, and yarn-site.xml.
- Service Accounts:
- Run Hadoop services under dedicated user accounts with minimal privileges.
- Regular Updates:
- Keep the Hadoop distribution and all dependencies updated with the latest security patches.
7. User Security Awareness
Educate users on secure practices.
- Strong Passwords:
- Enforce password complexity requirements and periodic password changes.
- Access Reviews:
- Conduct regular access reviews to ensure that only authorized users have access.
- Security Training:
- Provide security awareness training to users and administrators.
8. Backup and Disaster Recovery
Ensure the availability and integrity of your data.
- Backup Policy:
- Regularly back up metadata and critical data to secure storage.
- Disaster Recovery:
- Implement a disaster recovery plan with off-site replication.
9. Compliance
Ensure the cluster complies with industry standards and regulations.
- Data Protection Regulations:
- Adhere to GDPR, HIPAA, PCI DSS, or other relevant standards.
- Implement data masking and anonymization where required.
- Third-party Audits:
- Conduct periodic security assessments and audits.
By following these practices, you can ensure a robust security posture for your HPE Ezmeral Hadoop cluster.
Rack awareness in Hadoop
Rack awareness in Hadoop is a concept used to improve data availability and network efficiency within a Hadoop cluster. Here’s a breakdown of what it entails:
What is Rack Awareness?
Rack awareness is the ability of Hadoop to recognize the physical network topology of the cluster. This means that Hadoop knows the location of each DataNode (the nodes that store data) within the network2.
Why is Rack Awareness Important?
- Fault Tolerance: By placing replicas of data blocks on different racks, Hadoop ensures that even if an entire rack fails, the data is still available from another rack.
- Network Efficiency: Hadoop tries to place replicas on the same rack or nearby racks to reduce network traffic and improve read/write performance.
- High Availability: Ensures that data is available even in the event of network failures or partitions within the cluster.
How Does Rack Awareness Work?
- NameNode: The NameNode, which manages the file system namespace and metadata, maintains the rack information for each DataNode.
- Block Placement Policy: When Hadoop stores data blocks, it uses a block placement policy that considers rack information to place replicas on different racks.
- Topology Script or Java Class: Hadoop can use either an external topology script or a Java class to obtain rack information. The configuration file specifies which method to use3.
Example Configuration
Here’s an example of how to configure rack awareness in Hadoop:
- Create a Topology Script: Write a script that maps IP addresses to rack identifiers.
- Configure Hadoop: Set the net.topology.script.file.name parameter in the Hadoop configuration file to point to your script.
- Restart Hadoop Services: Restart the Hadoop services to apply the new configuration.
By implementing rack awareness, Hadoop can optimize data placement and improve the overall performance and reliability of the cluster.
Topology Script Example
This script maps IP addresses to rack IDs. Let’s assume we have a few DataNodes with specific IP addresses, and we want to assign them to different racks.
- Create the Script: Save the following script as topology-script.sh.
#!/bin/bash
# Script to map IP addresses to rack identifiers
# Default rack if no match is found
DEFAULT_RACK=”/default-rack”
# Function to map IP to rack
map_ip_to_rack() {
case $1 in
192.168.1.1) echo “/rack1” ;;
192.168.1.2) echo “/rack1” ;;
192.168.1.3) echo “/rack2” ;;
192.168.1.4) echo “/rack2” ;;
192.168.1.5) echo “/rack3” ;;
192.168.1.6) echo “/rack3” ;;
*) echo $DEFAULT_RACK ;;
esac
}
# Read IP addresses from stdin
while read -r line; do
map_ip_to_rack “$line”
done
- Make the Script Executable:
chmod +x topology-script.sh
- Configure Hadoop: Update your Hadoop configuration to use this script. Add the following line to your hdfs-site.xml file:
<property>
<name>net.topology.script.file.name</name>
<value>/path/to/topology-script.sh</value>
</property>
- Restart Hadoop Services: Restart your Hadoop services to apply the new configuration.
This script maps specific IP addresses to rack IDs and uses a default rack if no match is found. Adjust the IP addresses and rack IDs according to your cluster setup.
Ping auth plugin
The Ping Auth plugin for Kong API Gateway integrates with Ping Identity’s PingAuthorize to provide attribute-based access control and policy decisions. This plugin allows Kong to utilize Ping products for dynamic authorization, making it easier to control access to your API resources1.
Key Features:
- Attribute-Based Access Control (ABAC): Allows fine-grained access control based on user attributes and policies.
- Dynamic Authorization: Policies can be updated in real-time without redeploying the API gateway.
- Mutual TLS (mTLS): Supports client certificate authentication using mTLS.
- Sideband API Protocol: Communicates with Ping services to retrieve authorization decisions.
Installation:
- Download the Plugin: Get the ping-auth plugin from Luarocks.
- Install the Plugin: Use LuaRocks to install the plugin:
luarocks install kong-plugin-ping-auth
- Configure Kong: Add the plugin to your Kong configuration:
plugins = bundled,ping-auth
- Apply the Plugin: Enable and configure the plugin via Kong’s admin UI or API.
Example Configuration:
plugins:
– name: ping-auth
config:
service_url: “https://your-ping-service/policy”
This setup allows Kong to communicate with Ping services to handle authorization decisions.
Would you like more details on configuring this plugin or any other specific information?
Kong API Gateway
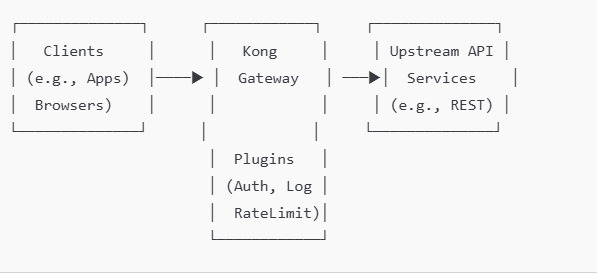
Kong API Gateway is a lightweight, fast, and flexible solution for managing APIs. It acts as a reverse proxy, sitting between clients (e.g., applications, users) and upstream services (e.g., APIs, microservices). Kong provides features like request routing, authentication, rate limiting, logging, and monitoring.
How Kong API Gateway Works
- Clients Make Requests:
- Applications or users send HTTP/HTTPS requests to the Kong Gateway.
- Kong Intercepts Requests:
- Kong routes these requests to the appropriate upstream service based on configuration rules.
- It can apply middleware plugins for authentication, rate limiting, transformations, logging, and more.
- Plugins Process Requests:
- Plugins enhance Kong’s functionality. For example:
- Authentication plugins: Validate tokens or credentials.
- Rate limiting plugins: Control the number of requests allowed.
- Logging plugins: Send logs to monitoring systems.
- Transformation plugins: Modify requests or responses.
- Plugins enhance Kong’s functionality. For example:
- Request Routed to Upstream:
- Kong forwards the processed request to the backend service (API or microservice).
- Upstream Service Responds:
- The upstream service sends the response back to Kong.
- Kong Returns Response:
- Kong optionally applies response transformations (e.g., add headers) before sending the response to the client.
Key Components of Kong
| Component | Description |
| Proxy | Routes incoming requests to the appropriate upstream service. |
| Admin API | Manages Kong configurations, including services, routes, and plugins. |
| Database | Stores Kong configuration data (e.g., PostgreSQL or Cassandra). |
| Plugins | Extend Kong’s functionality (e.g., authentication, monitoring, logging). |
| Upstream Services | The actual backend services or APIs that Kong forwards requests to. |
Diagram: How Kong API Gateway Works
Here’s a simplified visual representation of Kong’s architecture:
Detailed Kong Workflow with Features
- Request Received by Kong
A request like https://api.example.com/v1/orders reaches Kong.
Kong matches the request with:- A route: (e.g., /v1/orders).
- A service: The upstream API serving the request.
- Plugins Applied
Kong processes the request with active plugins for:- Authentication: Checks API keys, OAuth tokens, or LDAP credentials.
- Rate Limiting: Ensures the client doesn’t exceed allowed requests.
- Logging: Sends logs to external systems like ElasticSearch or Splunk.
- Routing to Upstream
After processing, Kong forwards the request to the appropriate upstream service.
Example:- Route /v1/orders → Upstream service http://orders.example.com.
- Response Handling
The upstream service responds to Kong.
Plugins can modify responses (e.g., masking sensitive data). - Response Sent to Client
Kong sends the final response back to the client.
Common Use Cases
- API Security:
- Add layers of authentication (e.g., JWT, OAuth, mTLS).
- Enforce access control policies.
- Traffic Control:
- Apply rate limiting or request throttling to prevent abuse.
- API Management:
- Route requests to appropriate backend APIs or microservices.
- Monitoring & Analytics:
- Capture detailed logs and metrics about API usage.
- Ease of Scalability:
- Kong can scale horizontally, ensuring high availability and performance.
Advanced Configurations
- Load Balancing: Kong can distribute requests across multiple instances of an upstream service.
- mTLS: Mutual TLS ensures secure communication between Kong and clients or upstream services.
- Custom Plugins: You can write custom Lua or Go plugins to extend Kong’s capabilities.
Databricks vs. MapR (HPE Ezmeral Data Fabric)
Databricks vs. MapR (HPE Ezmeral Data Fabric)
Databricks and MapR (now HPE Ezmeral Data Fabric) are platforms tailored for handling big data and analytics workloads, but they cater to slightly different use cases and approaches. Here’s a detailed comparison based on key aspects:
1. Core Purpose and Focus
| Aspect | Databricks | MapR (HPE Ezmeral Data Fabric) |
| Primary Use Case | Unified data analytics and AI platform for big data and ML. | Distributed file system and data platform for scalable storage, analytics, and applications. |
| Focus | Machine Learning, Data Engineering, and Data Science. | Enterprise-grade distributed storage, streaming, and analytics. |
| Deployment Model | Cloud-native (AWS, Azure, GCP). | On-premise, hybrid cloud, or cloud-native. |
2. Data Storage and Processing
| Aspect | Databricks | MapR (HPE Ezmeral Data Fabric) |
| Data Format | Supports Delta Lake (optimized storage for analytics). | Supports HDFS, POSIX, NFS, and S3-compatible object storage. |
| Distributed Storage | Relies on cloud storage (S3, ADLS, GCS). | MapR-FS offers integrated, distributed storage. |
| Real-Time Processing | Integrates with Spark Structured Streaming. | Built-in support for MapR Streams (Apache Kafka-compatible). |
3. Compute and Processing Engine
| Aspect | Databricks | MapR (HPE Ezmeral Data Fabric) |
| Primary Engine | Apache Spark (optimized for performance). | Supports Hadoop ecosystem tools, Spark, Hive, Drill, etc. |
| Integration | Tight integration with ML libraries like MLflow, TensorFlow, and PyTorch. | Supports multiple processing frameworks (Hadoop, Spark, etc.). |
| Scalability | Elastic cloud-based scaling for compute. | Scales both storage and compute independently. |
4. Machine Learning and AI Capabilities
| Aspect | Databricks | MapR (HPE Ezmeral Data Fabric) |
| ML & AI Support | Provides native ML runtime, feature store, and MLflow for lifecycle management. | Requires integration with external ML frameworks (e.g., TensorFlow, Spark MLlib). |
| Ease of Use | Designed for data scientists and engineers to build ML pipelines easily. | Requires more manual configuration for ML workloads. |
5. Ecosystem and Tooling
| Aspect | Databricks | MapR (HPE Ezmeral Data Fabric) |
| Data Cataloging | Unity Catalog for data governance and lineage. | Requires third-party tools for cataloging and lineage. |
| Streaming Support | Integrates with Spark Structured Streaming. | Built-in MapR Streams for high-throughput streaming. |
| Data Integration | Supports a wide range of connectors and libraries. | Native connectors for Kafka, S3, POSIX, NFS, and Hadoop tools. |
6. Security and Governance
| Aspect | Databricks | MapR (HPE Ezmeral Data Fabric) |
| Authentication | Cloud-based IAM systems (e.g., AWS IAM). | Kerberos, LDAP, and custom authentication options. |
| Access Control | Fine-grained access controls with Unity Catalog. | Role-based access with POSIX compliance and NFS integration. |
| Encryption | Encryption for data in transit and at rest via cloud services. | Native encryption (e.g., MapR volumes support AES encryption). |
7. Deployment and Management
| Aspect | Databricks | MapR (HPE Ezmeral Data Fabric) |
| Ease of Deployment | Fully managed SaaS platform; minimal setup required. | Requires expertise to set up and manage on-prem or hybrid deployments. |
| Platform Management | Managed by Databricks. | Managed by the enterprise or service provider (if hybrid). |
| Elasticity | Auto-scaling for cloud resources. | Requires manual configuration for scalability. |
8. Cost Model
| Aspect | Databricks | MapR (HPE Ezmeral Data Fabric) |
| Pricing Model | Consumption-based pricing for compute and storage. | License-based or pay-as-you-go for cloud deployments. |
| Operational Overhead | Minimal for managed service. | Higher for on-prem installations due to hardware and management. |
Key Considerations
- Choose Databricks If:
- Your workload is cloud-first, analytics-heavy, and AI/ML-focused.
- You require a unified platform for data engineering, analytics, and machine learning.
- You prioritize ease of use and scalability with managed services.
- Choose MapR (HPE Ezmeral Data Fabric) If:
- You have existing on-premise or hybrid infrastructure with a focus on distributed storage and real-time data processing.
- You need flexibility in data storage and integration with diverse workloads.
- You want strong support for edge, IoT, and streaming use cases.
Conclusion
Databricks excels in cloud-based analytics, AI, and ML workflows, while MapR (HPE Ezmeral Data Fabric) focuses on enterprise-grade data storage, streaming, and integration for hybrid or on-premise deployments. The choice between the two depends on your organization’s specific needs for storage, analytics, scalability, and operational preferences.
Step to install HPE Ezmeral Data Fabric (formerly MapR) 7.x cluster on Linux
Contents
1. Pre-Installation Requirements. 1
2. Download and Configure HPE Ezmeral Repositories. 1
3. Install Core Data Fabric Packages. 2
4. Configure ZooKeeper and CLDB. 2
7. Additional Configuration (Optional) 4
9. Set Up Monitoring and Logging. 5
Step to install HPE Ezmeral Data Fabric (formerly MapR) 7.x cluste on linux
Setting up an HPE Ezmeral Data Fabric (formerly MapR) 7.x cluster on Linux involves several steps, including environment preparation, software installation, and cluster configuration. Here’s a detailed guide to install and configure a basic Ezmeral Data Fabric 7.x cluster on Linux:
1. Pre-Installation Requirements
- Operating System: Ensure your Linux distribution is compatible. HPE Ezmeral 7.x supports various versions of RHEL, CentOS, and Ubuntu. Check the official compatibility matrix for version specifics.
- Hardware Requirements: Verify that your hardware meets the minimum requirements:
- CPU: At least 4 cores per node (adjust based on workload).
- Memory: Minimum of 8 GB RAM (16 GB recommended).
- Storage: SSD or high-performance disks for data storage; adequate storage space for data and logs.
- Network: Ensure all cluster nodes can communicate over the network. Set up DNS or /etc/hosts entries so nodes can resolve each other by hostname.
- Permissions: You will need root or sudo privileges on each node.
2. Download and Configure HPE Ezmeral Repositories
- Add Repository and GPG Key: Set up the HPE Ezmeral Data Fabric repository on each node by adding the appropriate repository file and importing the GPG key.
- For RHEL/CentOS:
sudo tee /etc/yum.repos.d/ezmeral-data-fabric.repo <<EOF
[maprtech]
name=MapR Technologies
baseurl=http://package.mapr.com/releases/v7.0.0/redhat/
enabled=1
gpgcheck=1
gpgkey=http://package.mapr.com/releases/pub/maprgpg.key
EOF
sudo rpm –import http://package.mapr.com/releases/pub/maprgpg.key
- Update Package Manager:
CentOS/RHEL: sudo yum update
3. Install Core Data Fabric Packages
- Install Core Packages:
- Install essential packages, including core components, CLDB, and webserver.
# For CentOS/RHEL
sudo yum install mapr-core mapr-cldb mapr-fileserver mapr-zookeeper mapr-webserver
Install Additional Services:
-Based on your needs, install additional services like MapR NFS, Resource Manager, or YARN.
sudo yum install mapr-nfs mapr-resourcemanager mapr-nodemanager
4. Configure ZooKeeper and CLDB
- ZooKeeper Configuration:
- Identify nodes to act as ZooKeeper servers (recommended at least 3 for high availability).
- Add each ZooKeeper node to /opt/mapr/zookeeper/zookeeper-3.x.x/conf/zoo.cfg:
server.1=<zk1_hostname>:2888:3888
server.2=<zk2_hostname>:2888:3888
server.3=<zk3_hostname>:2888:3888
- Start ZooKeeper on each ZooKeeper node:
sudo systemctl start mapr-zookeeper
- CLDB Configuration:
- Specify the nodes that will run the CLDB service.
- Edit /opt/mapr/conf/cldb.conf and add the IPs or hostnames of the CLDB nodes:
cldb.zookeeper.servers=<zk1_hostname>:5181,<zk2_hostname>:5181,<zk3_hostname>:5181
5. Cluster Initialization
- Set Up the MapR License:
- Copy the HPE Ezmeral Data Fabric license file to /opt/mapr/conf/mapr.license on the CLDB node.
- Run Cluster Installer:
- Use the configure.sh script to initialize the cluster. Run this script on each node:
sudo /opt/mapr/server/configure.sh -C <cldb1_ip>:7222,<cldb2_ip>:7222 -Z <zk1_hostname>,<zk2_hostname>,<zk3_hostname>
- The -C flag specifies the CLDB nodes, and -Z specifies the ZooKeeper nodes.
- Start Warden Services:
- On each node, start the mapr-warden service to initiate the core services:
sudo systemctl start mapr-warden
6. Verify Cluster Status
- MapR Control System (MCS):
- Access the MCS web UI to monitor the cluster. Open https://<cldb_node_ip>:8443 in a browser.
- Log in with the default credentials and verify the health and status of the cluster components.
- CLI Verification:
- Run the following command on the CLDB node to check cluster status:
maprcli node list -columns hostname,ip
- Check the status of services using:
maprcli service list
7. Additional Configuration (Optional)
- NFS Gateway Setup:
- Install and configure the MapR NFS gateway to expose cluster data as NFS shares.
sudo yum install mapr-nfs
sudo systemctl start mapr-nfs
- High Availability (HA) Setup:
- For high availability, consider adding redundant nodes for critical services (CLDB, ZooKeeper) and configuring failover settings.
- Security Configuration:
- Set up user roles and permissions using the maprcli command and configure Kerberos or TLS for secure authentication if needed.
8. Test the Cluster
- Data Operations: Use the following commands to test basic operations:
# Create a new directory in the data fabric
hadoop fs -mkdir /test_directory
# Copy a file into the data fabric
hadoop fs -copyFromLocal localfile.txt /test_directory
# List files in the directory
hadoop fs -ls /test_directory
- Service Health Check: Use the MCS or maprcli commands to ensure all services are running as expected.
9. Set Up Monitoring and Logging
- MapR Monitoring:
- Set up logging and monitoring for long-term maintenance. Configure mapr-metrics or integrate with external monitoring tools (e.g., Prometheus).
- Backup and Recovery:
- Enable volume snapshots and set up periodic backups for critical data.
Following these steps will give you a functional HPE Ezmeral Data Fabric 7.x cluster on Linux, ready for production workloads. Customize configurations based on your specific needs, especially around security, high availability, and resource allocation to get optimal performance from your environment.
Disk encryption
In HPE Ezmeral Data Fabric (formerly MapR), disk encryption (not just volume-level encryption) can provide added security by encrypting the entire storage disk at a low level, ensuring that data is protected as it is written to and read from physical storage. This approach is commonly implemented using Linux-based disk encryption tools on the underlying operating system, as HPE Ezmeral does not natively provide disk encryption functionality.
Steps to Set Up Disk Encryption for HPE Ezmeral Data Fabric on Linux
To encrypt disks at the OS level, use encryption tools like dm-crypt/LUKS (Linux Unified Key Setup), which is widely supported, integrates well with Linux, and offers flexibility for encrypting storage disks used by HPE Ezmeral Data Fabric.
1. Prerequisites
- Linux system with root access where HPE Ezmeral Data Fabric is installed.
- Unformatted disk(s) or partitions that you plan to use for HPE Ezmeral storage.
- Backup any important data, as disk encryption setups typically require formatting the disk.
2. Install Required Packages
Ensure cryptsetup is installed, as it provides the tools necessary for LUKS encryption.
sudo apt-get install cryptsetup # For Debian/Ubuntu systems
sudo yum install cryptsetup # For CentOS/RHEL systems
3. Encrypt the Disk with LUKS
- Set Up LUKS Encryption on the Disk:
- Choose the target disk (e.g., /dev/sdb), and initialize it with LUKS encryption. This command will erase all data on the disk.
sudo cryptsetup luksFormat /dev/sdb
- Open and Map the Encrypted Disk:
- Unlock the encrypted disk and assign it a name (e.g., encrypted_data).
sudo cryptsetup luksOpen /dev/sdb encrypted_data
- Format the Encrypted Disk:
- Create a file system (such as ext4) on the encrypted disk mapping.
sudo mkfs.ext4 /dev/mapper/encrypted_data
- Mount the Encrypted Disk:
- Create a mount point for the encrypted storage, and then mount it.
sudo mkdir -p /datafabric
sudo mount /dev/mapper/encrypted_data /datafabric
- Configure Automatic Unlocking on Reboot (Optional):
- To automate unlocking on system boot, you can store the passphrase in a secure location or use a network-based key server, but this may affect security.
- Alternatively, you can manually unlock the disk after each reboot using cryptsetup luksOpen.
4. Update HPE Ezmeral to Use the Encrypted Disk
- Update HPE Ezmeral Configuration:
- Point HPE Ezmeral Data Fabric’s configuration to use the new encrypted mount point (/datafabric) for its storage.
- Update relevant configuration files, such as disksetup or fstab, as needed, to use the encrypted path.
- Restart HPE Ezmeral Services:
- Restart services to ensure that the system is using the encrypted disk for data operations.
5. Verify Disk Encryption
To confirm the encryption is working correctly:
- Check the encrypted device status:
sudo cryptsetup -v status encrypted_data
- Confirm that the mount point is in use by HPE Ezmeral and verify that data written to the directory is stored on the encrypted disk.
Summary
Using LUKS for disk encryption on the HPE Ezmeral Data Fabric platform provides robust data-at-rest security at the storage disk level. This setup ensures that any data written to physical disks is encrypted, protecting it from unauthorized access at a hardware level.
How to encrypt disk in HPE ezmeral
In HPE Ezmeral Data Fabric (formerly MapR), disk encryption is a key component for securing data at rest. HPE Ezmeral supports data-at-rest encryption through encryption keys and policies that enable disk-level encryption, protecting data on disk without impacting application performance.
Here’s a guide to setting up disk encryption in HPE Ezmeral:
1. Prerequisites
- HPE Ezmeral Data Fabric 6.x or 7.x installed.
- Access to MapR Control System (MCS) or command-line interface (CLI) to configure encryption settings.
- MapR Core Security enabled. Data encryption requires core security to be enabled for HPE Ezmeral Data Fabric.
- Access to the MapR Key Management System (KMS), or alternatively, an external KMS can also be used, depending on your setup and security requirements.
2. Configure MapR Security and KMS (Key Management System)
- Enable Core Security:
- During HPE Ezmeral installation, make sure core security is enabled. If it’s not, you’ll need to enable it as encryption depends on core security services.
- Configure MapR KMS:
- The MapR KMS service handles key management for encryption. Ensure that the KMS service is running, as it is essential for generating and managing encryption keys.
- You can check the KMS status through the MCS or by using:
maprcli kms keys list
- Set Up an External KMS (Optional):
- If you need to integrate with an external KMS (such as AWS KMS or other supported key management systems), configure it to work with HPE Ezmeral as per the system’s documentation.
3. Generate Encryption Keys
- Use the maprcli to Generate Keys:
- You can create encryption keys using the maprcli command. These keys are necessary for encrypting and decrypting data on the disks.
- To create an encryption key, use:
maprcli kms keys create -keyname <encryption_key_name>
- Store and Manage Keys:
- After generating the key, you can use it in volume policies or for specific datasets. Key management can be handled directly within MapR KMS or through integrated KMS if you’re using an external provider.
4. Apply Encryption Policies to Volumes
Encryption in HPE Ezmeral is typically applied at the volume level:
- Create a Volume with Encryption:
- When creating a new volume, specify that it should be encrypted and assign it the encryption key generated in the previous step.
- For example:
maprcli volume create -name <volume_name> -path /<volume_path> -encryptiontype 1 -keyname <encryption_key_name>
- encryptiontype 1 specifies that the volume should be encrypted.
- Apply Encryption to Existing Volumes:
- You can also apply encryption to existing volumes by updating them with an encryption key.
- Run:
maprcli volume modify -name <volume_name> -encryptiontype 1 -keyname <encryption_key_name>
- Verify Volume Encryption:
- You can check the encryption status of volumes in MCS or by using:
maprcli volume info -name <volume_name>
- Look for the encryption field to confirm that it’s enabled.
5. Test Disk Encryption
- Once encryption is configured, run tests to confirm data security. Write data to the encrypted volume and verify that unauthorized users or applications cannot access the data without appropriate permissions.
6. Monitor and Rotate Keys (Ongoing Maintenance)
- Monitor the Health of Encrypted Volumes:
- Use the MCS or CLI to monitor the health of volumes, checking for any issues related to encryption or access.
- Rotate Encryption Keys:
- To rotate keys, generate a new key and assign it to the volume. You may need to use the MapR KMS tool or an external KMS provider depending on your setup.
- Regularly rotating keys is a best practice to enhance security.
7. (Optional) Use External KMS with HPE Ezmeral
If you prefer an external KMS, configure it as per your organization’s security requirements. External KMS options may provide additional features, such as compliance reporting and enhanced security controls.
Summary
By following these steps, you can set up and manage disk encryption within HPE Ezmeral Data Fabric, ensuring that data at rest remains protected. Regularly review encryption policies, monitor encrypted volumes, and rotate keys to maintain robust data security.
Can use dm-crypt/LUKS encryption after Linux OS is installed ?
Yes, you can use dm-crypt/LUKS to encrypt disks or specific partitions after Linux is installed, although it may require some additional steps, especially if you’re encrypting a drive that already contains data. Here’s a general guide on how to use dm-crypt/LUKS for encryption post-installation:
Steps to Use dm-crypt/LUKS for Post-Installation Disk Encryption
Option 1: Encrypting a Non-System Partition or Additional Disk
If you want to encrypt a separate partition or disk that doesn’t contain the OS (e.g., a secondary data disk), this process is straightforward.
- Backup Data:
- If the disk or partition already contains data, make a backup, as this process will erase the data on the disk.
- Install Required Packages:
- Ensure cryptsetup is installed.
sudo apt update
sudo apt install cryptsetup
- Initialize the LUKS Partition:
- Replace /dev/sdX with the disk or partition you want to encrypt (e.g., /dev/sdb1).
sudo cryptsetup luksFormat /dev/sdX
- Confirm and enter a passphrase when prompted. This passphrase will be required to unlock the partition.
- Open the Encrypted Partition:
- This maps the encrypted partition to a device you can interact with.
sudo cryptsetup open /dev/sdX encrypted_data
- Format the Partition:
- Format the encrypted partition to your preferred file system (e.g., ext4).
sudo mkfs.ext4 /dev/mapper/encrypted_data
- Mount the Partition:
- Create a mount point and mount the partition.
sudo mkdir /mnt/encrypted_data
sudo mount /dev/mapper/encrypted_data /mnt/encrypted_data
- Configure Automatic Mounting (Optional):
- To have the partition prompt for a passphrase at boot, edit /etc/crypttab and /etc/fstab.
- Add an entry to /etc/crypttab:
encrypted_data /dev/sdX none luks
- Then, add an entry to /etc/fstab to mount it at boot:
/dev/mapper/encrypted_data /mnt/encrypted_data ext4 defaults 0 2
Option 2: Encrypting the Root or System Partition Post-Installation
Encrypting the root or system partition after installation is more complex, as it requires bootloader changes and adjustments to the initramfs. It typically involves the following high-level steps:
- Boot from a Live USB: Boot from a live Linux USB to avoid active usage of the root partition.
- Backup System: Make a complete backup of your system, as these steps involve substantial changes to the partition.
- Set Up LUKS on Root Partition:
- Unmount the root partition and initialize it with luksFormat, then reopen it.
- Restore Data: Restore your data to the encrypted root partition.
- Update Initramfs: Update your initramfs configuration to include the LUKS configuration so it can prompt for a password at boot.
- Update Bootloader: Modify the bootloader (e.g., GRUB) to support LUKS so that it can unlock the root partition at boot.
Important Considerations
- Performance: LUKS encryption can introduce some performance overhead, particularly on older hardware.
- Password Management: Store your passphrase securely, as losing it will make the data irrecoverable.
- Backup Regularly: Encrypted partitions make data recovery complex, so regular backups are essential.
Using dm-crypt/LUKS after installation is feasible, especially for non-system partitions, and provides strong encryption for securing sensitive data on Linux.
Example on HPE ezmeral install on 12 servers cluster
Setting up an HPE Ezmeral Data Fabric cluster on 12 servers involves several key steps, including planning, installation, configuration, and validation. Here’s a step-by-step guide to get you started:
1. Plan the Cluster Configuration
- Determine Node Roles: Decide which servers will handle specific roles. For a 12-node setup, you could designate:
- 3 nodes for core services (e.g., CLDB, ZooKeeper, Resource Manager).
- 9 nodes for data and compute (e.g., Node Manager, FileServer services, Spark, HBase, etc.).
- Network and Hostname Configuration:
- Ensure each server has a static IP address, and configure hostnames consistently across nodes.
- Set up DNS or
/etc/hostsentries for name resolution.
- Storage: Prepare storage volumes for the Data Fabric filesystem and other data services, ideally with high-throughput storage for each node.
2. Prepare the Servers
- OS Requirements: Install a compatible Linux distribution on each server (e.g., RHEL, CentOS, or Ubuntu).
- User and Security Settings:
- Create a user for Ezmeral operations (typically
mapr). - Disable SELinux or configure it to permissive mode.
- Ensure firewall ports are open for required services (e.g., CLDB, ZooKeeper, Warden).
- Create a user for Ezmeral operations (typically
- System Configuration:
- Set kernel parameters according to Ezmeral requirements (e.g., adjust
vm.swappinessandfs.file-maxsettings). - Synchronize time across all servers with NTP.
- Set kernel parameters according to Ezmeral requirements (e.g., adjust
3. Install Prerequisite Packages
- Install necessary packages for HPE Ezmeral Data Fabric, such as Java (Oracle JDK 8), Python, and other utilities.
- Ensure SSH key-based authentication is configured for the
mapruser across all nodes, allowing passwordless SSH access.
4. Download and Install HPE Ezmeral Data Fabric Packages
- Obtain the installation packages for HPE Ezmeral Data Fabric 7.x from HPE’s official site.
- Install the required packages on each node, either manually or using a script. Required packages include
mapr-core,mapr-cldb,mapr-zookeeper,mapr-fileserver, andmapr-webserver.
5. Install and Configure ZooKeeper
- On the nodes designated to run ZooKeeper, install the ZooKeeper package (
mapr-zookeeper) and configure it. - Update
/opt/mapr/conf/zookeeper.confto specify the IP addresses of all ZooKeeper nodes. - Start the ZooKeeper service on each of these nodes.
6. Install and Configure CLDB
- Install the
mapr-cldbpackage on the nodes you’ve chosen to run CLDB. - Configure CLDB settings in
/opt/mapr/conf/cldb.confand specify thecldb.nodesparameter to list the IPs or hostnames of your CLDB nodes. - Start the CLDB service on these nodes.
7. Install Other Core Services
- Install the following packages on appropriate nodes:
mapr-webserverfor the Control System (MCS).mapr-resourcemanagerandmapr-nodemanagerif using YARN.
- Start each of these services as needed.
8. Install Data and Compute Services
- FileServer: Install
mapr-fileserveron each node where you plan to store data. This typically includes all nodes except the dedicated service nodes. - NodeManager: Install
mapr-nodemanageron the data and compute nodes if running YARN for resource management. - Database and Table Services: Install services like
mapr-dbandmapr-hbaseon nodes where you need NoSQL capabilities or HBase tables.
9. Cluster Configuration
- Use
maprclicommands or the MCS web interface to configure and manage your cluster. For example:- Set up cluster-wide replication and volume configurations.
- Define quotas and user permissions for data access.
- Configure replication and fault tolerance settings.
10. Start and Verify the Cluster
- Start all services using
systemctlorservicecommands as needed. - Check the health of the cluster using:bashCopy code
maprcli node list -columns ip,svc,health - Access the MapR Control System (MCS) GUI by going to
https://<cldb-node>:8443and log in to confirm services are running correctly.
11. Post-Installation and Validation
- Validate that all nodes are connected and the services are running.
- Run health checks to ensure there are no configuration issues.
- Monitor storage utilization and data replication to confirm that volumes and data distribution meet your needs.
- Set up monitoring (e.g., Grafana, Prometheus) if you want real-time insight into cluster performance.
This setup provides a foundational Ezmeral Data Fabric cluster with core, data, and compute services distributed across 12 nodes for high availability and scalability. Each step includes installing necessary services, configuring core components, and verifying that the cluster operates as expected.
Deploy monitoring solution with Prometheus and Grafana on premise in HA mode
Deploy monitoring solution with Prometheus and Grafana on premise in HA mode
Deploying Prometheus and Grafana in High Availability (HA) mode on-premises ensures monitoring continuity and data resilience. In this setup, Prometheus will run in HA mode with redundancy and Grafana will connect to the Prometheus instances, also configured for HA.
Below are the steps to deploy Prometheus and Grafana on-premises with HA:
1. Plan the Architecture
- Prometheus Instances:
- Set up at least two Prometheus instances in HA mode for redundancy.
- Each Prometheus instance will scrape the same set of targets independently and store its own local data.
- Grafana Instances:
- Deploy at least two Grafana instances in HA mode, load balanced to ensure availability.
- Grafana will connect to both Prometheus instances and aggregate the metrics.
- Storage:
- Use a distributed storage system like Thanos, VictoriaMetrics, or Prometheus remote storage (like Cortex or Mimir) for long-term data storage.
- Configure a shared storage for Grafana, or use a SQL database (e.g., MySQL, PostgreSQL) to keep dashboards and configuration in sync.
2. Set Up Prometheus in HA Mode
Step 2.1: Install Prometheus
- Download and extract Prometheus on each node:
tar -xvf prometheus-2.37.0.linux-amd64.tar.gz
cd prometheus-2.37.0.linux-amd64
- Copy the Prometheus binary to /usr/local/bin and set up the configuration directory (/etc/prometheus).
Step 2.2: Configure Prometheus
- Create a prometheus.yml configuration file in /etc/prometheus for each instance:
global:
scrape_interval: 15s
scrape_configs:
– job_name: ‘your_targets’
static_configs:
– targets: [‘<target_ip1>:<port>’, ‘<target_ip2>:<port>’]
- For HA, each Prometheus instance must be configured identically with the same scrape targets and rules.
- High Availability Labeling:
- To distinguish between HA Prometheus instances, add a –cluster.peer=<other_instance_ip>:<port> flag in each instance’s configuration.
- This will allow the instances to work as separate, yet synchronized, peers.
Step 2.3: Start Prometheus
- Create a systemd service file for each Prometheus instance at /etc/systemd/system/prometheus.service:
[Unit]
Description=Prometheus
After=network.target
[Service]
User=prometheus
ExecStart=/usr/local/bin/prometheus –config.file=/etc/prometheus/prometheus.yml –storage.tsdb.path=/var/lib/prometheus –web.enable-lifecycle
[Install]
WantedBy=multi-user.target
- Enable and start each Prometheus instance:
sudo systemctl enable prometheus
sudo systemctl start prometheus
3. Install and Configure Thanos (Optional for Long-Term Storage)
- Deploy Thanos Sidecar alongside each Prometheus instance for storing data in a distributed store and enabling HA Prometheus queries.
- Thanos Sidecar:
- Set up a sidecar container or service to work with each Prometheus instance.
- It will upload data to an object storage (e.g., S3, MinIO) and enable querying of both Prometheus instances as a unified source.
4. Deploy Grafana in HA Mode
Step 4.1: Install Grafana
- Download and install Grafana on each node:
wget https://dl.grafana.com/oss/release/grafana-8.0.0.linux-amd64.tar.gz
tar -zxvf grafana-8.0.0.linux-amd64.tar.gz
- Copy the Grafana binaries and set up the configuration directory (/etc/grafana).
Step 4.2: Configure Grafana
- In the Grafana configuration file (/etc/grafana/grafana.ini), set up the database to store Grafana data centrally:
[database]
type = postgres
host = <database_host>:5432
name = grafana
user = grafana_user
password = grafana_password
- Add both Prometheus instances as data sources in Grafana. Grafana will automatically handle HA and load balancing between them.
Step 4.3: Start Grafana
- Set up a systemd service for Grafana:
[Unit]
Description=Grafana
After=network.target
[Service]
User=grafana
ExecStart=/usr/local/bin/grafana-server -config /etc/grafana/grafana.ini
[Install]
WantedBy=multi-user.target
- Enable and start Grafana:
sudo systemctl enable grafana-server
sudo systemctl start grafana-server
5. Set Up Load Balancers for HA
- Prometheus Load Balancer:
- Set up a load balancer in front of the Prometheus instances to ensure that requests are evenly distributed across instances.
- Grafana Load Balancer:
- Set up another load balancer for the Grafana instances to distribute user access and enable failover.
6. Verify and Test the HA Setup
- Prometheus:
- Test that both Prometheus instances are running independently by accessing them via <node_ip>:9090.
- Use Thanos Querier (if configured) to query both Prometheus instances as a single source.
- Grafana:
- Log in to Grafana via the load balancer IP, add Prometheus as a data source, and create a sample dashboard.
- Simulate a failure on one Grafana instance and ensure that the other instance handles the load transparently.
7. Enable Monitoring and Alerting
- Configure Alertmanager for Prometheus:
- Set up Alertmanager to handle alerts in case of any issues.
- Use HA by deploying multiple Alertmanager instances with clustering.
- Set up alerts in Grafana for visualization and notifications based on key metrics and alert rules.
Summary of Key Points
- HA Prometheus: Multiple Prometheus instances scraping the same targets, optionally with Thanos for long-term storage and aggregation.
- HA Grafana: Multiple Grafana instances with a centralized database for dashboards, load-balanced to ensure redundancy.
- Alerting: Use Alertmanager in HA mode to handle alerts from Prometheus.
This HA setup for Prometheus and Grafana provides a robust monitoring solution that is resilient, scalable, and fault-tolerant.
