DNS Architecture
Q: Can you explain the difference between Azure Public DNS and Azure Private DNS Zones, and when you would use each?
Azure Public DNS is used to host publicly resolvable domain names — for example, resolving http://www.yourcompany.com from the internet. Anyone on the internet can query it.
Azure Private DNS Zones, on the other hand, are only resolvable within a VNet or linked VNets. They are used for internal name resolution — for example, resolving a private endpoint for a storage account like mystorageaccount.privatelink.blob.core.windows.net from inside your network, without exposing it publicly.
You use Public DNS when you need external-facing resolution, and Private DNS Zones when you need secure, internal name resolution for resources that should never be reachable from the internet.
Q: How does DNS resolution work for a VM inside a VNet — what is the default behavior, and when would you override it?
By default, Azure provides a built-in DNS resolver at the special IP 168.63.129.16. Every VM in a VNet uses this address automatically. It can resolve Azure-internal hostnames and any Private DNS Zones linked to that VNet.
You would override this default when:
- You need to resolve on-premises hostnames from Azure (hybrid scenarios)
- You need conditional forwarding to route specific domain queries to specific DNS servers
- You are using a centralized custom DNS server (e.g., a DNS forwarder VM or Azure DNS Private Resolver) to control and log all DNS traffic across the environment
In those cases, you configure a custom DNS server address at the VNet level, pointing VMs to your centralized resolver instead.
Q: What is conditional forwarding, and how would you set it up to resolve on-premises domain names from Azure?
Conditional forwarding is a DNS rule that says: “For queries matching this specific domain, forward them to this specific DNS server instead of resolving them normally.”
For example, if your on-premises domain is corp.contoso.local, you would configure your Azure DNS resolver to forward any query for corp.contoso.local to your on-premises DNS server IP.
The setup typically looks like this:
- Deploy Azure DNS Private Resolver with an outbound endpoint in your Hub VNet
- Create a DNS forwarding ruleset with a rule: corp.contoso.local → forward to on-premises DNS IP
- Associate the ruleset with the relevant VNets
- Ensure the on-premises DNS server can be reached over ExpressRoute or VPN
Q: A client reports that their Azure VM cannot resolve a private endpoint hostname. What are the first things you check?
I would systematically check the following:
- Private DNS Zone linkage — Is the Private DNS Zone (e.g., privatelink.blob.core.windows.net) linked to the VNet the VM is in? Without the link, the zone is invisible to that VNet.
- A record presence — Does the Private DNS Zone actually contain an A record pointing to the private endpoint’s IP?
- Custom DNS configuration — If the VNet uses a custom DNS server, is that server forwarding queries for privatelink.* domains to Azure’s resolver (168.63.129.16)? This is a very common misconfiguration.
- nslookup / dig from the VM — Run nslookup <hostname> on the VM to see what IP is being returned. If it returns the public IP instead of the private IP, the DNS zone is not being picked up correctly.
- Network connectivity — Even if DNS resolves correctly, confirm NSG rules and routing aren’t blocking traffic to the private endpoint IP.
Q: How would you use Azure DNS Private Resolver, and how does it differ from a traditional DNS forwarder running on a VM?
Azure DNS Private Resolver is a fully managed, highly available DNS service that handles inbound and outbound DNS resolution without requiring you to manage VMs.
- The inbound endpoint allows on-premises clients to send DNS queries into Azure and resolve Private DNS Zones — something that wasn’t possible before without a forwarder VM.
- The outbound endpoint with forwarding rulesets allows Azure VMs to forward specific domain queries (e.g., on-premises domains) to external DNS servers.
Compared to a forwarder VM, DNS Private Resolver is:
- Fully managed — no patching, no VM maintenance, no availability concerns
- Scalable — handles high query volumes automatically
- Integrated — natively understands Azure Private DNS Zones without extra configuration
- More secure — no need to open management ports on a VM
The main reason teams still use forwarder VMs is legacy architecture or specific advanced configurations not yet supported by Private Resolver.
🔵 VNet Peering
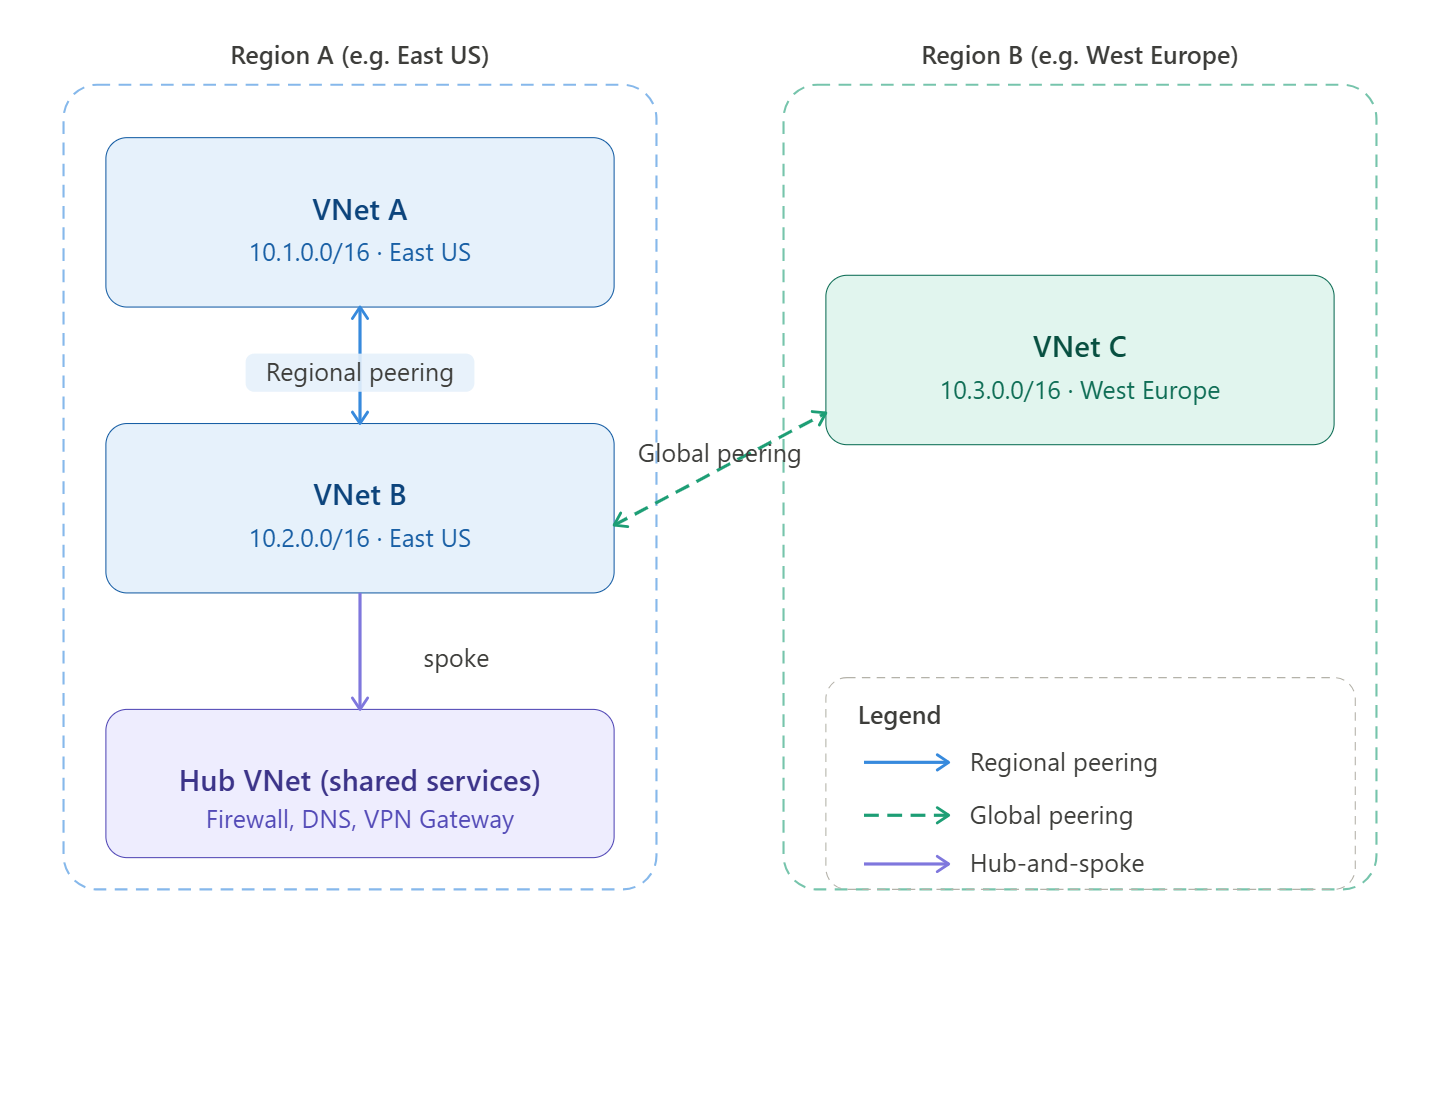
Q: What is the difference between regional and global VNet peering? Are there any restrictions with global peering?
Regional VNet peering connects two VNets within the same Azure region. Global VNet peering connects VNets across different Azure regions.
Restrictions with global peering:
- Basic Load Balancer — Resources behind a Basic Load Balancer in one VNet cannot be reached from a globally peered VNet. Standard Load Balancer works fine.
- Latency — Global peering crosses region boundaries, so latency is higher than regional peering. You need to account for this in latency-sensitive workloads.
- Cost — Global peering incurs data transfer charges in both directions, whereas regional peering charges are lower.
- No transitive routing — Same as regional peering, traffic does not flow transitively through a peered VNet without additional configuration.
Q: Can peered VNets communicate transitively by default? How would you work around this?
No — transitive routing is not supported natively in VNet peering. If Spoke A is peered to the Hub, and Spoke B is peered to the Hub, Spoke A cannot reach Spoke B directly through the Hub by default.
To work around this, you have two main options:
- Azure Firewall or NVA in the Hub — Route traffic from Spoke A through the Hub firewall, which then forwards it to Spoke B. This requires User Defined Routes (UDRs) on both Spokes pointing their traffic to the firewall’s private IP as the next hop. This is the most common enterprise approach and has the added benefit of traffic inspection.
- Azure Virtual WAN — Virtual WAN supports transitive routing natively, making it a cleaner option when you have many Spokes and don’t want to manage UDRs manually.
Q: Spoke A and Spoke B are peered to the Hub. Can Spoke A reach Spoke B? What needs to be in place?
Not by default. To enable this:
- Deploy Azure Firewall (or an NVA) in the Hub VNet
- Create a UDR on Spoke A’s subnet with a route: destination = Spoke B’s address space, next hop = Azure Firewall private IP
- Create a mirror UDR on Spoke B’s subnet: destination = Spoke A’s address space, next hop = Azure Firewall private IP
- Configure Azure Firewall network rules to allow the traffic between Spoke A and Spoke B
- Enable “Use Remote Gateway” or “Allow Gateway Transit” on the peering connections as needed for routing to propagate correctly
This gives you transitive connectivity with centralized inspection — a core benefit of Hub-and-Spoke.
Q: When would you choose VNet peering over VPN Gateway or ExpressRoute for VNet-to-VNet connectivity?
- VNet Peering — Best for Azure-to-Azure connectivity. It uses the Microsoft backbone, offers the lowest latency, highest throughput, and is the simplest to configure. Use it whenever both VNets are in Azure.
- VPN Gateway (VNet-to-VNet) — Used when you need encrypted tunnels between VNets, or when connecting across different Azure tenants/subscriptions where peering may be complex. Higher latency and limited throughput compared to peering.
- ExpressRoute — Used for on-premises to Azure connectivity over a private, dedicated circuit. Not typically used for VNet-to-VNet unless traffic must flow through on-premises for compliance or inspection reasons.
In short: always prefer peering for Azure-to-Azure, and reserve VPN/ExpressRoute for hybrid or cross-tenant scenarios.
🔵 Hub-and-Spoke Network Design
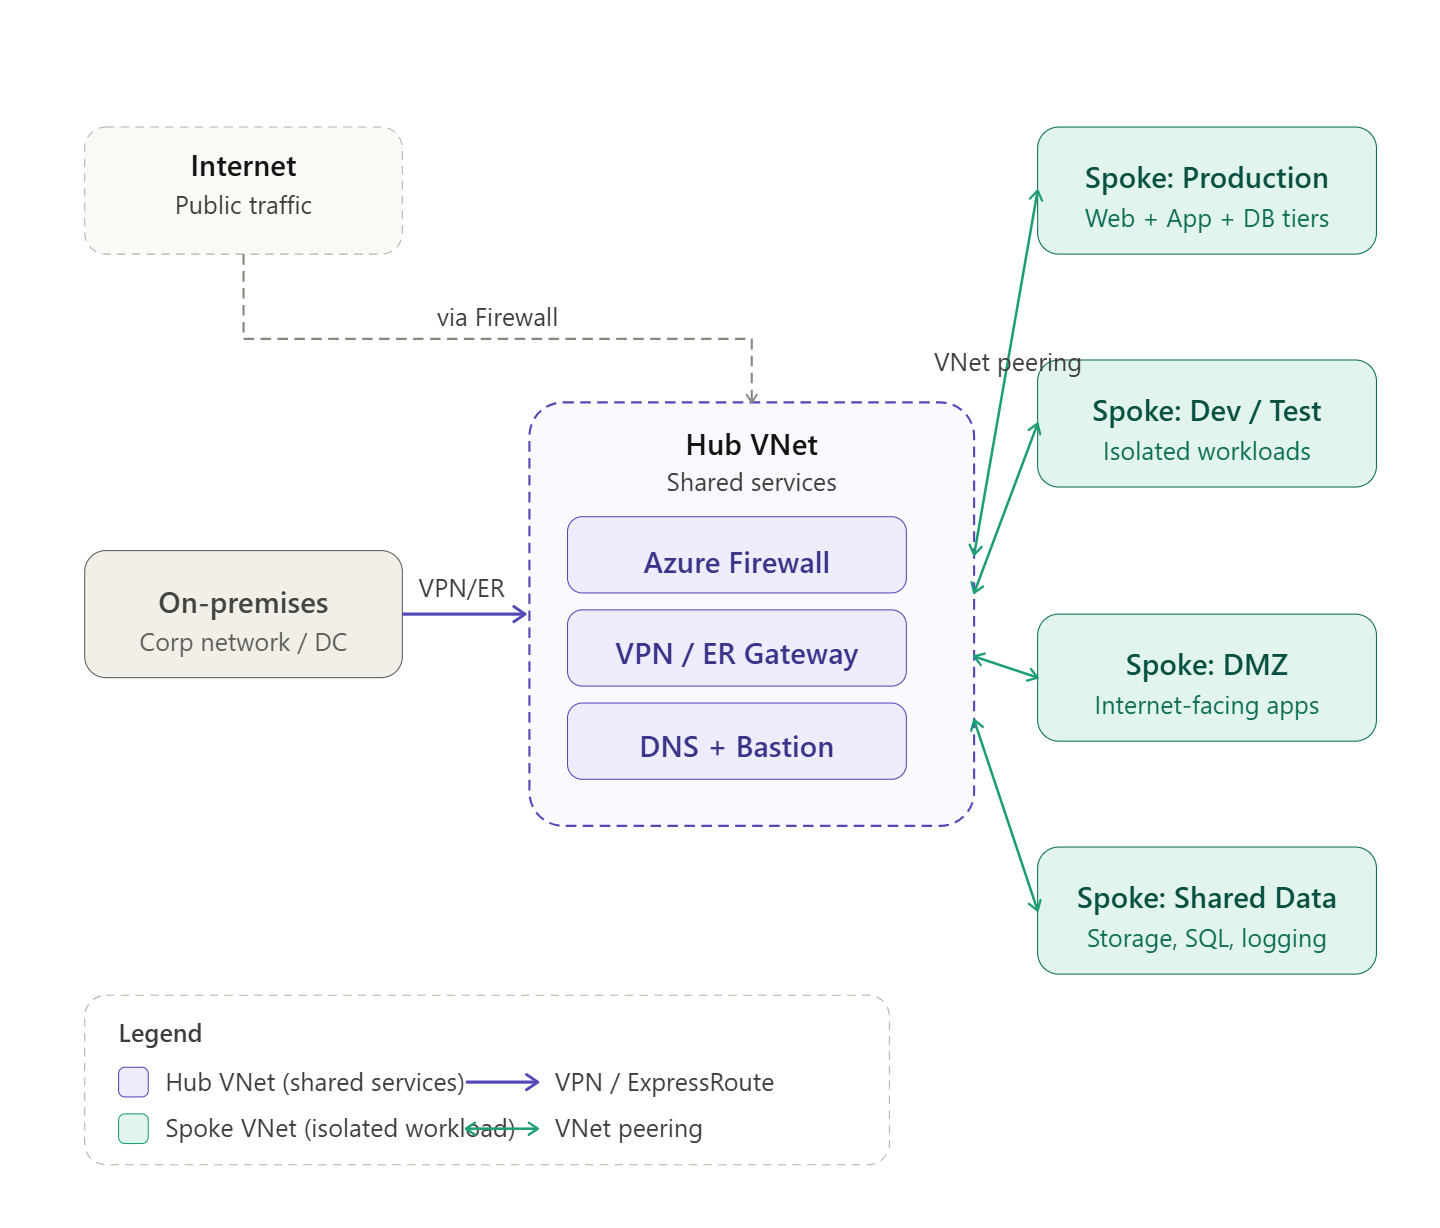
Q: Explain the Hub-and-Spoke topology. What lives in the Hub, and what lives in the Spokes?
Hub-and-Spoke is a network design pattern where a central VNet (the Hub) acts as the connectivity and security backbone, and multiple Spoke VNets connect to it via peering.
The Hub hosts shared, centralized services:
- Azure Firewall or NVA for traffic inspection and internet egress control
- VPN Gateway or ExpressRoute Gateway for on-premises connectivity
- Azure DNS Private Resolver
- Bastion for secure VM access
- Shared monitoring and logging infrastructure
The Spokes host workload-specific resources:
- Application VMs, AKS clusters, App Services
- Databases and storage
- Each Spoke is isolated — it can only communicate outside its boundary through the Hub, which enforces security policies
This model gives you centralized governance and security without duplicating shared services in every workload environment.
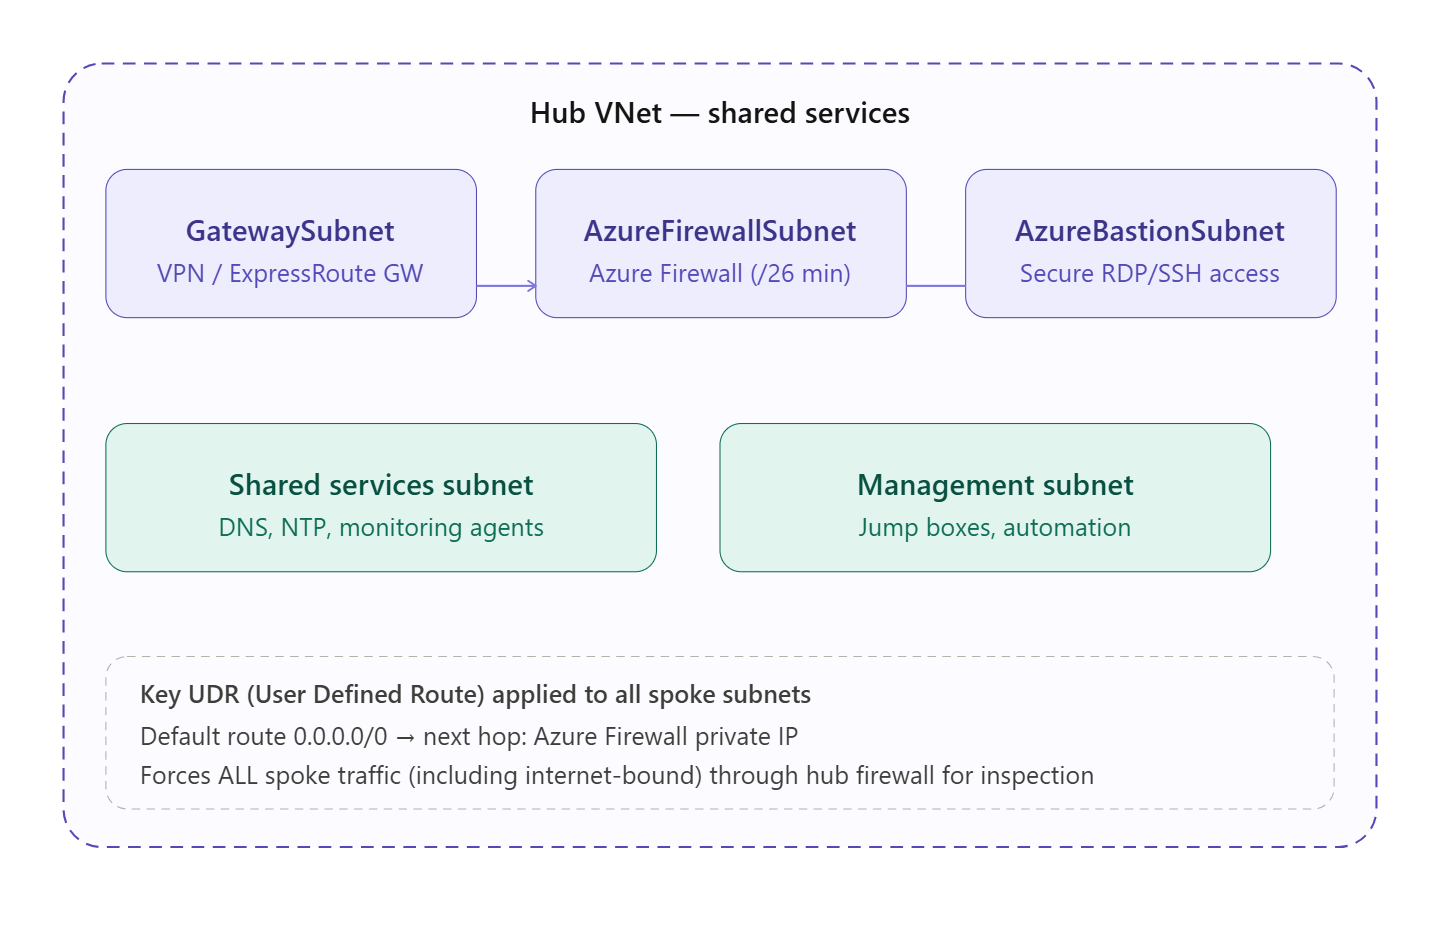
Q: How do you enforce traffic inspection through the Hub for Spoke-to-internet traffic?
- Deploy Azure Firewall in the Hub VNet
- On each Spoke subnet, create a UDR with a default route: 0.0.0.0/0 → next hop = Azure Firewall private IP
- This forces all outbound internet traffic from Spoke VMs through the firewall before it exits
- On the Hub, configure Azure Firewall application and network rules to define what traffic is allowed out
- Enable Azure Firewall DNS proxy if you want centralized DNS logging as well
For Spoke-to-Spoke, additional UDRs point inter-spoke traffic to the firewall as described earlier.
Q: A new business unit needs to be onboarded into your existing Hub-and-Spoke architecture. Walk me through the steps.
- IP planning — Allocate a non-overlapping address space for the new Spoke VNet from the enterprise IP plan
- Create the Spoke VNet — Deploy it in the appropriate subscription under the correct Management Group
- Establish peering — Create bidirectional peering between the new Spoke and the Hub (allow gateway transit on Hub side, use remote gateway on Spoke side if needed)
- Configure UDRs — Apply route tables on the Spoke subnets to direct internet and cross-spoke traffic through the Hub firewall
- DNS configuration — Point the Spoke VNet’s DNS settings to the centralized DNS Private Resolver in the Hub
- Firewall rules — Add rules in Azure Firewall to permit the business unit’s required traffic flows
- Azure Policy — Ensure the new subscription inherits enterprise policies (e.g., no public IPs, required tags, allowed regions)
- Private DNS Zone links — Link relevant Private DNS Zones to the new Spoke VNet for private endpoint resolution
- Connectivity testing — Validate DNS resolution, internet egress, and any required on-premises connectivity
🔵 Landing Zones & Enterprise Network Governance
Q: What is an Azure Landing Zone, and how does networking fit into it?
An Azure Landing Zone is a pre-configured, governed Azure environment that provides the foundation for hosting workloads securely and at scale. It is designed following Microsoft’s Cloud Adoption Framework (CAF) and covers identity, governance, security, networking, and management.
Networking is one of the most critical components. In the CAF Landing Zone model:
- A Connectivity subscription hosts the Hub VNet, gateways, firewall, and DNS infrastructure
- Landing Zone subscriptions host Spoke VNets for individual workloads or business units
- All networking is governed centrally — workload teams cannot create arbitrary public IPs or peer VNets outside the approved architecture
- Azure Policy enforces these constraints automatically
Q: What role do Azure Policy and Management Groups play in enforcing network governance?
Management Groups create a hierarchy of subscriptions (e.g., Root → Platform → Landing Zones → Business Units). Policies applied at a Management Group level automatically inherit down to all subscriptions beneath it.
Azure Policy enforces guardrails such as:
- Deny creation of public IP addresses in Spoke subscriptions
- Require all VNets to use a specific custom DNS server
- Deny VNet peering unless it connects to the approved Hub
- Enforce NSG association on every subnet
- Require private endpoints for PaaS services like Storage and SQL
Together, they ensure that even if a workload team has Contributor access to their subscription, they cannot violate the network architecture — the policies block non-compliant actions automatically.
Q: How would you manage IP address space allocation across multiple subscriptions to avoid conflicts?
This is an area where discipline and tooling are both essential:
- Centralized IP plan — Maintain a master IP address management (IPAM) document or tool (e.g., Azure’s native IPAM feature in preview, or third-party tools like Infoblox or NetBox) that tracks all allocated ranges across subscriptions
- Non-overlapping ranges per Spoke — Assign each Landing Zone a dedicated, non-overlapping CIDR block from a master supernet (e.g., 10.0.0.0/8 split into /16 per region, then /24 per Spoke)
- Azure Policy — Use policy to deny VNet creation if the address space conflicts with known ranges or falls outside the approved supernet
- Automation — When onboarding new Landing Zones via Pulumi or other IaC, automatically pull the next available range from the IPAM system rather than relying on manual assignment
🔵 Hybrid DNS Resolution
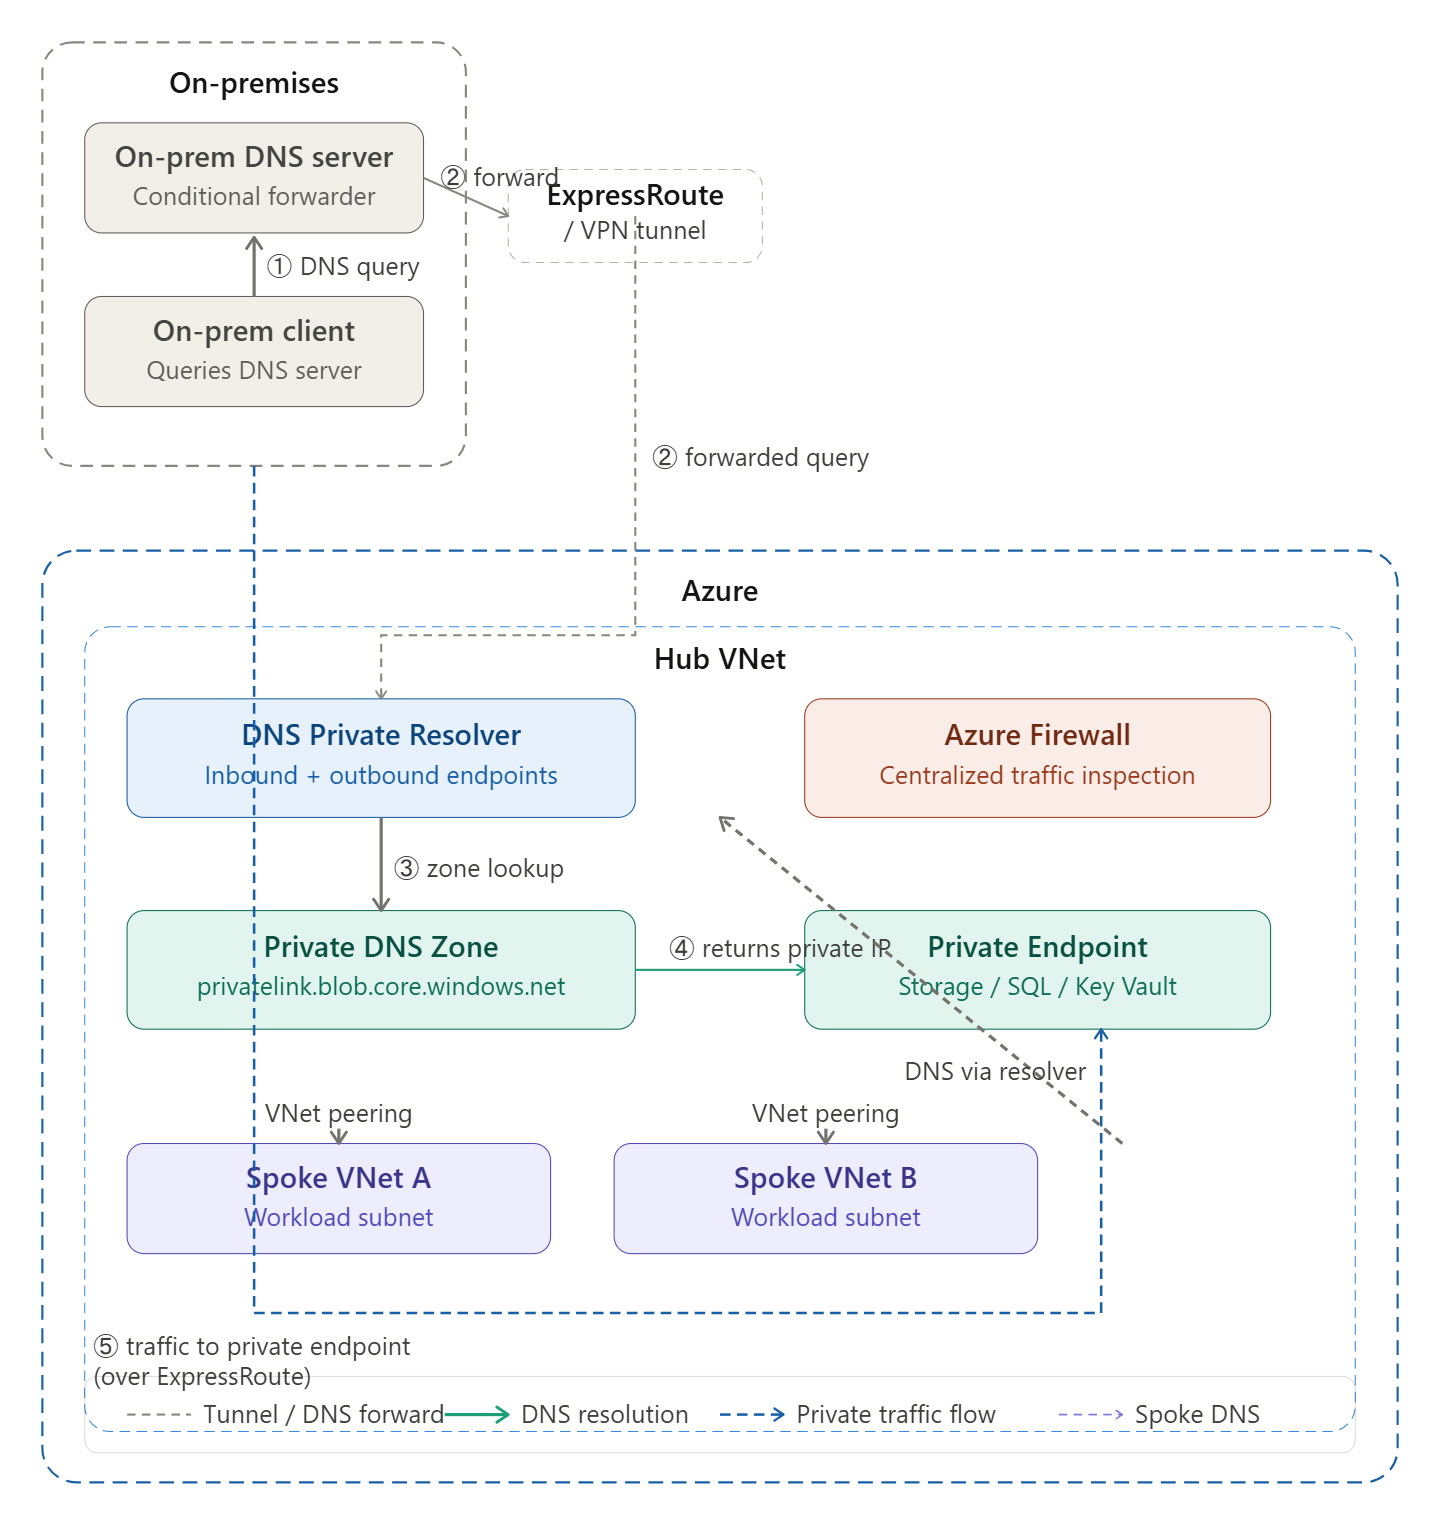
Q: On-premises clients need to resolve privatelink.blob.core.windows.net. What DNS architecture changes are needed?
This is one of the most common hybrid DNS challenges. By default, privatelink.blob.core.windows.net resolves to a public IP from on-premises. To make it resolve to the private endpoint IP, you need:
On the Azure side:
- Create a Private DNS Zone for privatelink.blob.core.windows.net and link it to the Hub VNet
- Ensure the private endpoint A record is registered in the zone
- Deploy Azure DNS Private Resolver with an inbound endpoint in the Hub VNet — this gives on-premises clients a routable IP to send DNS queries into Azure
On the on-premises side:
- Configure your on-premises DNS server with a conditional forwarder: privatelink.blob.core.windows.net → forward to the DNS Private Resolver inbound endpoint IP
- Ensure the inbound endpoint IP is reachable over ExpressRoute or VPN from on-premises
Result: On-premises clients query their local DNS → conditional forwarder redirects to Azure DNS Private Resolver → Private Resolver checks the linked Private DNS Zone → returns the private endpoint IP → traffic flows privately over ExpressRoute/VPN.
Q: You’re migrating from a custom DNS forwarder VM to Azure DNS Private Resolver. How do you ensure zero DNS disruption?
- Deploy Private Resolver in parallel — Set up the inbound and outbound endpoints and configure forwarding rulesets to mirror the existing forwarder VM’s rules exactly
- Test thoroughly — Validate resolution of all key domains (on-premises, private endpoints, public) from test VMs pointing to the new resolver
- Staged migration — Update the custom DNS server setting on VNets one at a time, starting with non-production VNets, monitoring for any resolution failures
- Update on-premises conditional forwarders — Once Azure-side is validated, update on-premises DNS to point to the Private Resolver inbound endpoint instead of the old forwarder VM IP
- Monitor — Use Azure Monitor and DNS metrics on the Private Resolver to confirm query volumes are healthy
- Decommission the VM — Only after all VNets and on-premises forwarders are updated and validated, remove the forwarder VM
The key principle is run both in parallel, migrate gradually, and never cut over until validation is complete.