The CIDR (Classless Inter-Domain Routing) notation tells you two things: the starting IP address and the size of your network.
The number after the slash (e.g., /16, /24) represents how many bits are “locked” for the network prefix. Since an IPv4 address has 32 bits in total, you subtract the CIDR number from 32 to find how many bits are left for your “hosts” (the actual devices).
📏 The “Rule of 32”
To calculate how many IPs you get, use this formula: $2^{(32 – \text{prefix})}$.
Higher number = Smaller network:/28 is a small room.
Lower number = Larger network:/16 is a massive warehouse.
Common Azure CIDR Sizes
CIDR
Total IPs
Azure Usable IPs*
Common Use Case
/16
65,536
65,531
VNet Level: A massive space for a whole company’s environment.
/22
1,024
1,019
VNet Level: Good for a standard “Hub” network.
/24
256
251
Subnet Level: Perfect for a standard Web or App tier.
/27
32
27
Service Subnet: Required for things like SQL Managed Instance.
/28
16
11
Micro-Subnet: Used for small things like Azure Bastion or Gateways.
/29
8
3
Minimum Size: The smallest subnet Azure allows.
🚫 The “Azure 5” (Critical)
In every subnet you create, Azure automatically reserves 5 IP addresses. You cannot use these for your VMs or Apps.
If you create a /28 (16 IPs), you only get 11 usable addresses.
x.x.x.0: Network Address
x.x.x.1: Default Gateway
x.x.x.2 & x.x.x.3: Azure DNS mapping
x.x.x.255: Broadcast Address
💡 How to choose for your VNet?
When designing your Azure network, follow these two golden rules:
Don’t go too small: It is very difficult to “resize” a VNet once it’s full of resources. It’s better to start with a /16 or /20 even if you only need a few IPs today.
Plan for Peering: If you plan to connect VNet A to VNet B (Peering), their CIDR ranges must not overlap. If VNet A is 10.0.0.0/16, VNet B should be something completely different, like 10.1.0.0/16.
While both Service Endpoints and Private Endpoints are designed to secure your traffic by keeping it on the Microsoft backbone network, they do so in very different ways.
The simplest way to remember the difference is: Service Endpoints secure a public entrance, while Private Endpoints build a private side door.
🛠️ Service Endpoints
Service Endpoints “wrap” your virtual network identity around an Azure service’s public IP.
The Connection: Your VM still talks to the Public IP of the service (e.g., 52.x.x.x), but Azure magically reroutes that traffic so it never leaves the Microsoft network.
Granularity: It is broad. If you enable a Service Endpoint for “Storage,” your subnet can now reach any storage account in that region via the backbone.
On-Premise: Does not work for on-premise users. A user in your office cannot use a Service Endpoint to reach a database over a VPN.
Cost: Completely Free.
🔒 Private Endpoints (Powered by Private Link)
Private Endpoints actually “inject” a specific service instance into your VNet by giving it a Private IP address from your own subnet.
The Connection: Your VM talks to a Private IP (e.g., 10.0.0.5). To the VM, the database looks like just another server in the same room.
Granularity: Extremely high. The IP address is tied to one specific resource (e.g., only your “Production-DB”). You cannot use that same IP to reach a different database.
On-Premise:Fully supports on-premise connectivity via VPN or ExpressRoute. Your office can reach the database using its internal 10.x.x.x IP.
Cost: There is a hourly charge plus a fee for data processed (roughly $7-$8/month base + data).
📊 Comparison Table
Feature
Service Endpoint
Private Endpoint
Destination IP
Public IP of the Service
Private IP from your VNet
DNS Complexity
None (Uses public DNS)
High (Requires Private DNS Zones)
Granularity
Subnet to All Services in Region
Subnet to Specific Resource
On-Prem Access
No
Yes (via VPN/ExpressRoute)
Data Exfiltration
Possible (if not restricted)
Protected (bound to one instance)
Cost
Free
Paid (Hourly + Data)
🚀 Which one should you use?
Use Service Endpoints if:
You have a simple setup and want to save money.
You only need to connect Azure-to-Azure (no on-premise users).
You don’t want to deal with the headache of managing Private DNS Zones.
Use Private Endpoints if:
Security is your #1 priority (Zero Trust).
You need to reach the service from your on-premise data center.
You must strictly prevent “Data Exfiltration” (ensuring employees can’t copy data from your VNet to their own personal storage accounts).
You are in a highly regulated industry (Finance, Healthcare, Government).
Expert Tip: In 2026, most enterprises have moved toward Private Endpoints as the standard. While they are more expensive and harder to set up (DNS is the biggest hurdle), they offer the “cleanest” security architecture for a hybrid cloud environment.
This is a classic “architectural corner” that many engineers find themselves in. When an Azure Virtual Network (VNet) or its subnets are out of IP addresses, you cannot simply “resize” a subnet that has active resources in it.
Here is the hierarchy of solutions, from the easiest to the most complex.
🛠️ Option 1: The “Non-Disruptive” Fix (Add Address Space)
In 2026, Azure allows you to expand a VNet without taking it down. You can add a Secondary Address Space to the VNet.
Add a New Range: Go to the VNet > Address space and add a completely new CIDR block (e.g., if you used 10.0.0.0/24, add 10.1.0.0/24).
Create a New Subnet: Create a new subnet (e.g., Subnet-2) within that new range.
Deploy New Workloads: Direct all new applications or VMs to the new subnet.
Sync Peerings: If this VNet is peered with others, you must click the Sync button on the peering configuration so the other VNets “see” the new IP range.
🔄 Option 2: The “Migration” Fix (VNet Integration)
If your existing applications need more room to grow (scaling up) but their current subnet is full:
Create a Parallel Subnet: Add a new, larger subnet to the VNet (assuming you have space in the address range).
Migrate Resources: For VMs, you can actually change the subnet of a Network Interface (NIC) while the VM is stopped.
App Services: If you are using VNet Integration for App Services, simply disconnect the integration and reconnect it to a new, larger subnet.
🌐 Option 3: The “Expansion” Fix (VNet Peering)
If you cannot add more address space to your current VNet (perhaps because it would overlap with your on-prem network), you can “spill over” into a second VNet.
Create VNet-B: Set up a brand new VNet with its own IP range.
Peer them: Use VNet Peering to connect VNet-A and VNet-B.
Routing: Use Internal Load Balancers or Private Endpoints to bridge the gap between applications in both networks.
⚠️ Important “Gotchas” to Remember
The “Azure 5”: Remember that Azure reserves 5 IP addresses in every subnet (the first four and the last one). If you create a /29 subnet, you think you have 8 IPs, but you actually only have 3 usable ones.
Subnet Resizing: You cannot resize a subnet if it has any resources in it (even one dormant NIC). You must delete the resources or move them first.
NAT Gateway: In 2026, if you are running out of Public IPs for outbound traffic, attach an Azure NAT Gateway to your subnet. This allows up to 64,000 concurrent flows using a single public IP, preventing “SNAT Port Exhaustion.”
💡 The “Pro” Recommendation:
If this is a production environment, use Option 1. Add a secondary address space (like 172.16.0.0/16 or 100.64.0.0/10 if you’re out of 10.x.x.x space) and start a new subnet. It’s the only way to get more IPs without a “stop-everything” maintenance window.
When discussing “peering” in Azure, it’s important to clarify the context. Usually, this refers to VNet Peering (connecting virtual networks) or Direct Peering (which can refer to Azure Peering Service for optimized internet or ExpressRoute Direct for high-speed private fiber).
Here is what you need to consider for each to ensure a secure and performant design.
1. VNet Peering (Connecting VNets)
VNet Peering is the primary way to connect two Azure Virtual Networks. They behave as a single network using private IP addresses.
🔑 Key Considerations:
Address Space Overlap:CRITICAL. You cannot peer VNets if their IP address spaces (CIDR blocks) overlap. Plan your IP schema early; fixing an overlap later requires deleting and recreating the VNet.
Transitivity: VNet peering is not transitive. If VNet A is peered with VNet B, and VNet B is peered with VNet C, VNet A cannot talk to VNet C.
Solution: Use a Hub-and-Spoke model with an Azure Firewall/NVA or Azure Virtual WAN for transitive routing.
Gateway Transit: If VNet A has a VPN/ExpressRoute gateway, you can allow VNet B to use it.
Check: Enable “Allow gateway transit” on VNet A and “Use remote gateways” on VNet B.
Cost: Local peering (same region) is cheaper than Global peering (different regions). You are charged for both inbound and outbound data transfer on both sides of the peering.
2. Direct Peering (ExpressRoute Direct & Peering Service)
“Direct Peering” usually refers to ExpressRoute Direct, where you connect your own hardware directly to Microsoft’s edge routers at 10 Gbps or 100 Gbps.
🔑 Key Considerations:
Physical Connectivity: You are responsible for the “Last Mile” fiber from your data center to the Microsoft Peering Location.
SKU Selection: * Local: For traffic within the same geopolitical region (cheapest).
Standard: For traffic within the same continent.
Premium: Required for global connectivity and more than 10 VNet links.
Microsoft Peering vs. Private Peering:
Private Peering: Connects your on-prem network to your Azure VNets (internal traffic).
Microsoft Peering: Connects your on-prem network to Microsoft 365, Dynamics 365, and Azure Public PaaS services (Storage, SQL) over a private link.
3. Comparison Summary
Consideration
VNet Peering
Direct Peering (ExpressRoute Direct)
Primary Use
Cloud-to-Cloud connectivity.
On-Prem-to-Cloud (High Bandwidth).
Medium
Microsoft Global Backbone.
Dedicated Physical Fiber + Backbone.
Bandwidth
Limited by VM/Gateway SKU.
Up to 100 Gbps.
Complexity
Low (Point-and-click).
High (Requires physical fiber/BGP).
Security
Encapsulated in Azure backbone.
Private, dedicated physical path.
🚦 Common Pitfall: Asymmetric Routing
If you have both a VNet Peering and an ExpressRoute circuit connecting the same two locations, Azure might send traffic out via the peering but receive it back via ExpressRoute.
The Fix: Use User-Defined Routes (UDRs) or BGP weights to ensure the “return” path matches the “outbound” path. Azure will prioritize VNet Peering routes over ExpressRoute routes by default if the address prefixes are the same.
Would you like a specific KQL query to monitor the latency or throughput between your peered networks?
It sounds like you are describing a “Traffic Spike” or perhaps a “Burst” in resource usage. Since there are no alerts, you are in “detective mode,” looking for a silent surge that hasn’t crossed a threshold yet but is clearly visible in your telemetry.
If you heard “frost,” you might be referring to “Cold Start” spikes (common in Serverless/Functions) or a “Request Spike.” Here are the steps to track down the source of a sudden surge in Azure:
🔍 Step 1: Use Azure Monitor “Metrics Explorer”
Since you don’t have alerts, you need to visualize the spike to see its “shape.”
Go to the resource (e.g., App Service, VM, or Load Balancer).
Select Metrics from the left menu.
Add the Request Count (for apps) or CPU/Network In (for VMs) metric.
The Secret Step: Change the “Aggregation” to Count or Sum and look for the exact timestamp of the spike.
Apply Splitting: Split the metric by “RemoteIP” or “Instance”. This tells you if the spike is coming from one specific user/IP or hitting one specific server.
🕵️ Step 2: Dig into Log Analytics (KQL)
If the metrics show a spike but not the “who,” you need the logs. This is where you find the “Source.”
Go to Logs (Log Analytics Workspace).
Run a query to find the top callers during that spike period.
Example KQL for App Gateways/Web Apps:
Code snippet
// Find the top 10 IP addresses causing the spike
AzureDiagnostics
| where TimeGenerated > datetime(2026-04-10T12:00:00Z) // Set to your spike time
| where Category == "ApplicationGatewayAccessLog"
| summarize RequestCount = count() by clientIP_s
| top 10 by RequestCount
Result: If one IP address has 50,000 requests while others have 10, you’ve found a bot or a misconfigured client.
If the spike is happening inside your application code (e.g., a “Cold Start” or a heavy API call):
Go to Application Insights > Failures or Performance.
Look at the “Top 10 Operations”.
Check if a specific API endpoint (e.g., /api/export) suddenly jumped in volume.
Use User Map to see if the traffic is coming from a specific geographic region (e.g., a sudden burst of traffic from a country you don’t usually service).
🗺️ Step 4: Network Watcher (Infrastructure Level)
If you suspect the spike is at the “packet” level (like a DDoS attempt or a backup job gone rogue):
Go to Network Watcher > NSG Flow Logs.
Use Traffic Analytics. It provides a map showing which VNets or Public IPs are sending the most data.
Check for “Flows”: It will show you the “Source Port” and “Destination Port.” If you see a spike on Port 22 (SSH) or 3389 (RDP), someone is likely trying to brute-force your VMs.
🤖 Step 5: Check for “Auto-Scaling” Events
Sometimes the “spike” isn’t a problem, but a reaction.
Go to Activity Log.
Filter for “Autoscale” events.
If the spike happened exactly when a new instance was added, the “spike” might actually be the resource “warming up” (loading caches, etc.), which can look like a surge in CPU or Disk I/O.
Summary Checklist:
Metrics Explorer: To see when it happened and how big it was.
Log Analytics (KQL): To find the specific Client IP or User Agent.
Traffic Analytics: To see if it was a Network-level burst.
Activity Log: To see if any Manual Changes or Scaling occurred at that exact second.
A common real-world “mystery spike” case. Since you mentioned “frost spike” and “source space,” you are likely referring to a Cost Spike or a Request/Throughput Spike in your resource namespace.
If there are no alerts firing, it means the spike either didn’t hit a specific threshold or was too brief to trigger a standard “Static” alert.
🏗️ Step 1: Establish the “When” and “What”
First, you need to see the “DNA” of the spike using Azure Monitor Metrics.
Look at the Graph: Is it a “Square” spike (starts and stops abruptly, like a scheduled job)? Or a “Needle” spike (hits a peak and drops, like a bot attack)?
Identify the Resource: Go to Metrics Explorer and check:
For VMs:Percentage CPU or Network In/Out.
For Storage/SQL:Transactions or DTU Consumption.
For App Services:Requests or Data In.
🔍 Step 2: Finding the Source (The Detective Work)
Since you don’t know where it came from, you use “Splitting” and “Filtering” in Metrics Explorer.
Split by Instance/Role: If you have 10 servers, split by InstanceName. Does only one server show the spike? If yes, it’s a local process (like a hanging Windows Update or a log-rotation fail).
Split by Operation: For Storage or SQL, split by API Name. Is it GetBlob? PutBlob? This tells you if you are reading too much or writing too much.
Split by Remote IP: If your load balancer shows the spike, split by ClientIP. If one IP has 100x the traffic of others, you’ve found your source.
🕵️ Step 3: Deep Dive with Log Analytics (KQL)
Metrics only show numbers. Logs show names. You need to run a KQL query in your Log Analytics Workspace.
Query to find “Who is talking to me”:
Code snippet
// This finds the top 5 callers during the spike window
AzureDiagnostics
| where TimeGenerated > datetime(2026-04-10T12:00:00Z) // Use your spike time
| summarize RequestCount = count() by clientIp_s, requestUri_s
| top 5 by RequestCount
Result: This will literally list the IP address and the specific URL they were hitting.
💰 Step 4: The “Cost” Investigation
If the spike is financial (a “Cost Spike”), you check Azure Cost Management.
Cost Analysis: View cost by Resource. Did one specific Disk or Data Transfer cost jump?
Check for “Orphaned” Resources: Sometimes a spike comes from a process that created 1,000 snapshots or temporary disks and forgot to delete them.
🤖 Step 5: Check the “Silent” Sources
If the metrics and logs don’t show an external attacker, check internal Azure “automated” sources:
Resource Graph: Check for “Change Tracking.” Did someone deploy code or change a firewall rule at that exact minute?
Backup/Recovery Services: A “huge spike” in disk I/O often aligns with a Storage Snapshot or an Azure Backup job starting.
Defender for Cloud: Even if you don’t have a “Metric Alert,” check the Security Alerts. Defender might have seen the spike and flagged it as “Suspicious PowerShell Activity” or “Port Scanning.”
✅ Summary Checklist
Step
Action
Tool
1. Visualize
See the shape and duration of the spike.
Metrics Explorer
2. Isolate
Split metrics by IP or Instance.
Metrics Explorer
3. Identify
Run a query to find the specific Client IP or User.
Log Analytics (KQL)
4. Correlate
Check if any “Deployments” happened at that time.
Activity Log / Change Analysis
5. Network
Check for massive data transfers between regions.
Network Watcher / Traffic Analytics
How to prevent this next time? Once you find the source, create a Dynamic Threshold Alert. Unlike static alerts, these use AI to learn your “normal” pattern and will fire if a spike looks “unusual,” even if it doesn’t hit a high maximum number.
When a VM can’t talk to a Storage Private Endpoint, the issue almost always boils down to one of three things: DNS, Network Rules, or Approval State.
Here is your step-by-step troubleshooting checklist.
🔍 Step 1: The “Approval” Check
Before looking at technical networking, ensure the connection is actually “On.”
Check the Status: Go to the Storage Account > Networking > Private Endpoint Connections.
Look for “Approved”: If it says Pending, the connection isn’t active yet. Someone needs to manually approve it (common if the Storage Account is in a different subscription than the Private Endpoint).
🌐 Step 2: The DNS Resolution Check (Most Likely Culprit)
This is where 90% of Private Endpoint issues live. Your VM needs to resolve the Storage Account’s URL to a Private IP (e.g., 10.0.0.5), not its Public IP.
Run a Test: From your VM (PowerShell or Bash), run:
nslookup yourstorage.blob.core.windows.net
Evaluate the Result:
Bad: It returns a Public IP. Your VM is bypassing the Private Link and hitting the internet (which is likely blocked by the storage firewall).
Good: It returns a Private IP (usually in the range of your VNet) and shows an alias like yourstorage.privatelink.blob.core.windows.net.
The Fix: * Ensure you have a Private DNS Zone named privatelink.blob.core.windows.net.
Ensure that DNS Zone is linked to the Virtual Network where your VM sits.
If you use a Custom DNS/Domain Controller, ensure it has a conditional forwarder pointing to the Azure DNS IP 168.63.129.16.
🛡️ Step 3: Network Security Group (NSG) Check
Even with Private Link, your Subnet’s “Firewall” rules still apply.
Outbound Rules (VM Subnet): Does the NSG on your VM’s subnet allow traffic to the Private Endpoint’s IP? (Usually, the default “AllowVnetOutbound” covers this, but check for manual “Deny” rules).
Inbound Rules (Private Endpoint Subnet): In 2026, Private Endpoints support Network Policies. Check if the NSG on the Private Endpoint’s subnet allows inbound traffic from your VM on Port 443.
ASG Check: If you are using Application Security Groups, ensure your VM is a member of the ASG allowed in the NSG rules.
🧱 Step 4: Storage Firewall Settings
By default, when you enable a Private Endpoint, you usually “Lock Down” the Storage Account.
Go to Storage Account > Networking.
Ensure Public Network Access is set to “Disabled” or “Enabled from selected virtual networks and IP addresses.”
Crucial: Even if public access is disabled, the Private Endpoint connection itself must be listed and active in the “Private endpoint connections” tab.
🛠️ Step 5: The “Quick Tools” Test
If you’re still stuck, run these two commands from the VM to narrow down if it’s a DNS or Port issue:
Test the Port (TCP 443):PowerShell# Windows Test-NetConnection -ComputerName yourstorage.blob.core.windows.net -Port 443 (If this fails but DNS is correct, an NSG or Firewall is blocking you).
Check the IP directly:Find the Private IP of the endpoint in the Azure Portal and try to ping it (if ICMP is allowed) or use it in the connection string to see if the error changes.
Identity and Access Management (IAM) in Azure is the framework of policies and technologies that ensures the right people (and software) have the appropriate access to technology resources.
In 2026, Azure IAM is primarily managed through Microsoft Entra ID (formerly Azure AD). It is built on the philosophy of Zero Trust: “Never trust, always verify.”
🏗️ The Core Architecture
Azure IAM is governed by two separate but integrated systems:
Entra ID Roles: Control access to “Identity” tasks (e.g., creating users, resetting passwords, managing domain names).
Azure RBAC (Role-Based Access Control): Control access to “Resources” (e.g., starting a VM, reading a database, managing a virtual network).
🔑 The Three Pillars of IAM
To understand any IAM request, Azure looks at three specific components:
1. Who? (The Security Principal)
This is the “Identity” requesting access. It can be:
User: A human (Employee or Guest).
Group: A collection of users (Best practice: always assign permissions to groups, not individuals).
Service Principal: An identity for an application/tool (e.g., a backup script).
Managed Identity: The “most secure” ID for Azure-to-Azure communication.
2. What can they do? (The Role Definition)
A “Role” is a collection of permissions.
Owner: Can do everything, including granting access to others.
Contributor: Can create/manage resources but cannot grant access.
Reader: Can only view resources.
Custom Roles: You can create your own if the “Built-in” ones are too broad.
3. Where? (The Scope)
Scope defines the boundary of the access. Azure uses a hierarchy:
Management Group: Multiple subscriptions.
Subscription: The billing and resource boundary.
Resource Group: A logical container for related resources.
Resource: The individual VM, SQL DB, or Storage Account.
Note: Permissions are inherited. If you are a “Reader” at the Subscription level, you are a “Reader” for every single resource inside that subscription.
🛡️ Advanced IAM Tools (The “Pro” Features)
Privileged Identity Management (PIM)
In a modern setup, no one should have “Permanent” admin access.PIM provides:
Just-In-Time (JIT) Access: You are “Eligible” for a role, but you only activate it for 2 hours when you need to do work.
Approval Workflows: A manager must approve your request to become an Admin.
Conditional Access (The “Smart” Gatekeeper)
Conditional Access is like a “Check-in Desk” that looks at signals before letting you in:
Signal: Is the user in a weird location? Is their device unmanaged?
Decision: Require MFA, Block access, or allow it.
ABAC (Attribute-Based Access Control)
As of 2025/2026, Azure has expanded into ABAC. This allows you to add “Conditions” to roles.
Example: “User can only read storage blobs if the blob is tagged with Project=Blue.”
✅ Best Practices
Principle of Least Privilege: Give users only the bare minimum access they need.
Use Groups: Never assign a role to a single user; assign it to a group so you can easily audit it later.
Enable MFA: 99.9% of identity attacks are blocked by Multi-Factor Authentication.
Use Managed Identities: Avoid using passwords or “Client Secrets” in your code.
The “most secure” identity in Azure is the Managed Identity.
It is considered the gold standard because it eliminates the need for developers to manage credentials (passwords, secrets, or certificates) entirely. Since there are no credentials to leak or rotate, it essentially removes the “human error” element from authentication.
🏆 The Most Secure: Managed Identity
A Managed Identity is a special type of Service Principal that is automatically managed by Azure.
No Secrets: You never see the password; Azure handles it in the background.
Automatic Rotation: Azure rotates the credentials automatically on a regular schedule.
Lifecycle Bonded: If you delete the Virtual Machine or App Service, the identity is automatically deleted with it.
👥 How many types of ID are in Azure?
In the world of Microsoft Entra ID (formerly Azure AD), there are 4 main categories of identities, though the family is expanding with the introduction of AI-specific IDs.
1. Human Identities
Internal Users: Your employees and staff members.
External Identities (B2B/B2C): Guests, partners, or customers who use their own emails (Gmail, Outlook, etc.) to log into your apps.
2. Workload Identities (Non-Human)
Managed Identities: (The “Most Secure” choice mentioned above).
Service Principals: Used by applications or automated tools (like GitHub Actions or Jenkins) to access Azure resources. Unlike Managed Identities, these require you to manage secrets or certificates manually.
3. Device Identities
Azure AD Joined: Corporate devices owned by the organization.
Registered Devices: Personal “Bring Your Own Device” (BYOD) equipment.
4. Agent Identities (New in 2026)
AI Agent IDs: With the rise of AI, Microsoft introduced Agent ID. These are specialized identities for AI agents and autonomous bots, allowing them to perform tasks on behalf of users with specific governance and “blueprints” to keep them from going rogue.
💡 Quick Comparison: Managed Identity vs. Service Principal
Feature
Managed Identity
Service Principal
Credentials
Managed by Azure (Invisible)
Managed by You (Secrets/Certs)
Credential Rotation
Automatic
Manual (or scripted)
Risk of Leakage
Extremely Low
High (if secret is hardcoded)
Best For
Azure-to-Azure communication
External apps / CI-CD pipelines
Bottom Line: If your app is running inside Azure, always use a Managed Identity. If it’s running outside Azure (like on-prem or in AWS), use a Service Principal.
Think of NSG and ASG as two sides of the same coin. The NSG is the actual “firewall” that enforces the rules, while the ASG is a “labeling” system that makes those rules easier to manage and understand.
🛡️ Network Security Group (NSG)
An NSG is a filter for network traffic. It contains a list of security rules that allow or deny traffic based on the “5-tuple” (Source IP, Source Port, Destination IP, Destination Port, and Protocol).
Where it lives: You associate it with a Subnet or a Network Interface (NIC).
What it does: It acts as a basic firewall for your Virtual Machines (VMs).
The Problem: If you have 50 web servers, you’d traditionally have to list all 50 IP addresses in your NSG rules. If you add a 51st server, you have to update the NSG rule. This is tedious and prone to error.
🏷️ Application Security Group (ASG)
An ASG is not a firewall itself; it is a logical object (a grouping) that you put inside an NSG rule. It allows you to group VMs together based on their function (e.g., “Web-Servers” or “DB-Servers”) regardless of their IP addresses.
Where it lives: You assign it directly to a Network Interface (NIC).
What it does: It allows you to write “natural language” rules. Instead of saying “Allow IP 10.0.0.4 to 10.0.0.5,” you can say “Allow Web-Servers to talk to DB-Servers.”
The Benefit: If you scale up and add 10 more web servers, you just tag them with the “Web-Servers” ASG. The NSG automatically applies the correct rules to them without you needing to change a single IP address in the security policy.
🔄 Key Differences at a Glance
Feature
Network Security Group (NSG)
Application Security Group (ASG)
Primary Role
The “Enforcer” (Filters traffic).
The “Organizer” (Groups VMs).
Logic
Based on IP addresses and ports.
Based on application roles/labels.
Association
Applied to Subnets or NICs.
Applied only to NICs.
Rule Limit
Up to 1,000 rules per NSG.
Used as a source/destination inside NSG rules.
Maintenance
High (must update IPs manually).
Low (rules update automatically as VMs are added).
Better Together: A Real-World Example
Imagine a 3-tier app (Web, App, Database).
You create three ASGs: ASG-Web, ASG-App, and ASG-DB.
You assign each VM to its respective ASG.
In your NSG, you create a rule: Allow Source: ASG-Web to Destination: ASG-App on Port 8080.
Now, it doesn’t matter if your web tier has 1 VM or 100 VMs—the security policy remains exactly the same and stays clean!
Would you like to see an example of how to configure these using the Azure CLI or Portal?
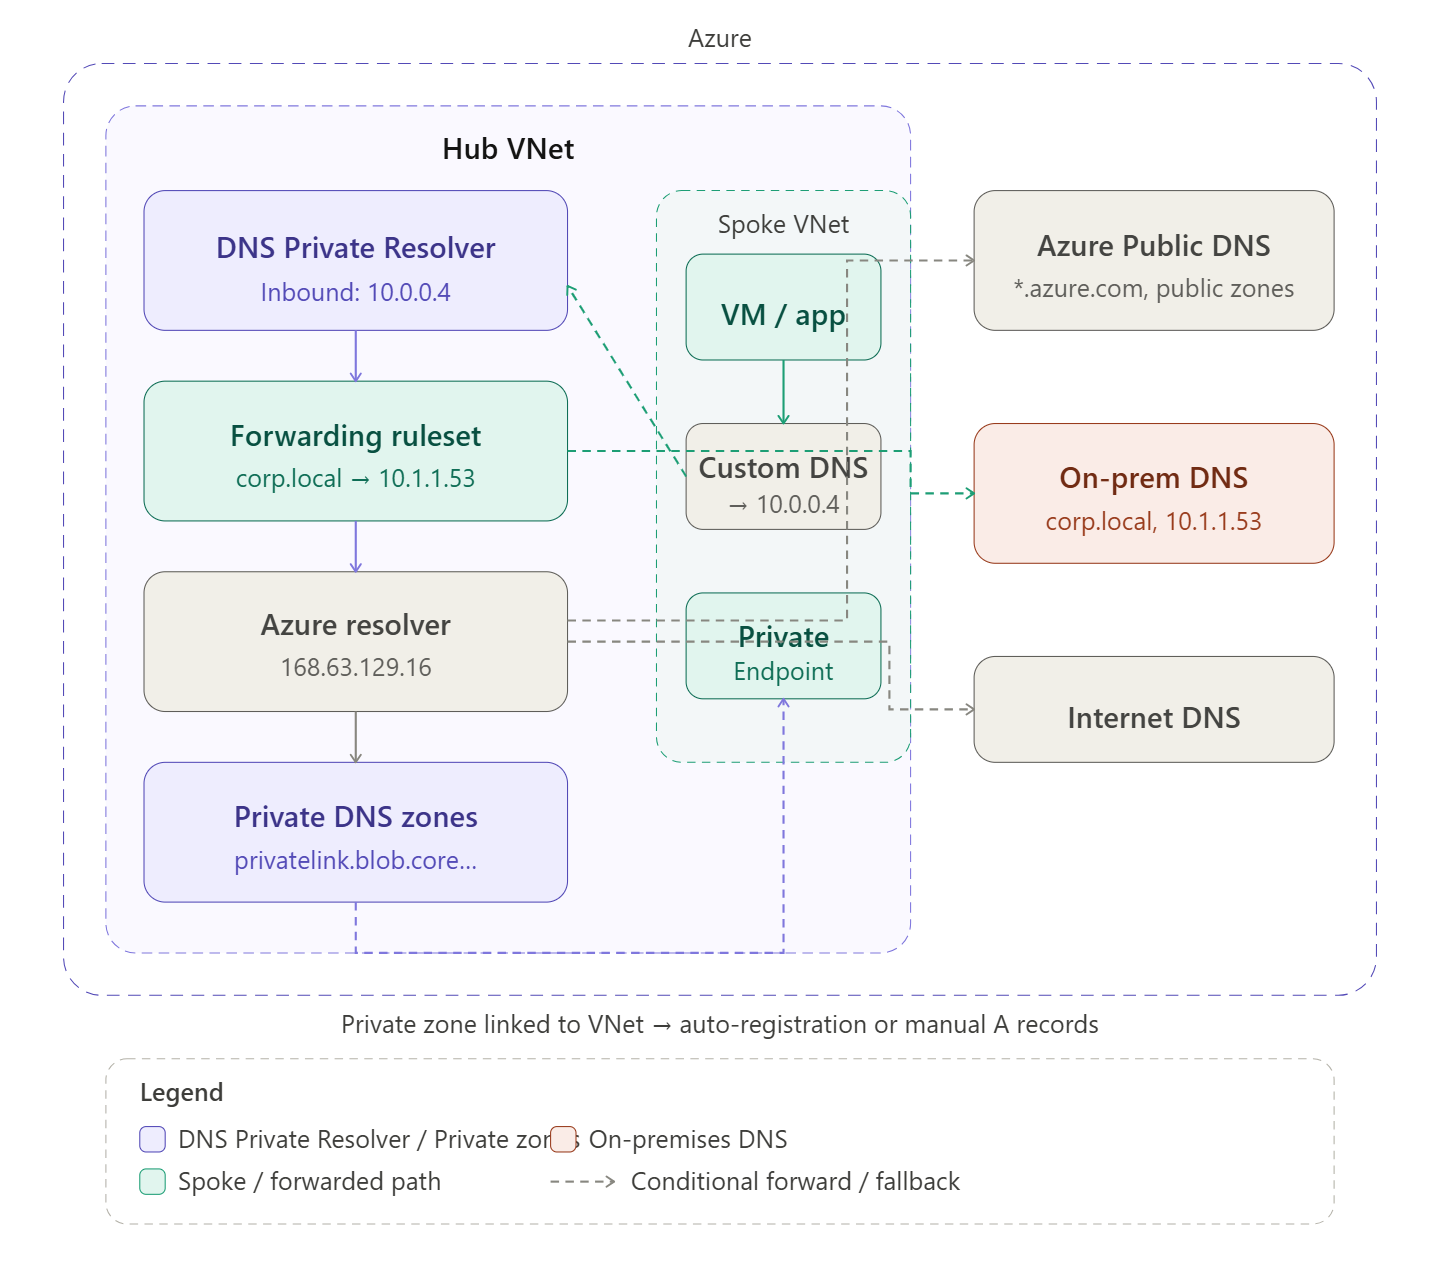
DNS in Azure is one of the most misunderstood parts of network architecture — let me build this up in two diagrams: first the overall structure of where name resolution happens, then the full query flow so you can see the decision logic in motion.
The DNS landscape in Azure
Every VNet has a built-in resolver at the special address 168.63.129.16. By default this resolves Azure public hostnames and the VNet’s own internal hostnames, but it knows nothing about your private zones or your on-premises DNS. The whole point of a DNS architecture is to extend that default with three building blocks: Private DNS Zones, DNS Private Resolver, and conditional forwarding rules.
Now let’s trace exactly what happens when a VM makes a DNS query — because the decision logic is what makes this architecture tick.Step through the query flow above. Here’s the full picture in prose:
The three building blocks
Private DNS Zones are Azure-managed authoritative zones that exist outside any VNet but get linked to VNets. When a zone is linked, 168.63.129.16 can resolve names in it from that VNet. The most important zones are the privatelink.* zones — one exists for every Azure PaaS service (Blob, SQL, Key Vault, etc.) and they map service hostnames to private endpoint IPs. Without a correct private zone, a private endpoint is useless because DNS still returns the public IP.
Auto-registration is a separate feature: link a zone named e.g. internal.contoso.com to a VNet with auto-registration enabled, and Azure automatically creates A records for every VM in that VNet. Useful for simple intra-VNet name resolution without managing records manually.
DNS Private Resolver is a fully managed, scalable DNS proxy service deployed into a VNet subnet (/28 minimum). It has two endpoint types. The inbound endpoint gets a static private IP — this is what you point all your spoke VNets’ custom DNS settings at, and what you configure on-prem DNS to forward Azure-destined queries to. The outbound endpoint is used by forwarding rulesets to reach external DNS servers (on-prem). Before DNS Private Resolver existed, people ran custom DNS VMs (Windows Server or BIND) in the hub — the resolver replaces that with a managed, zone-redundant service.
Forwarding rulesets are attached to the outbound endpoint of the resolver. They’re just ordered lists of <domain suffix> → <target DNS IP> rules. The catch-all dot (.) rule is critical — it determines where unmatched queries go. Typically that’s 168.63.129.16 so Azure private zones still work for everything else. Rulesets can be associated with multiple VNets, which makes them very powerful in hub-and-spoke: one ruleset attached to the hub propagates to all linked spokes.
The hybrid DNS loop
The trickiest part of Azure DNS is making it work symmetrically between cloud and on-premises:
On-premises → Azure: configure a conditional forwarder on your on-prem DNS server for each privatelink.* zone (and any Azure-private zones) pointing to the resolver’s inbound endpoint IP. Traffic flows: on-prem workstation → on-prem DNS → resolver inbound endpoint → 168.63.129.16 → private zone → private endpoint IP.
Azure → on-premises: configure a forwarding ruleset rule for your corporate domains (e.g. corp.local) pointing to your on-prem DNS server IP, reachable over the VPN/ExpressRoute. Traffic flows: Azure VM → resolver → ruleset matches → on-prem DNS → answer returned.
Common pitfalls
The most frequent DNS problem in Azure is a Private Endpoint resolving to its public IP instead of its private IP. This happens when the private zone isn’t linked to the VNet making the query, or when a spoke VNet is using the default 168.63.129.16 directly (bypassing the resolver) and the zone is only linked to the hub. The fix: link private zones to all VNets that need resolution, or ensure all VNets point their DNS to the resolver inbound endpoint.
The second most frequent issue is forgetting to set custom DNS on spoke VNets after creating them. The Azure default (168.63.129.16) works fine for public names but can’t do conditional forwarding. Always explicitly set the DNS server to the resolver inbound IP via the VNet’s DNS servers setting, then restart VMs so they pick up the new DHCP-assigned DNS server.