An Azure Landing Zone is basically the foundation of your cloud environment—a pre-configured setup in Microsoft Azure that ensures everything you build is secure, scalable, and well-organized from day one.
🧱 What is an Azure Landing Zone?
Think of it like setting up the rules and structure before building a city.
An Azure Landing Zone provides:
A standardized environment
Built using best practices (security, governance, networking)
Ready for workloads (apps, data, services) to be deployed
It’s part of the Cloud Adoption Framework (CAF) by Microsoft.
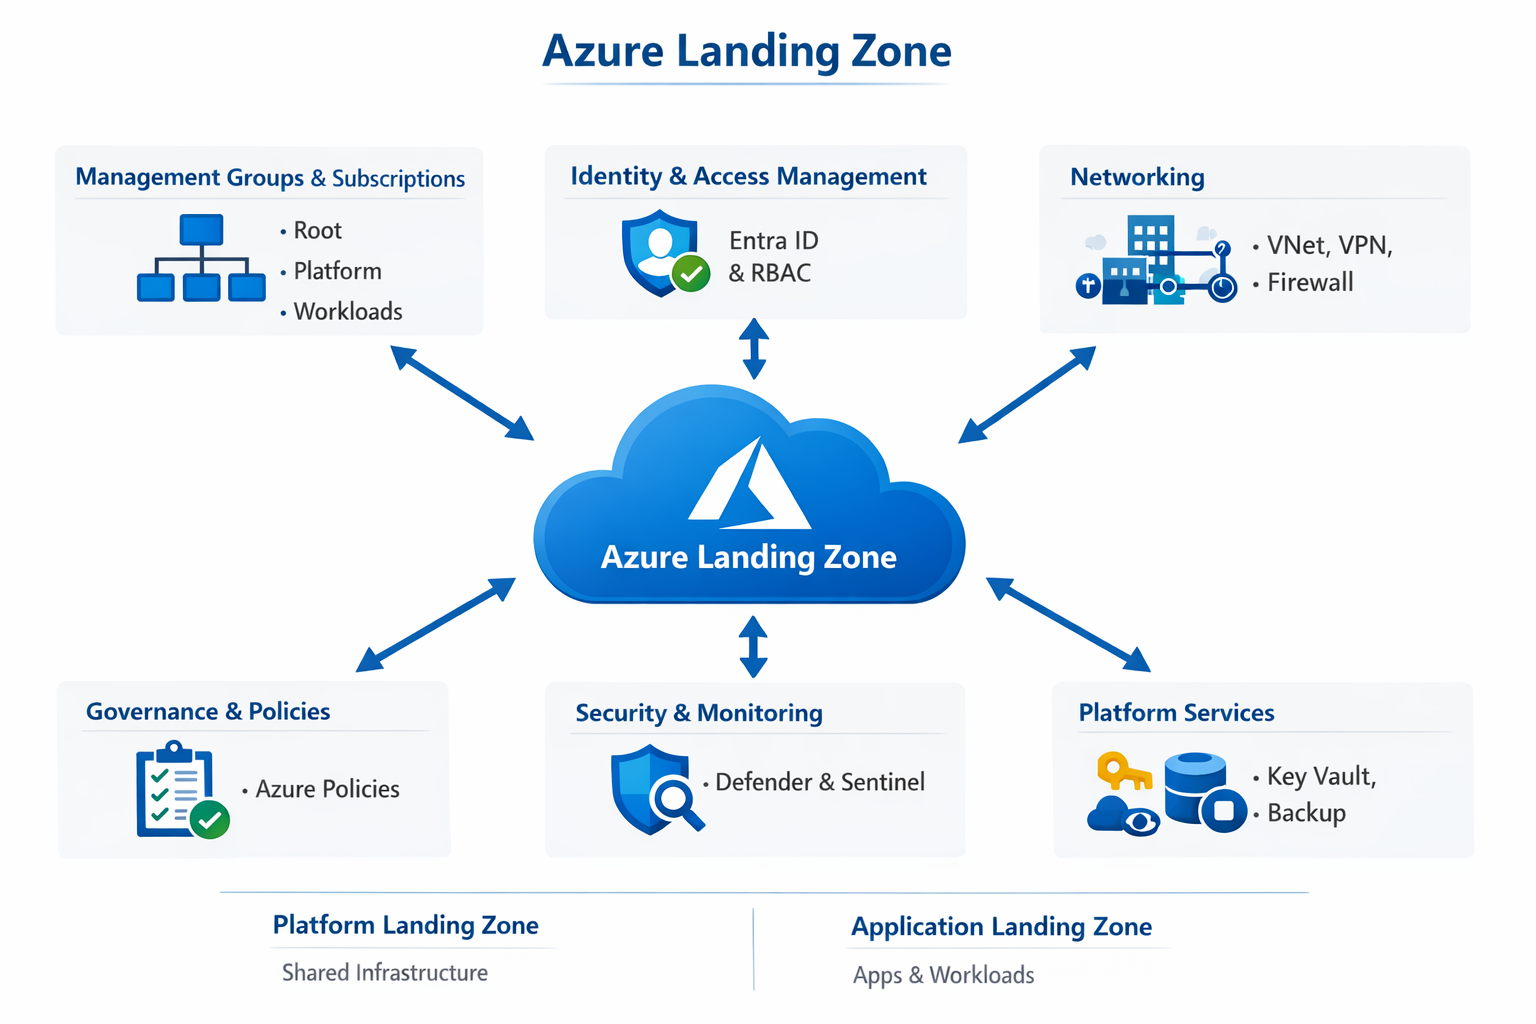
“An Azure Landing Zone is a pre-configured, enterprise-ready environment in Microsoft Azure that provides the foundational setup for deploying workloads securely and consistently. It includes key components like management groups and subscriptions for organization, identity and access management through Entra ID, hub-and-spoke networking, and governance using Azure Policies.
It also integrates security and monitoring tools like Defender for Cloud and Sentinel, along with shared platform services such as Key Vault. The goal is to enforce best practices from the start—covering security, compliance, and scalability—so teams can deploy applications without worrying about underlying infrastructure standards.
In practice, I’ve seen Landing Zones implemented using Infrastructure as Code with tools like Terraform or Bicep, combined with CI/CD pipelines, to ensure everything is repeatable and governed automatically.”
An Azure Landing Zone is the “plumbing and wiring” of your cloud environment. It is a set of best practices, configurations, and governance rules that ensure a subscription is ready to host workloads securely and at scale.
If you think of a workload (like a website or database) as a house, the Landing Zone is the city block—it provides the electricity, water, roads, and security so the house can function.
🏛️ The Conceptual Architecture
A landing zone follows a Hub-and-Spoke design, ensuring that common services (like firewalls and identity) aren’t repeated for every single application.
1. The Management Group Hierarchy
Instead of managing one giant subscription, you organize them into “folders” called Management Groups:
Platform: Contains the “Engine Room” (Identity, Management, and Connectivity).
Workloads (Landing Zones): Where your actual applications live (Production, Development, Sandbox).
Decommissioned: Where old subscriptions go to die while retaining data for audit.
🏗️ The 8 Critical Design Areas
When you build a landing zone, you must make decisions in these eight categories:
Enterprise Agreement (EA) & Tenants: How you bill and manage the top-level account.
Identity & Access Management (IAM): Setting up Microsoft Entra ID and RBAC.
Network Topology: Designing the Hub-and-Spoke, VNet peering, and hybrid connectivity (VPN/ExpressRoute).
Resource Organization: Establishing a naming convention and tagging strategy.
Security: Implementing Defender for Cloud and Azure Policy.
Management: Centralizing logging in a Log Analytics Workspace.
Governance: Using Azure Policy to prevent “shadow IT” (e.g., “No VMs allowed outside of East US”).
Deployment: Using Infrastructure as Code (Terraform, Bicep, or Pulumi) to deploy the environment.
🚀 Two Main Implementation Paths
A. “Platform” Landing Zone (The Hub)
This is the central infrastructure managed by your IT/Cloud Platform team.
Connectivity Hub: Contains Azure Firewall, VPN Gateway, and Private DNS Zones.
Identity: Dedicated subscription for Domain Controllers or Entra Domain Services.
Management: Centralized Log Analytics and Automation accounts.
B. “Application” Landing Zone (The Spoke)
This is a subscription handed over to a development team.
It comes pre-configured with network peering back to the Hub.
It has Policies already applied (e.g., “Encryption must be enabled on all disks”).
The dev team has “Contributor” rights to build their app, but they cannot break the underlying network or security rules.
🛠️ How do you actually deploy it?
Microsoft provides the “Accelerator”—a set of templates that allow you to deploy a fully functional enterprise-scale environment in a few clicks or via code.
Portal-based: Use the “Azure Landing Zone Accelerator” in the portal.
While both Service Endpoints and Private Endpoints are designed to secure your traffic by keeping it on the Microsoft backbone network, they do so in very different ways.
The simplest way to remember the difference is: Service Endpoints secure a public entrance, while Private Endpoints build a private side door.
🛠️ Service Endpoints
Service Endpoints “wrap” your virtual network identity around an Azure service’s public IP.
The Connection: Your VM still talks to the Public IP of the service (e.g., 52.x.x.x), but Azure magically reroutes that traffic so it never leaves the Microsoft network.
Granularity: It is broad. If you enable a Service Endpoint for “Storage,” your subnet can now reach any storage account in that region via the backbone.
On-Premise: Does not work for on-premise users. A user in your office cannot use a Service Endpoint to reach a database over a VPN.
Cost: Completely Free.
🔒 Private Endpoints (Powered by Private Link)
Private Endpoints actually “inject” a specific service instance into your VNet by giving it a Private IP address from your own subnet.
The Connection: Your VM talks to a Private IP (e.g., 10.0.0.5). To the VM, the database looks like just another server in the same room.
Granularity: Extremely high. The IP address is tied to one specific resource (e.g., only your “Production-DB”). You cannot use that same IP to reach a different database.
On-Premise:Fully supports on-premise connectivity via VPN or ExpressRoute. Your office can reach the database using its internal 10.x.x.x IP.
Cost: There is a hourly charge plus a fee for data processed (roughly $7-$8/month base + data).
📊 Comparison Table
Feature
Service Endpoint
Private Endpoint
Destination IP
Public IP of the Service
Private IP from your VNet
DNS Complexity
None (Uses public DNS)
High (Requires Private DNS Zones)
Granularity
Subnet to All Services in Region
Subnet to Specific Resource
On-Prem Access
No
Yes (via VPN/ExpressRoute)
Data Exfiltration
Possible (if not restricted)
Protected (bound to one instance)
Cost
Free
Paid (Hourly + Data)
🚀 Which one should you use?
Use Service Endpoints if:
You have a simple setup and want to save money.
You only need to connect Azure-to-Azure (no on-premise users).
You don’t want to deal with the headache of managing Private DNS Zones.
Use Private Endpoints if:
Security is your #1 priority (Zero Trust).
You need to reach the service from your on-premise data center.
You must strictly prevent “Data Exfiltration” (ensuring employees can’t copy data from your VNet to their own personal storage accounts).
You are in a highly regulated industry (Finance, Healthcare, Government).
Expert Tip: In 2026, most enterprises have moved toward Private Endpoints as the standard. While they are more expensive and harder to set up (DNS is the biggest hurdle), they offer the “cleanest” security architecture for a hybrid cloud environment.
It sounds like you are describing a “Traffic Spike” or perhaps a “Burst” in resource usage. Since there are no alerts, you are in “detective mode,” looking for a silent surge that hasn’t crossed a threshold yet but is clearly visible in your telemetry.
If you heard “frost,” you might be referring to “Cold Start” spikes (common in Serverless/Functions) or a “Request Spike.” Here are the steps to track down the source of a sudden surge in Azure:
🔍 Step 1: Use Azure Monitor “Metrics Explorer”
Since you don’t have alerts, you need to visualize the spike to see its “shape.”
Go to the resource (e.g., App Service, VM, or Load Balancer).
Select Metrics from the left menu.
Add the Request Count (for apps) or CPU/Network In (for VMs) metric.
The Secret Step: Change the “Aggregation” to Count or Sum and look for the exact timestamp of the spike.
Apply Splitting: Split the metric by “RemoteIP” or “Instance”. This tells you if the spike is coming from one specific user/IP or hitting one specific server.
🕵️ Step 2: Dig into Log Analytics (KQL)
If the metrics show a spike but not the “who,” you need the logs. This is where you find the “Source.”
Go to Logs (Log Analytics Workspace).
Run a query to find the top callers during that spike period.
Example KQL for App Gateways/Web Apps:
Code snippet
// Find the top 10 IP addresses causing the spike
AzureDiagnostics
| where TimeGenerated > datetime(2026-04-10T12:00:00Z) // Set to your spike time
| where Category == "ApplicationGatewayAccessLog"
| summarize RequestCount = count() by clientIP_s
| top 10 by RequestCount
Result: If one IP address has 50,000 requests while others have 10, you’ve found a bot or a misconfigured client.
If the spike is happening inside your application code (e.g., a “Cold Start” or a heavy API call):
Go to Application Insights > Failures or Performance.
Look at the “Top 10 Operations”.
Check if a specific API endpoint (e.g., /api/export) suddenly jumped in volume.
Use User Map to see if the traffic is coming from a specific geographic region (e.g., a sudden burst of traffic from a country you don’t usually service).
🗺️ Step 4: Network Watcher (Infrastructure Level)
If you suspect the spike is at the “packet” level (like a DDoS attempt or a backup job gone rogue):
Go to Network Watcher > NSG Flow Logs.
Use Traffic Analytics. It provides a map showing which VNets or Public IPs are sending the most data.
Check for “Flows”: It will show you the “Source Port” and “Destination Port.” If you see a spike on Port 22 (SSH) or 3389 (RDP), someone is likely trying to brute-force your VMs.
🤖 Step 5: Check for “Auto-Scaling” Events
Sometimes the “spike” isn’t a problem, but a reaction.
Go to Activity Log.
Filter for “Autoscale” events.
If the spike happened exactly when a new instance was added, the “spike” might actually be the resource “warming up” (loading caches, etc.), which can look like a surge in CPU or Disk I/O.
Summary Checklist:
Metrics Explorer: To see when it happened and how big it was.
Log Analytics (KQL): To find the specific Client IP or User Agent.
Traffic Analytics: To see if it was a Network-level burst.
Activity Log: To see if any Manual Changes or Scaling occurred at that exact second.
A common real-world “mystery spike” case. Since you mentioned “frost spike” and “source space,” you are likely referring to a Cost Spike or a Request/Throughput Spike in your resource namespace.
If there are no alerts firing, it means the spike either didn’t hit a specific threshold or was too brief to trigger a standard “Static” alert.
🏗️ Step 1: Establish the “When” and “What”
First, you need to see the “DNA” of the spike using Azure Monitor Metrics.
Look at the Graph: Is it a “Square” spike (starts and stops abruptly, like a scheduled job)? Or a “Needle” spike (hits a peak and drops, like a bot attack)?
Identify the Resource: Go to Metrics Explorer and check:
For VMs:Percentage CPU or Network In/Out.
For Storage/SQL:Transactions or DTU Consumption.
For App Services:Requests or Data In.
🔍 Step 2: Finding the Source (The Detective Work)
Since you don’t know where it came from, you use “Splitting” and “Filtering” in Metrics Explorer.
Split by Instance/Role: If you have 10 servers, split by InstanceName. Does only one server show the spike? If yes, it’s a local process (like a hanging Windows Update or a log-rotation fail).
Split by Operation: For Storage or SQL, split by API Name. Is it GetBlob? PutBlob? This tells you if you are reading too much or writing too much.
Split by Remote IP: If your load balancer shows the spike, split by ClientIP. If one IP has 100x the traffic of others, you’ve found your source.
🕵️ Step 3: Deep Dive with Log Analytics (KQL)
Metrics only show numbers. Logs show names. You need to run a KQL query in your Log Analytics Workspace.
Query to find “Who is talking to me”:
Code snippet
// This finds the top 5 callers during the spike window
AzureDiagnostics
| where TimeGenerated > datetime(2026-04-10T12:00:00Z) // Use your spike time
| summarize RequestCount = count() by clientIp_s, requestUri_s
| top 5 by RequestCount
Result: This will literally list the IP address and the specific URL they were hitting.
💰 Step 4: The “Cost” Investigation
If the spike is financial (a “Cost Spike”), you check Azure Cost Management.
Cost Analysis: View cost by Resource. Did one specific Disk or Data Transfer cost jump?
Check for “Orphaned” Resources: Sometimes a spike comes from a process that created 1,000 snapshots or temporary disks and forgot to delete them.
🤖 Step 5: Check the “Silent” Sources
If the metrics and logs don’t show an external attacker, check internal Azure “automated” sources:
Resource Graph: Check for “Change Tracking.” Did someone deploy code or change a firewall rule at that exact minute?
Backup/Recovery Services: A “huge spike” in disk I/O often aligns with a Storage Snapshot or an Azure Backup job starting.
Defender for Cloud: Even if you don’t have a “Metric Alert,” check the Security Alerts. Defender might have seen the spike and flagged it as “Suspicious PowerShell Activity” or “Port Scanning.”
✅ Summary Checklist
Step
Action
Tool
1. Visualize
See the shape and duration of the spike.
Metrics Explorer
2. Isolate
Split metrics by IP or Instance.
Metrics Explorer
3. Identify
Run a query to find the specific Client IP or User.
Log Analytics (KQL)
4. Correlate
Check if any “Deployments” happened at that time.
Activity Log / Change Analysis
5. Network
Check for massive data transfers between regions.
Network Watcher / Traffic Analytics
How to prevent this next time? Once you find the source, create a Dynamic Threshold Alert. Unlike static alerts, these use AI to learn your “normal” pattern and will fire if a spike looks “unusual,” even if it doesn’t hit a high maximum number.
The “most secure” identity in Azure is the Managed Identity.
It is considered the gold standard because it eliminates the need for developers to manage credentials (passwords, secrets, or certificates) entirely. Since there are no credentials to leak or rotate, it essentially removes the “human error” element from authentication.
🏆 The Most Secure: Managed Identity
A Managed Identity is a special type of Service Principal that is automatically managed by Azure.
No Secrets: You never see the password; Azure handles it in the background.
Automatic Rotation: Azure rotates the credentials automatically on a regular schedule.
Lifecycle Bonded: If you delete the Virtual Machine or App Service, the identity is automatically deleted with it.
👥 How many types of ID are in Azure?
In the world of Microsoft Entra ID (formerly Azure AD), there are 4 main categories of identities, though the family is expanding with the introduction of AI-specific IDs.
1. Human Identities
Internal Users: Your employees and staff members.
External Identities (B2B/B2C): Guests, partners, or customers who use their own emails (Gmail, Outlook, etc.) to log into your apps.
2. Workload Identities (Non-Human)
Managed Identities: (The “Most Secure” choice mentioned above).
Service Principals: Used by applications or automated tools (like GitHub Actions or Jenkins) to access Azure resources. Unlike Managed Identities, these require you to manage secrets or certificates manually.
3. Device Identities
Azure AD Joined: Corporate devices owned by the organization.
Registered Devices: Personal “Bring Your Own Device” (BYOD) equipment.
4. Agent Identities (New in 2026)
AI Agent IDs: With the rise of AI, Microsoft introduced Agent ID. These are specialized identities for AI agents and autonomous bots, allowing them to perform tasks on behalf of users with specific governance and “blueprints” to keep them from going rogue.
💡 Quick Comparison: Managed Identity vs. Service Principal
Feature
Managed Identity
Service Principal
Credentials
Managed by Azure (Invisible)
Managed by You (Secrets/Certs)
Credential Rotation
Automatic
Manual (or scripted)
Risk of Leakage
Extremely Low
High (if secret is hardcoded)
Best For
Azure-to-Azure communication
External apps / CI-CD pipelines
Bottom Line: If your app is running inside Azure, always use a Managed Identity. If it’s running outside Azure (like on-prem or in AWS), use a Service Principal.
The Hub-and-Spoke architecture is the gold standard for enterprise networking in Azure. It’s designed to centralize shared resources while providing isolation for individual workloads, effectively balancing security with scalability.
Think of it like an airport: the Hub is the main terminal (security, baggage, customs), and the Spokes are the individual gates where the planes (your apps) live.
1. The Hub: The “Central Command”
The Hub is a Virtual Network (VNet) that acts as the central point of connectivity. It typically contains resources shared by the entire organization.
Azure Firewall / NVA: All traffic entering or leaving the network passes through here for inspection.
VPN / ExpressRoute Gateway: Connects your on-premises data center to the Azure environment.
Shared Services: Domain Controllers (ADDS), DNS servers, or specialized management tools.
Azure Bastion: Provides secure RDP/SSH access to VMs without exposing public IPs.
2. The Spokes: Isolated Workloads
Spokes are separate VNets used to host specific workloads, such as a production environment, a dev/test environment, or a specific business application.
Isolation: Spokes do not communicate with each other by default. This “Zero Trust” approach ensures that if one spoke is compromised, the threat is contained.
Connectivity: Each spoke is connected to the Hub via VNet Peering.
Resource Management: Spokes are often managed by different teams but still rely on the Hub for security and connectivity.
3. How Traffic Flows (Routing)
The “magic” of the Hub-and-Spoke model lies in how data moves through the network.
Spoke-to-Internet: Traffic is usually forced through the Hub’s Firewall using User Defined Routes (UDRs). This ensures no application can “talk” to the internet without being inspected.
Spoke-to-Spoke: If Spoke A needs to talk to Spoke B, the traffic must travel to the Hub, be inspected by the Firewall, and then be routed back out to the destination spoke.
On-Premises-to-Spoke: The Hub acts as the gateway. External traffic hits the VPN/ExpressRoute in the Hub and is then routed to the correct Spoke.
4. Why Use This Alignment?
Feature
Benefit
Cost Efficiency
You only pay for one Firewall and one VPN Gateway in the Hub, rather than putting them in every Spoke.
Security
Centralized “choke point” for security policies and traffic monitoring.
Scalability
You can add new Spokes easily without redesigning the core network.
Governance
Central IT can manage the Hub (security), while App Teams manage their own Spokes (agility).
5. The “Virtual WAN” Evolution
For very large global deployments, Microsoft offers Azure Virtual WAN. This is essentially “Hub-and-Spoke as a Service.” It automates the peering and routing, making it easier to manage hundreds of spokes across different geographic regions.
To implement this for a new migration
If you are starting a new migration, aligning your Hub-and-Spoke architecture with the Azure Landing Zone (ALZ) framework is the best move. It ensures you don’t just build a “network,” but a governed ecosystem that can grow from 10 VMs to 1,000 without a redesign.
Here is the blueprint for aligning a new migration to the Hub-and-Spoke model in 2026.
1. The Hierarchy (Management Groups)
Before touching the network, you must organize your subscriptions. Alignment starts with Management Groups (MGs).
Interim/Sandbox MG: For initial migration testing.
Platform MG: Holds your Hub subscription (Connectivity, Identity, Management).
Landing Zones MG: Holds your Spoke subscriptions, organized by archetype (e.g., “Corp” for internal apps, “Online” for public apps).
2. Connectivity: Hub vs. Spoke Strategy
The Hub (Centralized Services)
In a new migration, the Hub is your “Landing Strip.” It should be deployed first and contain:
Azure Firewall: Acts as the central security guard for all “North-South” (Internet) and “East-West” (Spoke-to-Spoke) traffic.
Private DNS Resolver: Critical for migrations. It ensures your migrated Azure VMs can still resolve names of servers remaining on-premises.
Gateway Subnet: Where your VPN or ExpressRoute lands to connect your old data center to the new cloud environment.
The Spokes (Workload Isolation)
Each application or business unit gets its own Spoke VNet.
VNet Peering: Connect each Spoke to the Hub.
Gateways: Spokes should not have their own VPN gateways. They “use the remote gateway” in the Hub to reach on-premises.
3. The Migration “Paved Path”
To make the migration repeatable, use a Subscription Vending Machine approach.
Step
Action
Why?
1. Standardize
Use Infrastructure as Code (IaC) (Bicep or Terraform).
Avoids “snowflake” configurations that are hard to support.
2. Secure
Apply Azure Policy at the Landing Zone MG level.
Automatically prevents Spokes from creating Public IPs or bypassing the Firewall.
3. Route
Deploy User Defined Routes (UDRs) in every Spoke subnet.
Forces all traffic (0.0.0.0/0) to the Hub Firewall for inspection.
4. Migrate
Use Azure Migrate or Azure Site Recovery (ASR).
Replicates your on-prem VMs directly into the designated Spoke VNets.
4. Key 2026 Best Practices
Identity-First Security: Don’t just rely on the network. Use Microsoft Entra ID (formerly Azure AD) and Managed Identities for all migrated apps.
Private Link Everything: Instead of opening ports, use Private Endpoints in your Spokes to connect to PaaS services (like SQL or Storage) privately.
Observability: Connect all Spokes to a central Log Analytics Workspace in the Hub’s “Management” subscription for a single pane of glass during the migration cutover.
5. Pro-Tip: Use the “ALZ Accelerator”
Microsoft provides a Landing Zone Accelerator (available in the Azure Portal or via GitHub). It allows you to deploy a fully compliant Hub-and-Spoke foundation in about 20 minutes. It handles the management groups, policies, and core networking for you, so you can focus on moving your data rather than building the pipes.
Warning: During a migration, watch out for IP Address Overlap. Ensure the CIDR ranges you choose for your Azure Spokes do not conflict with your existing on-premises network or you won’t be able to peer them.
Are you planning to move physical/virtual servers (IaaS) or are you refactoring directly into platform services (PaaS)?
Enterprise RAG Pipeline & Internal AI AssistantAzure Ecosystem: ADF, ADLS Gen2, Databricks, AI Search, OpenAI
2. Impact-Driven Bullet Points
Use the C-A-R (Context-Action-Result) method. Choose 3-4 from this list:
Architecture: Architected and deployed a multi-stage data lake (Medallion Architecture) using ADLS Gen2 and Terraform, reducing data fragmentation across internal departments.
Orchestration: Developed automated Azure Data Factory (ADF) pipelines with event-based triggers to ingest and preprocess 5,000+ internal documents (PDF/Office) with 99% reliability.
AI Engineering: Built a Databricks processing engine to perform recursive character chunking and vector embedding using text-embedding-3-large, optimizing retrieval context for a GPT-4o powered chatbot.
Search Optimization: Implemented Hybrid Search (Vector + Keyword) and Semantic Ranking in Azure AI Search, improving answer relevance by 35% compared to traditional keyword-only search.
Security & Governance: Integrated Microsoft Entra ID and ACL-based Security Trimming to ensure the AI assistant respects document-level permissions, preventing unauthorized data exposure.
Cost Management: Optimized cloud spend by 40% through Databricks Serverless compute and automated ADLS Lifecycle Management policies (Hot-to-Cold tiering).
In your Professional Summary or Project Description, add one sentence that proves you know the real-world challenges of AI:
“Implemented a production-ready RAG system that solves for LLM hallucinations by enforcing strict citation requirements and PII redaction during the ingestion phase.”
Pro-Tip for 2026:
Hiring managers currently care deeply about “Day 2 Operations.” If they ask about this project in an interview, mention how you monitored it for Cost (Azure Budgets) and Quality (using an evaluation framework like Ragas or Azure AI Content Safety). This proves you aren’t just a “tutorial follower” but a production-ready engineer.
To deploy Azure Databricks using Terraform, you need to set up three main components: a Resource Group, the Databricks Workspace, and the Network Security Group (optional but recommended).
Below is a clean, modular example. This configuration uses the “standard” pricing tier, which is usually sufficient for internal RAG testing.
1. The Terraform Configuration (main.tf)
Terraform
# 1. Define the Provider
terraform {
required_providers {
azurerm = {
source = "hashicorp/azurerm"
version = "~> 3.0" # Use the latest stable 3.x version
# 4. Output the Workspace URL (You'll need this to log in)
output "databricks_host" {
value = azurerm_databricks_workspace.example.workspace_url
}
2. Crucial Architecture Notes for Terraform
The Managed Resource Group: Databricks is a “Managed Service.” When you run the code above, Azure will automatically create a second resource group (e.g., rg-dbw-managed-resources). You should not manually delete items inside that group; Terraform and Databricks manage them.
SKU Selection:
Standard: Cheaper, but lacks advanced security.
Premium:Required if you want to use Unity Catalog or User-level Permissions, which are essential for your internal RAG system’s security.
VNet Injection (Advanced): If your company requires the Databricks clusters to stay entirely off the public internet, you would need to add a custom_parameters block to the resource to “inject” it into your own Virtual Network.
3. How to Deploy
Initialize: Download the Azure providers.Bashterraform init
Plan: Preview what will be created.Bashterraform plan
Apply: Deploy to Azure (you will be prompted to type yes).Bashterraform apply
4. Next Steps for your RAG Pipeline
Once this workspace is deployed, you will likely want to use Terraform to create Personal Access Tokens (PATs) or Service Principals so that Azure Data Factory (ADF) has permission to trigger Databricks jobs.
II . Add the ADLS Storage Account and ADF to this same Terraform script so they are all connected automatically
This is the “Enterprise Starter Kit” in Terraform. This code creates the resource group, the ADLS Gen2 storage (the reservoir), the Data Factory (the pipes), and the Databricks Workspace (the engine), then connects them so they can talk to each other.
The Integrated Terraform Script
Terraform
# 1. Resource Group
resource "azurerm_resource_group" "main" {
name = "rg-internal-rag-prod"
location = "East US"
}
# 2. ADLS Gen2 Storage (The Warehouse)
resource "azurerm_storage_account" "adls" {
name = "stdatalakeprod001" # Must be unique globally
is_hns_enabled = true: This is the most critical line. Without it, you just have a slow, flat blob storage. This enables the high-speed folder structure for your data lake.
Managed Identity (SystemAssigned): Notice there are no passwords or “Access Keys” in this code. ADF uses its own identity to log into Databricks. This is the gold standard for internal security.
sku = "premium": In an internal environment, you need “Premium” so you can enable Unity Catalog. This ensures that if a user doesn’t have permission to see an HR file in the Data Lake, the Databricks AI code won’t be able to read it either.
Automatic Cluster: The new_cluster_config block tells Data Factory to spin up a Databricks cluster only when it’s needed and shut it down immediately after, saving your department significant money.
How to use this:
Save this as main.tf.
Run terraform init and terraform apply.
Once finished, go to the Azure Portal and you will see your entire data ecosystem ready to be loaded with documents.
III. Terraform code to deploy the Azure AI Search service to complete the RAG stack
To complete your Internal RAG stack, we need to add Azure AI Search. In 2026, this service is the “Vector Database” that allows your chatbot to find the right paragraphs within your internal documents.
The Final Terraform Piece: Azure AI Search
Add this block to your existing main.tf file. It deploys the Search service with Semantic Ranking enabled—which is the “secret sauce” for high-accuracy internal bots.
# 'basic' or 'standard' is required for Semantic Ranker and Vector Search
sku = "basic"
# Enabling Semantic Search (Standard plan for the ranker)
semantic_search_sku = "standard"
# Identity for secure connection to ADLS and OpenAI
identity {
type = "SystemAssigned"
}
tags = {
Project = "Internal-RAG"
}
}
# Output the Search Admin Key (for your App/Chatbot)
output "search_admin_key" {
value = azurerm_search_service.search.primary_key
sensitive = true
}
output "search_endpoint" {
value = "https://${azurerm_search_service.search.name}.search.windows.net"
}
How it all fits together (The Finished Product)
You now have a fully automated infrastructure code that creates:
ADLS Gen2: Where your raw internal PDFs and Docs are stored.
Azure Data Factory: The engine that “watches” for new files and tells the system to update.
Azure Databricks: The brain that cleans data and can perform complex AI “chunking” of your documents.
Azure AI Search: The searchable index that your chatbot queries to get answers.
2026 Pro-Tip: “Integrated Vectorization”
In 2026, you don’t actually need to write Python code to turn text into vectors. You can configure Azure AI Search to connect directly to your ADLS (using the adlsgen2 data source type) and it will:
Automatically “crack” the PDFs.
Chunk the text.
Call Azure OpenAI to create vectors.
Keep the index updated whenever a file in ADLS changes.
Final Step for Security
Since this is an Internal system, remember to go into the Azure Portal (or add to Terraform) a Role Assignment. You must give the Search Service’s Managed Identity the role of Storage Blob Data Reader on your ADLS account so it can “read” the files to index them.
IV. Terraform code to add the LLM to this stack as well
To finish the “Brain” of your RAG system, we will add Azure OpenAI. This provides the Embedding Model (to turn text into math/vectors) and the GPT Model (to actually talk to your employees).
In 2026, the best practice is to deploy these as “Account Deployments” within a single Azure OpenAI resource.
7. Azure OpenAI Resource & Models
Add this to your main.tf. This script creates the AI service and deploys two specific models:
text-embedding-3-large: For high-accuracy vector search.
gpt-4o: The “Omni” model for fast, reasoning-based chat.
Terraform
# 7. Azure OpenAI Service
resource "azurerm_cognitive_account" "openai" {
name = "oai-internal-rag-brain"
location = "East US" # Check availability for gpt-4o in your region
[ ] Region: Ensure all services (especially OpenAI and AI Search) are in the same region to minimize latency and data egress costs.
[ ] Quotas: Check your Azure subscription for “Cognitive Services” quotas; sometimes new subscriptions have a limit on GPT-4o capacity.
[ ] Cost: Remember to turn off your Databricks clusters when not in use—they are the most expensive part of this stack!
V. Infrastructure is defined, the Python/Spark code you’ll need inside Databricks to start processing those internal documents
To get your internal RAG system running, you need a Databricks Notebook that acts as the bridge between your documents in ADLS and the searchable index in Azure AI Search.
In 2026, the most efficient way to do this is using Spark for parallel processing and the langchain-azure-ai library for the AI logic.
1. Library Installation
Run this in the first cell of your Databricks notebook to install the 2026-standard libraries.
RecursiveCharacterTextSplitter: This ensures that chunks don’t break in the middle of a word, which helps the LLM maintain “contextual integrity.”
text-embedding-3-large: We use the latest 2026 embedding model because it supports MRL (Matryoshka Representation Learning), allowing you to store smaller vectors without losing accuracy—saving you money on storage.
Managed Identity: In a real production setup, you would replace SEARCH_KEY with DefaultAzureCredential() so no keys are ever visible in the code.
4. How the Chatbot Queries this Data
Once that script runs, your “Search Index” is full. When a user asks a question, your backend app (likely a Python Web App or Azure Function) runs this simple logic:
# Pass 'docs' to GPT-4o to get the final human-friendly answer
Summary of your Pipeline
ADF detects the file.
Databricks (using the code above) reads the file.
Databricks chunks it and calculates the math (embeddings).
Azure AI Search stores the result.
Your infrastructure and code are now fully aligned, setting up the User Interface (like a Streamlit or React app) to actually talk to this bot
For the final piece of your internal RAG system, you need a user-friendly interface. In 2026, there are two primary paths: the “Pro-Code” way (custom and flexible) and the “Low-Code” way (fast and integrated).
Option 1: The “Low-Code” Way (Azure AI Foundry)
If you want a professional-grade internal portal in under 10 minutes, use the Azure AI Foundry (formerly AI Studio) “Deploy to Web App” feature.
Go to Azure AI Foundry: Open your project.
Open Playground: Select the “Chat” playground.
Setup RAG: Under “Add your data,” select your Azure AI Search index.
Deploy: Click the Deploy to button and select “as a web app”.
Azure will automatically provision an Azure App Service.
It creates a beautiful, ChatGPT-like interface that is pre-connected to your data.
Security: It integrates with Microsoft Entra ID out of the box, so only your employees can log in.
Option 2: The “Pro-Code” Way (Python + Streamlit)
If you want to customize the branding or add specific internal tools (like a “Feedback” button), Streamlit is the industry standard for 2026.
The app.py logic:
Python
import streamlit as st
from langchain_azure_ai.chat_models import AzureChatOpenAI
from langchain_azure_ai.vectorstores import AzureAISearch
from langchain_azure_ai.embeddings import AzureOpenAIEmbeddings
To make your bot actually useful for employees, ensure your UI includes:
Citations: Never show an answer without a link to the source document in ADLS. This builds trust and allows employees to verify the info.
“I Don’t Know” Guardrail: Explicitly tell the LLM in the system prompt: “If the answer is not in the provided documents, say you don’t know. Do not make up facts.”
Feedback Loop: Add a Thumbs Up/Down on every response. You can pipe this feedback back into ADF to log which documents are confusing the AI.
Summary of your Journey
You have successfully moved from raw data to a live AI assistant:
Infrastructure: Deployed via Terraform.
Pipeline: Data moved by ADF into ADLS.
Processing: Cleaned and Vectorized in Databricks.
Retrieval: Indexed and ranked in Azure AI Search.
Interface: Served via App Service or Streamlit.
VII. how to monitor the costs of this stack so you don’t get a surprise bill at the end of the month
Building a RAG system in 2026 is an exercise in consumption-based engineering. Because every PDF page processed and every chat message sent has a price tag, monitoring isn’t just “good hygiene”—it’s a requirement to keep the project alive.
Here is how to monitor and optimize the costs of your specific ADF-ADLS-Databricks-AI Search stack.
1. The “Big Three” Cost Drivers
In your internal RAG architecture, these three will typically account for 90% of your bill:
Service
The Cost Driver
2026 Pro-Tip
Databricks
Cluster uptime (DBUs)
Use Serverless Compute for job runs. It scales to zero the second the processing finishes.
AI Search
Search Units (SUs)
Start with the Basic tier. Don’t move to Standard until your document count exceeds 15GB or 1 million chunks.
Azure OpenAI
Token Consumption
Use gpt-4o-mini for simple summarization and only use gpt-4o for complex reasoning to save up to 80% on tokens.
2. Setting Up “Hard” Guardrails (Azure Budgets)
Don’t wait for the monthly invoice. Set up an automated kill-switch.
Create a Resource Group Budget: Put all your RAG resources (ADF, ADLS, etc.) in one Resource Group.
Set Thresholds: * 50%: Send an email to the team.
90%: Send a high-priority alert to the Manager.
100% (The Nuclear Option): In 2026, you can trigger an Azure Automation Runbook that programmatically disables the Azure OpenAI API keys, instantly stopping further spending.
3. Optimization Checklist by Service
Azure Data Factory (ADF)
Data Integration Units (DIUs): When copying files from SharePoint/On-prem to ADLS, ADF defaults to 4 DIUs. For small internal docs, manually set this to 2 to halve the copy cost.
Avoid Over-Polling: Set your triggers to “Tumbling Window” or “Storage Event” rather than “Schedule” (e.g., checking every 1 minute) to reduce trigger run costs.
Azure Databricks
Auto-Termination: Ensure your clusters are set to terminate after 10 minutes of inactivity.
Photon Engine: Turn on the Photon query engine. While it costs slightly more per hour, it processes data so much faster that the total cost of the job is usually lower.
Azure Data Lake (ADLS)
Lifecycle Management: Set a policy to move files from Hot to Cold storage if they haven’t been accessed in 30 days. Your “Raw/Bronze” data almost never needs to be in the Hot tier.
Azure AI Search
Image Cracking: If your PDFs contain images, “Document Cracking” costs extra ($1 per 1,000 images). If you don’t need to “read” charts or photos, disable image extraction in your indexer settings.
4. 2026 “FinOps for AI” Dashboard
The most effective way to stay under budget is to build a Cost Visibility Dashboard.
Tagging: Ensure every resource in your Terraform code has a Project: Internal-RAG and Department: HR tag.
Cost Analysis: Use the Azure Cost Management tool to group by “Tag.” This allows you to show your stakeholders exactly how much the “HR Bot” is costing per department.
Summary
If you are just starting, your daily “Idle” cost (with everything turned on but no one using it) should be roughly $5–$10/day. If it’s higher, check if a Databricks cluster was left running or if you deployed a “Standard” tier AI Search unnecessarily.
Since we’ve covered the infrastructure, the code, the UI, and the costs, is there any specific part of the internal security (like preventing certain employees from seeing certain files) you’d like to dive into?
If ADF is the plumbing and Databricks is the engine, Azure Data Lake Storage (ADLS) Gen2 is the actual physical warehouse where everything is kept.
In 2026, it remains the standard for “Big Data” because it combines the cheap, limitless nature of Cloud Object Storage with the high-speed organization of a File System.
1. The Secret Sauce: Hierarchical Namespace (HNS)
Standard cloud storage (like Azure Blob or Amazon S3) is “flat.” If you have a file at /logs/2026/March/data.csv, the computer sees that whole string as one long name. To move a folder, it has to copy every single file inside it.
With ADLS Gen2, folders are “real” (Hierarchical Namespace).
Rename/Move: Renaming a folder with 10 million files is instantaneous because it just changes one reference, not 10 million files.
Performance: When a tool like Databricks or Spark asks for “all files in the March folder,” ADLS knows exactly where they are without searching through the entire lake.
2. The Storage Tiers (Cost Savings)
You don’t pay the same price for all data. ADLS allows you to move data between “Tiers” automatically based on how often you touch it:
Hot Tier: Highest cost to store, lowest cost to access. Use this for data you are actively processing in your RAG pipeline today.
Cool/Cold Tier: Lower storage cost, but you pay a fee to read it. Great for data from last month.
Archive Tier: Dirt cheap (pennies per GB). The data is “offline”—it can take a few hours to “rehydrate” it so you can read it again. Perfect for legal compliance backups.
3. Security (ACLs vs. RBAC)
For your Internal RAG system, this is the most important part of ADLS. It uses two layers of security:
RBAC (Role-Based Access Control): Broad permissions (e.g., “John is a Storage Contributor”).
ACLs (Access Control Lists): POSIX-style permissions. You can say “John can see the ‘Public’ folder, but only HR can see the ‘Salaries’ folder.”2026 Update: Azure AI Search now “respects” these ACLs. If you index files from ADLS, the search results will automatically hide files that the logged-in user doesn’t have permission to see in the Data Lake.
4. ADLS Gen2 vs. Microsoft Fabric OneLake
You might hear about OneLake (the “OneDrive for data”). Here is how to tell them apart in 2026:
ADLS Gen2: The “Infrastructure” choice. You have full control over networking, encryption keys, and regions. Best for custom data engineering and Databricks heavy-lifters.
OneLake: The “SaaS” choice. It is actually built on top of ADLS, but it manages the folders and permissions for you automatically within Microsoft Fabric.
Summary Checklist
Format: Use Delta or Parquet for your “Silver” and “Gold” layers. These are compressed and optimized for AI and BI.
Structure: Always follow the Bronze -> Silver -> Gold folder structure to keep your lake from becoming a “data swamp.”
Access: Use Managed Identities so ADF and Databricks can talk to ADLS without you ever having to copy-paste a password or a secret key.
Are you planning to manage the ADLS folders yourself, or is your company moving toward a managed environment like Microsoft Fabric?
In 2026, Azure Databricks is much more than just a “data processing tool.” It is now positioned as a Data Intelligence Platform. While it’s still based on Apache Spark, it has evolved to use AI to help you manage your data, write your code, and govern your security.
Think of it as the high-performance engine of your data factory.
1. The Core Technology: Spark + Delta Lake
At its heart, Databricks does two things exceptionally well:
Apache Spark: A distributed computing engine. If you have 100TB of data, Databricks breaks it into 1,000 tiny pieces and processes them all at the same time across a “cluster” of computers.
Delta Lake: This is the storage layer that sits on top of your ADLS. it gives your “data lake” (files) the powers of a “database” (tables), allowing for things like Undo (Time Travel) and ACID transactions (ensuring data isn’t corrupted if a write fails).
2. New in 2026: The “Intelligence” Layer
The biggest shift recently is that Databricks now uses AI to run its own infrastructure:
Genie Code (formerly Databricks Assistant): An agentic AI built into the notebooks. You can type “Clean this table and create a vector index for my RAG bot,” and it will write and execute the Spark code for you.
Serverless Compute: You no longer need to “size” clusters (deciding how many CPUs/RAM). You just run your code, and Databricks instantly scales the hardware up or down, charging you only for the seconds the code is running.
Liquid Clustering: In the past, data engineers had to manually “partition” data to keep it fast. Now, Databricks uses AI to automatically reorganize data based on how you query it, making searches up to 12x faster.
3. How it fits your RAG System
For your internal chatbot, Databricks is the “Processor” that prepares your data for Azure AI Search:
Parsing: It opens your internal PDFs/Word docs from ADLS.
Chunking: It breaks the text into logical paragraphs.
Embedding: It calls an LLM (like OpenAI) to turn those paragraphs into Vectors.
Syncing: It pushes those vectors into your Search Index.
4. Databricks vs. The Competition (2026)
Feature
Azure Databricks
Microsoft Fabric
Azure SQL
Best For
Heavy Data Engineering & AI
Business Intelligence (BI)
App Backend / Small Data
Language
Python, SQL, Scala, R
Mostly SQL & Low-Code
SQL
Philosophy
“Open” (Files in your ADLS)
“SaaS” (Everything managed)
“Relational” (Strict tables)
Power
Unlimited (Petabyte scale)
High (Enterprise scale)
Medium (GB to low TB)
5. Unity Catalog (The “Traffic Cop”)
In an internal setting, Unity Catalog is the most important part of Databricks. It provides a single place to manage permissions. If you grant a user access to a table in Databricks, those permissions follow the data even if it’s moved or mirrored into other services like Power BI or Microsoft Fabric.
Summary
Use ADF to move the data.
Use ADLS to store the data.
Use Databricks to do the “heavy thinking,” cleaning, and AI vectorization.
Use Azure SQL / AI Search to give the data to your users/bot.