Step to install
yum install collectd
wget https://s3.amazonaws.com/influxdb/influxdb-0.9.3-1.x86_64.rpm
yum localinstall influxdb-0.9.3-1.x86_64.rpm
Step to install
yum install collectd
wget https://s3.amazonaws.com/influxdb/influxdb-0.9.3-1.x86_64.rpm
yum localinstall influxdb-0.9.3-1.x86_64.rpm
my notes for aws Certified Solutions Architect – Associate – exam
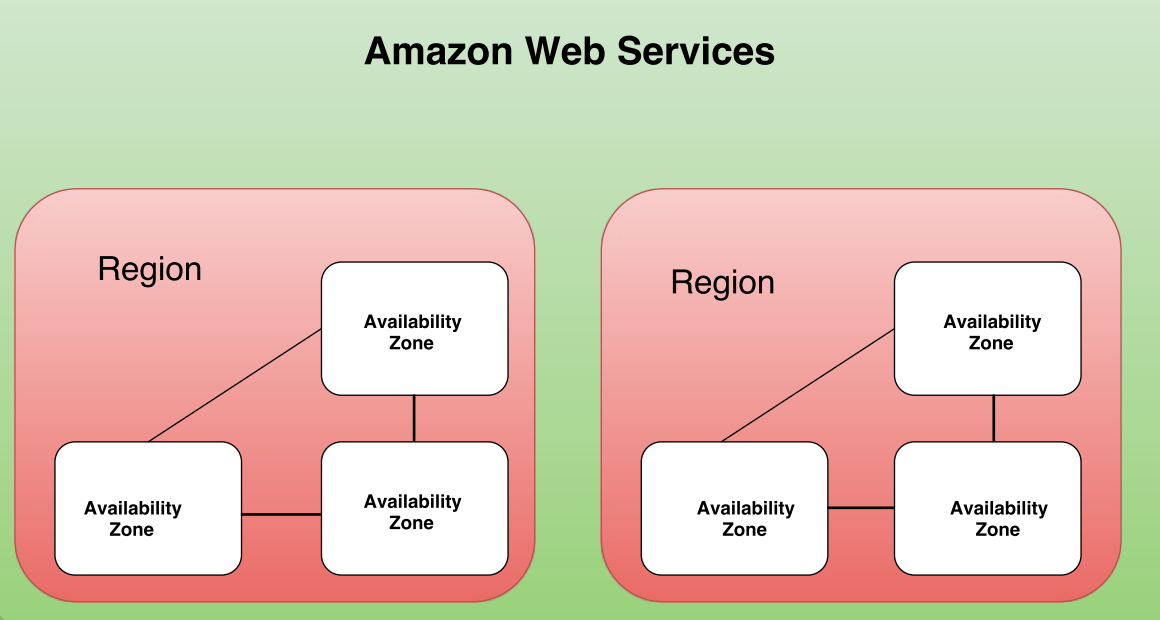
Regions
Each region is completely independent. Each Availability Zone is isolated, but the Availability Zones in a region are connected through low-latency links. The following diagram illustrates the relationship between regions and Availability Zones.
Edge Locations are used in conjunction with the AWS CloudFront service which is Content Delivery Network service. Edge Locations are deployed across the world in multiple locations to reduce latency for traffic served over the CloudFront and as result are usually located in highly populated areas.
1. SECURITY
IAM – Identity Access Management
-With IAM, you can centrally manage users, security credentials such as passwords, access keys, and permissions policies that control which AWS services and resources users can access
-You can use IAM to securely control individual and group access to your AWS resources.
-Currently, IAM users can use their SSH keys only with AWS CodeCommit to access their repositories.
– AWS supports the Security Assertion Markup Language (SAML) 2.0.
-IAM users can have any combination of credentials that AWS supports, such as an AWS access key, X.509 certificate, SSH key, password for web app logins, or an MFA device
* Identity Federation
You can allow users who already have password elsewhere –
You can also grant permissions for users outside of AWS (federated users).
– AWS Identity and Access Management (IAM) supports identity federation for delegated access to the AWS Management Console or AWS APIs. With identity federation, external identities are granted secure access to resources in your AWS account without having to create IAM users. These external identities can come from your corporate identity provider (such as Microsoft Active Directory or from the AWS Directory Service) or from a web identity provider (such as Amazon Cognito, Login with Amazon, Facebook, Google, or any OpenID Connect-compatible provider).
Multi-Factor Authentication
AWS-MFA provides an extra level of security that you can apply to your AWS environment.
AWS multi-factor authentication (AWS MFA) provides an extra level of security that you can apply to your AWS environment. You can enable AWS MFA for your AWS account and for individual AWS Identity and Access Management (IAM) users you create under your account.
– Hardware MFA device
– Virtual MFA device
**Identity Providers and Federation
If you already manage user identities outside of AWS, you can use IAM identity providers instead of creating IAM users in your AWS account. With an identity provider (IdP), you can manage your user identities outside of AWS and give these external user identities permissions to use AWS resources in your account. This is useful if your organization already has its own identity
system, such as a corporate user directory. It is also useful if you are creating a mobile app or web application that requires access to AWS resources.
*** IAM Role management
An IAM role is an IAM entity that defines a set of permissions for making AWS service requests
– You can only associate an IAM role while launching an EC2 instance
**** Temporary Security Credentials
**** Identity Federation
AWS Identity and Access Management (IAM) supports identity federation for delegated access to the AWS Management Console or AWS APIs. With identity federation, external identities are granted secure access to resources in your AWS account without having to create IAM users. These external identities can come from your corporate identity provider (such as Microsoft Active Directory or from the AWS Directory Service) or from a web identity provider (such as Amazon Cognito, Login with Amazon, Facebook, Google, or any OpenID Connect-compatible provider)
AWS CloudHSM
-The AWS CloudHSM service helps you meet corporate, contractual and regulatory compliance requirements for data security by using dedicated Hardware Security Module (HSM) appliances within the AWS cloud
-A Hardware Security Module (HSM) is a hardware appliance that provides secure key storage and cryptographic operations within a tamper-resistant hardware device
AWS Directory Service
AWS Key Management Service
AWS AWF
AWS WAF is a web application firewall that helps protect web applications from attacks by allowing you to configure rules that allow, block, or monitor (count) web requests based on conditions that you define. These conditions include IP addresses, HTTP headers, HTTP body, URI strings, SQL injection and cross-site scripting.
2. STORAGE
AWS Object Storage and CDN, S3 , Glacier and Cloud front
*Amazon simple storage service (s3)*
Amazon S3 is storage for the Internet. It’s a simple storage service that offers software developers a highly-scalable, reliable, and low-latency data storage infrastructure at very low costs.
Amazon S3 is secure by default. Only the bucket and object owners originally have access to Amazon S3 resources they create. Amazon S3 supports user authentication to control access to data. You can use access control mechanisms such as bucket policies and Access Control Lists (ACLs) to selectively grant permissions to users and groups of users. You can securely upload/download your data to Amazon S3 via SSL endpoints using the HTTPS protocol. If you need extra security you can use the Server Side Encryption (SSE) option or the Server Side Encryption with Customer-Provide Keys (SSE-C) option to encrypt data stored-at-rest. Amazon S3 provides the encryption technology for both SSE and SSE-C. Alternatively you can use your own encryption libraries to encrypt data before storing it in Amazon S3.
** Data Protection **
Amazon S3 Standard and Standard – IA are designed to provide 99.999999999% durability of objects over a given year. This durability level corresponds to an average annual expected loss of 0.000000001% of objects. For example, if you store 10,000 objects with Amazon S3, you can on average expect to incur a loss of a single object once every 10,000,000 years. In addition, Amazon S3 is designed to sustain the concurrent loss of data in two facilities.
Amazon S3 buckets in all Regions provide read-after-write consistency for PUTS of new objects and eventual consistency for overwrite PUTS and DELETES.
As with any environments, the best practice is to have a backup and to put in place safeguards against malicious or accidental users errors. For S3 data, that best practice includes secure access permissions, Cross-Region Replication, versioning and a functioning, regularly tested backup.
*** Versioning
Versioning allows you to preserve, retrieve, and restore every version of every object stored in an Amazon S3 bucket. Once you enable Versioning for a bucket, Amazon S3 preserves existing objects anytime you perform a PUT, POST, COPY, or DELETE operation on them. By default, GET requests will retrieve the most recently written version. Older versions of an overwritten or deleted object can be retrieved by specifying a version in the request.
Versioning offers an additional level of protection by providing a means of recovery when customers accidentally overwrite or delete objects.
Amazon S3 Standard – Infrequent Access (Standard – IA) is an Amazon S3 storage class for data that is accessed less frequently, but requires rapid access when needed.
Standard – IA offers the high durability, throughput, and low latency of Amazon S3 Standard, with a low per GB storage price and per GB retrieval fee. This combination of low cost and high performance make Standard – IA ideal for long-term storage, backups, and as a data store for disaster recovery. The Standard – IA storage class is set at the object level and can exist in the same bucket as Standard, allowing you to use lifecycle policies to automatically transition objects between storage classes without any application changes.
Standard – IA is ideal for data that is accessed less frequently, but requires rapid access when needed. Standard – IA is ideally suited for long-term file storage, older data from sync and share, backup data, and disaster recovery files.
S3 Standard – Infrequent Access provide the same performance as S3 Standard storage.
**Glacier**
Glacier – storage for data archival
*** S3 – security
The valid ways of encrypting data on S3 are:
–Server Side Encryption (SSE)-S3,SSE-C, SSE-KMS or a client library such as Amazon S3 Encryption Client.
-Amazon S3 is secure by default. Only the bucket and object owners originally have access to Amazon S3 resources they create
– You can use bucket policies & Acess Control Lists (ACLs) to selectively
grant permissions to user and groups of users
– if you need extra security you can use Server Side Encryption (SSE ) or
**Control access –
There are a number of different options available to restrict access to S3 objects,
four mechanisms for controlling access to Amazon S3
-IAM policy
-bucket policies
-Access Control Lists( ACLS)
-query string authentication
**CCR Cross – Region Replication **
CRR is an Amazon S3 feature that automatically replicates data across AWS regions. With CRR, every object uploaded to an S3 bucket is automatically replicated to a destination bucket in a different AWS region that you choose. You can use CRR to provide lower-latency data access in different geographic regions. CRR can also help if you have a compliance requirement to store copies of data hundreds of miles apart.
– CRR is a bucket-level configuration. You enable a CRR configuration on your source bucket by specifying a destination bucket in a different region for replication
Workloads
The Amazon S3 best practice guidance given in this topic is based on two types of workloads:
Integrating Amazon CloudFront with Amazon S3, you can distribute content to your users with low latency and a high data transfer rate. You will also send fewer direct requests to Amazon S3, which will reduce your costs
size – a minimum of 0 bytes to a maximum of 5 terabytes
-The largest object that can be uploaded in a single PUT is 5 Gigabytes
-for Objects larger than 100 megabytes, customers should consider using a multipart upload capability
-You can use Multi-Object Delete to delete large numbers of objects from Amazon S3. This feature allows you to send multiple object keys in a single request to speed up your deletes. Amazon does not charge you for using Multi-Object Delete.
– By default, customers can provision up to 100 buckets per AWS account
– Amazon S3 is secure by default. Only the bucket and object owners originally have access to Amazon S3 resources they create
– You can choose to encrypt data using SSE-S3, SSE-C, SSE-KMS, or a client library such as the Amazon S3 Encryption Client
** S3 is a object based storage ( for files only )
** File can be from 1 byte to 5 TB
** unlimited storage
** Files are stored in buckets
|** S3 is universal name space , name must be unique globally
** Read after write consistency for PUTS of new objects
** Eventual consistency for overwrite PUTS and DELETES
** S3 Classes
An Amazon VPC Endpoint for Amazon S3 is a logical entity within a VPC that allows connectivity only to S3. The VPC Endpoint routes requests to S3 and routes responses back to the VPC. For more information about VPC Endpoints, read Using VPC Endpoints.
*Amazon Elastick Block Store (Amazon EBS)*
Amazon Elastic Block Store (Amazon EBS) provides persistent block level storage volumes for use with Amazon EC2 instances in the AWS Cloud. Each Amazon EBS volume is automatically replicated within its Availability Zone to protect you from component failure, offering high availability and durability. Amazon EBS volumes offer the consistent and low-latency performance needed to run your workloads. With Amazon EBS, you can scale your usage up or down within minutes – all while paying a low price for only what you provision
Amazon EBS provides three volume types:
-General Purpose (SSD) volumes
-Provisioned IOPS (SSD) volumes
-Magnetic volumes.
These volume types differ in performance characteristics and price, allowing you to tailor your storage performance and cost to the needs of your applications. For more performance infomation see the EBS product details page.
– snapshots are only available through the Amazon EC2 APIs.
EBS – summary
-A block storage (so you need to format it).
-As it’s a block storage, you can use Raid 1 (or 0 or 10) with multiple block storages
– It is really fast and is relatively cheap
– You can snapshot an EBS (while it’s still running) for backup reasons
– cannot just access it across regions
– You need an EC2 instance to attach it
-99.999% availability
With Amazon EBS, you can use any of the standard RAID configurations that you can use with a traditional bare metal server, as long as that particular RAID configuration is supported by the operating system for your instance. This is because all RAID is accomplished at the software level. For greater I/O performance than you can achieve with a single volume, RAID 0 can stripe multiple volumes together; for on-instance redundancy, RAID 1 can mirror two volumes together.
Amazon EBS volume data is replicated across multiple servers in an Availability Zone to prevent the loss of data from the failure of any single component. This replication makes Amazon EBS volumes ten times more reliable than typical commodity disk drives. For more information, see Amazon EBS Availability and Durability in the Amazon EBS product detail pages.
Creating a RAID 0 array allows you to achieve a higher level of performance for a file system than you can provision on a single Amazon EBS volume. A RAID 1 array offers a “mirror” of your data for extra redundancy. Before you perform this procedure, you need to decide how large your RAID array should be and how many IOPS you want to provision.
The resulting size of a RAID 0 array is the sum of the sizes of the volumes within it, and the bandwidth is the sum of the available bandwidth of the volumes within it. The resulting size and bandwidth of a RAID 1 array is equal to the size and bandwidth of the volumes in the array. For example, two 500 GiB Amazon EBS volumes with 4,000 provisioned IOPS each will create a 1000 GiB RAID 0 array with an available bandwidth of 8,000 IOPS and 640 MB/s of throughput or a 500 GiB RAID 1 array with an available bandwidth of 4,000 IOPS and 320 MB/s of throughput.
** EBS – snapshot **
There is a limit of 5 pending snapshots for a single volume.
-Snapshot that are taken from encrypted volume s are automatically encrypted
– To create a snapshot for Amazon EBS volumes that serve as root devices, you should stop the instance before taking the snapshot.
– Instances store Volumes are sometime called Ephemeral Storage
– Instances store Volumes can not be stooped
– EBS baked instance can be stooped. You will not lose the data of this instance if is stopped
-You can reboot both, you will not lose the your data
-By default, both ROOT volumes will be delete on termination , with EBS you can tell AWS to keep the root volume
** Volume restore from snapshots
CLI
aws ec2 create-snapshot –volume-id vol-123abc –description ” this is a snapshot”
*Amazon Cloud Front*
Amazon CloudFront is a global content delivery network (CDN) service. It integrates with other Amazon Web Services products to give developers and businesses an easy way to distribute content to end users with low latency, high data transfer speeds, and no minimum usage commitments.
*Amazon Glacier*
– an extremely low cost storage service that provides highly secure, durable, and flexible storage for data backup and archival
Amazon Glacier is a low cost storage service designed to store data that is infrequently accessed and long lived. Amazon Glacier jobs typically complete in 3 to 5 hours
**Cross Region Replication – CCR**
CRR is an Amazon S3 feature that automatically replicates data across AWS regions. With CRR, every object uploaded to an S3 bucket is automatically replicated to a destination bucket in a different AWS region that you choose. You can use CRR to provide lower-latency data access in different geographic regions. CRR can also help if you have a compliance requirement to store copies of data hundreds of miles apart
*AWS Import/Export Snowball*
A single Snowball appliance can transport up to 50 terabytes of data and multiple appliances can be used in parallel to transfer petabytes of data into or out of AWS
*AWS Storage Gateway*
The AWS Storage Gateway supports three configurations:
Gateway-Cached Volumes: You can store your primary data in Amazon S3, and retain your frequently accessed data locally. Gateway-cached volumes provide substantial cost savings on primary storage, minimize the need to scale your storage on-premises, and retain low-latency access to your frequently accessed data.
Gateway-Stored Volumes: In the event you need low-latency access to your entire data set, you can configure your on-premises data gateway to store your primary data locally, and asynchronously back up point-in-time snapshots of this data to Amazon S3. Gateway-stored volumes provide durable and inexpensive off-site backups that you can recover locally or from Amazon EC2 if, for example, you need replacement capacity for disaster recovery.
Gateway-Virtual Tape Library (VTL): With gateway-VTL you can have a limitless collection of virtual tapes. Each virtual tape can be stored in a Virtual Tape Library backed by Amazon S3 or a Virtual Tape Shelf (VTS) backed by Amazon Glacier. The Virtual Tape Library exposes an industry standard iSCSI interface which provides your backup application with on-line access to the virtual tapes. When you no longer require immediate or frequent access to data contained on a virtual tape, you can use your backup application to move it from its Virtual Tape Library to your Virtual Tape Shelf in order to further reduce your storage costs.
** Event Notification **
EC2
Amazon Elastic Compute Cloud ( Amazon EC2 ) is a web services that provides resizable compute capacity in the cloud
Amazon EC2 provides a wide selection of instance types optimized to fit different use cases. Instance types comprise varying combinations of CPU, memory, storage, and networking capacity and give you the flexibility to choose the appropriate mix of resources for your applications
Amazon ec2 instance type
T2 – General Purpose
t2.nano, t2.micro, t2.small, t2.medium, t2.large
Storage – EBS only
T2 instances work well with Amazon EBS General purpose (SSD) volumes for instance block storage
M4 – are the latest generation of General Purpose
Storage – EBS only
M3 –
SSD – storage
Use Cases
Small and mid-size databases, data processing tasks that require additional memory, caching fleets, and for running backend servers for SAP, Microsoft SharePoint, cluster computing, and other enterprise applications.
C4 –
Model vCPU Mem(GiB) Storage Throughput(Mbps)
c4.large 2 3.75 EBS-Only 500
c4.xlarge 4 7.5 EBS-Only 750
c4.2xlarge 8 15 EBS-Only 1,000
c4.4xlarge 16 30 EBS-Only 2,000
c4.8xlarge 36 60 EBS-Only 4,000
C3 –
c3.large – 2 vCPU
c3.xlarge, 4 vCPU
c3.2xlarge – 8 vCPU
c3.4xlarge – 16 vCPU
c3.8xlarge – 32 vCPU
Use Cases
High performance front-end fleets, web-servers, batch processing, distributed analytics, high performance science and engineering applications, ad serving, MMO gaming, and video-encoding.
R3 – Memory Optimized
R3 instances are optimized for memory-intensive applications and have the lowest cost per GiB of RAM among Amazon EC2 instance types.
G2 – GPU
This family includes G2 instances intended for graphics and general purpose GPU compute applications
I2 – storage Optimized High I/O instances
This family includes the High Storage Instances that provide very fast SSD-backed instance storage optimized for very high random I/O performance, and provide high IOPS at a low cost.
D2 – Dense- storage instances
D2 instances feature up to 48 TB of HDD-based local storage, deliver high disk throughput, and offer the lowest price per disk throughput performance on Amazon EC2.
Amazon EC2 allows you to choose between Fixed Performance Instances (e.g. M3, C3, and R3) and Burstable Performance Instances (e.g. T2). Burstable Performance Instances provide a baseline level of CPU performance with the ability to burst above the baseline. T2 instances are for workloads that don’t use the full CPU often or consistently, but occasionally need to burst.
EC2 compute unit
***Spot instance
Spot instances are a new way to purchase and consume Amazon EC2 Instances. They allow customers to bid on unused EC2 capacity and run those instances for as long as their bid exceeds the current Spot Price. The Spot Price changes periodically based on supply and demand, and customers whose bids meet or exceed it gain access to the available Spot instances. Spot instances are complementary to On-Demand instances and Reserved Instances, providing another option for obtaining compute capacity.
EC2 – placement group
*Elastic IP*
An Elastic IP address is a static IP address designed for dynamic cloud computing. An Elastic IP address is associated with your AWS account. With an Elastic IP address, you can mask the failure of an instance or software by rapidly remapping the address to another instance in your account.
An Elastic IP address is a public IP address, which is reachable from the Internet. If your instance does not have a public IP address, you can associate an Elastic IP address with your instance to enable communication with the Internet; for example, to connect to your instance from your local computer
By default, all accounts are limited to 5 Elastic IP addresses per region. If you need more the 5 Elastic IP addresses, we ask that you apply for your limit to be raised
*Elastic Load Balancing*
Elastic Load Balancing automatically distributes incoming application traffic across multiple Amazon EC2 instances in the cloud. It enables you to achieve greater levels of fault tolerance in your applications, seamlessly providing the required amount of load balancing capacity needed to distribute application traffic.
-Elastic Load Balancing supports load balancing of applications using HTTP, HTTPS (Secure HTTP), SSL (Secure TCP) and TCP protocols.
– you can map HTTP port 80 and HTTPS port 443 to a single Elastic Load Balancer.
– To receive a history of Elastic Load Balancing API calls made on your account, simply turn on CloudTrail in the AWS Management Console
** Configure the Idle time out **
For each request that a client makes through a load balancer, the load balancer maintains two connections. One connection is with the client and the other connection is to a back-end instance . For each connection, the load balancer manage an idle time out that is triggered when no data is sent over the connection for a specified time period
**Configure Coss-Zone Load Balancing
By default, your load balancer distributes incoming requests evenly across its enabled Availability Zones.
Cross-Zone load balancing reduce the needs to maintain equivalent numbers of back-end instances in each Availability Zones, and improves our application’s ability to handle the loss of one or more instances
** Configure Connection Draining for ELB **
To ensure that the load balancer stops sending request to instance that are de-registering or unhealthy, while keeping the existing connection open, use connection draining . This enable the load balancer to complete in -flight requests made to instances that are de-register or unhealthy.
** Configure Sticky Sesions **
By default, a load balancer routes each request independently to the registered instance with the smallest load . However, you can use sticky session feature ( also know as session affinity ) which enable the load balancer to bind the user’s session to a specific instance . This ensures that all requests from the user during the session are sent to the same instance
AWS Elastic Beanstalk
AWS Elastic Beanstalk is an easy-to-use service for deploying and scaling web applications and services developed with Java, .NET, PHP, Node.js, Python, Ruby, Go, and Docker on familiar servers such as Apache, Nginx, Passenger, and IIS.
You can simply upload your code and Elastic Beanstalk automatically handles the deployment, from capacity provisioning, load balancing, auto-scaling to application health monitoring. At the same time, you retain full control over the AWS resources powering your application and can access the underlying resources at any time.
There is no additional charge for Elastic Beanstalk – you pay only for the AWS resources needed to store and run your applications.
* Amazon CloudWatch*
-Amazon CloudWatch is a monitoring service for AWS cloud resources and the applications you run on AWS. You can use Amazon CloudWatch to collect and track metrics, collect and monitor log files, and set alarms. Amazon CloudWatch can monitor AWS resources such as Amazon EC2 instances, Amazon DynamoDB tables, and Amazon RDS DB instances, as well as custom metrics generated by your applications and services, and any log files your applications generate. You can use Amazon CloudWatch to gain system-wide visibility into resource utilization, application performance, and operational health. You can use these insights to react and keep your application running smoothly.
-Many metrics are received and aggregated at 1-minute intervals. Some are at 3-minute or 5-minute intervals.
-Minimal time interval- Metrics are received and aggregated at 1 minute intervals.
-When you create an alarm, you can configure it to perform one or more automated actions when the metric you chose to monitor exceeds a threshold you define. For example, you can set an alarm that sends you an email, publishes to an SQS queue, stops or terminates an Amazon EC2 instance, or executes an Auto Scaling policy.
Since Amazon CloudWatch alarms are integrated with Amazon Simple Notification Service, you can also use any notification type supported by SNS.
– You can retrieve metrics data for any Amazon EC2 instance up to 2 weeks from the time you started to monitor it. After 2 weeks, metrics data for an Amazon EC2 instance will not be available if monitoring was disabled for that Amazon EC2 instance
monitor EC2 Instance
View metrics for CPU utilization, data transfer, and disk usage activity from Amazon EC2 instances (Basic Monitoring) for no additional charge. For an additional charge, CloudWatch provides Detailed Monitoring for EC2 instances with higher resolution and metric aggregation. No additional software needs to be installed.
Monitor EC2 instances automatically, without installing additional software:
-You can use the CLI to retrieve your log events and search through them using command line grep or similar search functions.
CloudWatch – CLI -example
Delete alarms
$ aws cloudwatch delete-alarms –alarm-name myalarm
The following example uses the list-metrics command to list the metrics for Amazon SNS
$aws cloudwatch list-metrics –namespace “AWS/SNS”
*ELB
Elastic Load-Balancing
-Timeout Configuration
-Connection Draining
-Cross-Zone Load Balancing
*Autoscaling*
Auto Scaling helps you maintain application availability and allows you to scale your Amazon EC2 capacity up or down automatically according to conditions you define
you can define a scale up condition to increase your Amazon EC2 capacity by 10% and a scale down condition to decrease it by 5%.
If you have an Auto Scaling group with running instances and you choose to delete the Auto Scaling group, the instances will be terminated and the Auto Scaling group will be deleted.
auto scaling instance state
Instances in Auto Scaling group can be in one of four main states
** Pending
** InService
** Terminating
** Terminated
autoscaling – cli
* Reserved instances
Spot Instances
Micro Instances
Compute-Optimized Instances
GPU – instances
Cluster Instances
High I/O instances
** VM Import/Export
You can import your VM images using the Amazon EC2 API tools:
Availability Zones
Databases on AWS
*RDS
*DynamoDB
*Elasticache*
Elasticache is a web service that makes it easy to deploy, operate, and scale a distributed, in-memory cache in the cloud. ElastiCache improves the performance of web applications by allowing you to retrieve information from afast, managed, in-memory caching system, instead of relying entirely on slower disk-based databases. ElastiCache supports two popular open-source caching engines: Memcached and Redis.
Memcached –ElastiCache is protocol-compliant with Memcached, a widely adopted memory object caching system, so code, applications, and popular tools that you use today with existing Memcached environments will work seamlessly with the service.
Redis –a popular open-source in-memory key-value store that supports data structures such as sorted sets and lists.
ElastiCache supports Redismaster / slave replication which can be used to achieve cross Availability Zoneredundancy.
*Redshift*
DMS
Networking
*VPC*
A Virtual Private Cloud (VPC): A logically isolated virtual network in the AWS cloud.
Amazon VPC lets you provision a logically isolated section of the AWS cloud where you can lunch your AWS resources in a virtual network that you define.
The VPC lives within a single AWS region, but is subnets can be spread across Multiple AZ
*components of Amazon VPC
A VPC endpoint enables you to create a private connection between your VPC and anoter AWS services withowt
Endpoints are virtual devices
Currently, Amazon S3 is the only VPC endpoint .Adding S3 as a VPC endpoint allow you to access your S3 buckets without sending request through the Internet
Four basic options for network architectures, The four options are:
The core difference between a public and private subnets is defined by what subnet’s default route is, in the VPC tables.
*Connectivity
You may connect your VPC to:
Amazon VPC supports the creation of an Internet gateway. This gateway enables Amazon EC2 instances in the VPC to directly access the Internet.
Elastic IP addresses (EIPs) give instances in the VPC the ability to both directly communicate outbound to the Internet and to receive unsolicited inbound traffic from the Internet (e.g., web servers)
Instances without EIPs can access the Internet in one of two ways:
There are two ways to create a VPC using the Amazon VPC console: the Create VPC dialog box and the VPC wizard
*IP Addressing
Currently, Amazon VPC supports VPCs between /28 (in CIDR notation) and /16 in size. The IP address range of your VPC should not overlap with the IP address ranges of your existing network.
Amazon reserves the first four (4) IP addresses and the last one (1) IP address of every subnet for IP networking purposes.
The minimum size of a subnet is a /28 (or 16 IP addresses.) Subnets cannot be larger than the VPC in which they are created.
The larges subnet use a /16 netmask ( 65,536 IP addresses )
If you create a VPC with CIDR bloc 10.0.0.0/24 – it supports 256 addresses ( – minus 5 reserved ) . You can break this CIDR block into two subnets, each supporting 128 IP addresses,
Recommended for most customers:
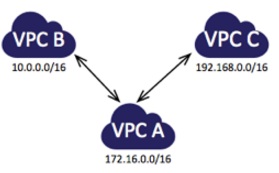
VPC peering
The following diagram is an example of one VPC peered to two different VPCs. There are two VPC peering connections: VPC A is peered with both VPC B and VPC C. VPC B and VPC C are not peered, and you cannot use VPC A as a transit point for peering between VPC B and VPC C. If you want to enable routing of traffic between VPC B and VPC C, you must create a unique VPC peering connection between them.
VPC Flow Logs
Routing Polocy
simple
weighted
latency
failover
geolocation
Network ACLs = Stateless firewall rules
Security groups
VPC Flow Logs: See all your traffic
VPC – cli
Create a VPC
$aws ec2 create-subnet –vpc-id vpc-a01106c2 –cidr-block 10.0.1.0/24
Delete a VPC
$ec2-delete-vpc vpc_id
Describes one or more of your VPCs.
The short version of this command is ec2dvpc
ec2-describe-vpcs [ vpc_id … ] [[–filter “name=value”] …]
*** Elastic Network Interfaces (ENI)
An elastic network interface (ENI) is a virtual network interface that you can attach to an instance in a VPC. ENIs are available only for instances running in a VPC.
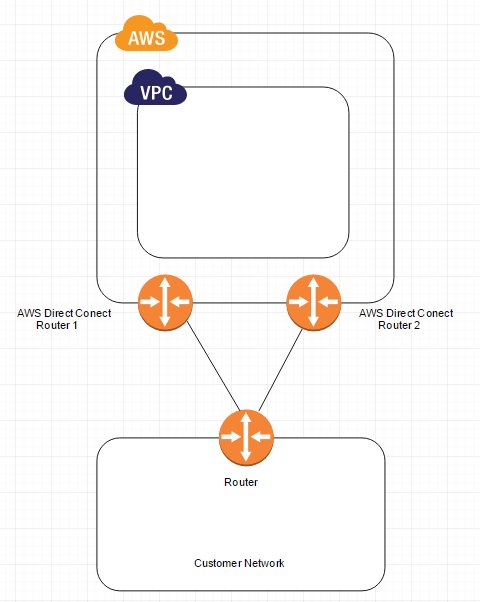
*AWS Direct Connect*
AWS Direct Connect makes it easy to establish a dedicated network connection from your premises to AWS. Using AWS Direct Connect, you can establish private connectivity between AWS and your datacenter, office, or colocation environment, which in many cases can reduce your network costs, increase bandwidth throughput, and provide a more consistent network experience than Internet-based connections.
AWS Direct Connect lets you establish a dedicated network connection between your network and one of the AWS Direct Connect locations. Using industry standard 802.1q VLANs, this dedicated connection can be partitioned into multiple virtual interfaces. This allows you to use the same connection to access public resources such as objects stored in Amazon S3 using public IP address space, and private resources such as Amazon EC2 instances running within an Amazon Virtual Private Cloud (VPC) using private IP space, while maintaining network separation between the public and private environments. Virtual interfaces can be reconfigured at any time to meet your changing needs.
The following diagram shows a simple Direct Connect connection with a redundant paths
VPN vs Direct Connect
Security & Filtering
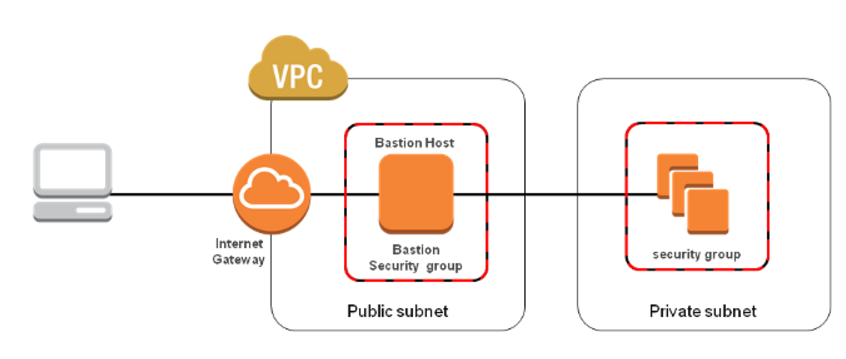
**Bastion Host
Always remember the following when configuring your bastion:
RDP – port 3389 / TCP
SSH – port 22 /TCP
Below diagram shows connectivity flowing from an end user to resources on a private subnet through an bastion host:
Application Services
*Route 53*
Amazon Route 53 currently supports the following DNS record types:
Alias record work like a CNAME record in that you can map one DNS name ( example.com) to another ‘ target’ DNS name ( test.amazonaws.com) . They differ from a CNAME record in that they are not visible to resolvers. Resolvers only see the A record and the resulting IP address of the target address .
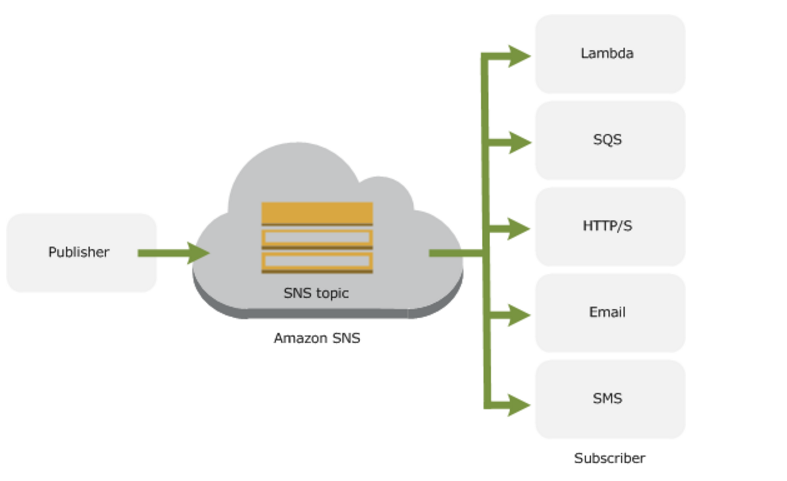
SNS -benefits
RAID
RAID 0
When I/O performance is more important than fault tolerance; for example, as in a heavily used database (where data replication is already set up separately).
I/O is distributed across the volumes in a stripe. If you add a volume, you get the straight addition of throughput.
Performance of the stripe is limited to the worst performing volume in the set. Loss of a single volume results in a complete data loss for the array.
RAID 1
When fault tolerance is more important than I/O performance; for example, as in a critical application.
Does not provide a write performance improvement; requires more Amazon EC2 to Amazon EBS bandwidth than non-RAID configurations because the data is written to multiple volumes simultaneousl
**CloudTrial
AWS CloudTrial captures AWS API calls and related events made by or on behalf or an AWS account and delivers log files to an Amazon S3 bucket that you specific . Optionally , you can configure CloudTrial to delivery events to a log group to be monitored by CloudWatch . You can also choose to receive Amazon SNS notifications each time a log file is delivered tou your bucket
**Kinessis
Amazon Kinesis Streams enables you to build custom applications that process or analyze streaming data for specialized needs. You can continuously add various types of data such as clickstreams, application logs, and social media to an Amazon Kinesis stream from hundreds of thousands of sources. Within seconds, the data will be available for your Amazon Kinesis Applications to read and process from the stream.
*** Data Retention – Kinessis
Amazon Kinesis stores your data for up to 24 hours by default. You can raise
data retention period to up to 7 days by enabling extended data retention.
***Monitoring – Kinesis
Amazon Kinesis Stream Management console
Amazon CloudWatch
**Opsworks
– is a configuration magement platform
AWS OpsWorks is a flexible configuration management solution with automation tools that enable you to model and control your applications and their supporting infrastructure
AWS OpsWorks provides three concepts to model your application :
-A Stack is the highest-level management unit
-Layer
-AppF
AWS OpsWorks uses chef recipes to deploy and configure software components on Amazon EC2 instances
**CloudFormation
**AWS Elastic Beanstalk
AWS Elastic Beanstalk is an application management platform
**Workspaces
Amazon WorkSpaces is a managed desktop computing service in the cloud. Amazon WorkSpaces allows customers to easily provision cloud-based desktops that allow end-users to access the documents, applications and resources they need on supported devices including Windows and Mac computers, Chromebooks, iPads, Kindle Fire tablets, and Android tablets. With a few clicks in the AWS Management Console, customers can provision a high-quality cloud desktop experience for any number of users at a cost that is competitive with traditional desktops and half the cost of most Virtual Desktop Infrastructure (VDI) solutions.
*** AWS KMS
*** AWS Trusted Advisor
The AWS Trusted advisor provides for checks at no additional charge to all users
Security Groups – Specific Ports Unrestricted
IAM Use
MFA on root account
Service Limits
AWS Trusted Advisor in the categories of:
Amazon Machine Images (AWS AMI) offers two types of virtualization: Paravirtual (PV) and Hardware Virtual Machine (HVM).
Each solution offers its own advantages
Every AWS AMI uses the Xen hypervisor on bare metal. Xen offers two kinds of virtualization: HVM (Hardware Virtual Machine) and PV (Paravirtualization). But before we discuss these virtualization capabilities, it’s important to understand how Xen architecture works.
Virtual machines (also known as Guests) run on top of a hypervisor. The hypervisor takes care of CPU scheduling and memory partitioning, but it is unaware of networking, external storage devices, video, or any other common I/O functions found on a computing system.
These guest VMs can be either HVM or PV.
AWS Encryption Models
Server-side encryption
Client-side encryption
[ovi@PROD]$ more include.yml
—
– hosts: endur_dev2
– include: tasks/chage_conf.yml
– include: tasks/chage_conf2.yml
[ovi@PROD]$ ansible-playbook include.yml –ask-pass
SSH password:
PLAY [endur_dev2] *************************************************************
GATHERING FACTS ***************************************************************
ok: [endora01.dev.my.com]
PLAY [endur_dev2] *************************************************************
TASK: [fetch ovi.txt] *********************************************************
changed: [endora01.dev.my.com]
TASK: [Sets default flag to 1] ************************************************
changed: [endora01.dev.my.com]
PLAY [endur_dev2] *************************************************************
TASK: [fetch ovi2.txt] ********************************************************
ok: [endora01.dev.my.com]
TASK: [Sets default flag to 1] ************************************************
changed: [endora01.dev.my.com]
PLAY RECAP ********************************************************************
endora01.dev.my.com : ok=5 changed=3 unreachable=0 failed=0
[ovi@ PROD]$ ansible-playbook chage_line.yml –ask-pass
SSH password:
PLAY [endur_dev2] *************************************************************
GATHERING FACTS ***************************************************************
ok: [endora01.dev.my.com]
TASK: [Sets default flag to 1] ************************************************
changed: [endora01.dev.my.com]
PLAY RECAP ********************************************************************
endora01.dev.my.com : ok=2 changed=1 unreachable=0 failed=0
[ovi@ PROD]$ more chage_line.yml
—
– hosts: endur_dev2
tasks:
– name: Sets default flag to 1
sudo: yes
lineinfile: dest=/tmp/ovi.txt regexp=”^ENABLED” line=”ENABLED=1″
Simple playbook to retrieve files from servers ( passwd and shadow )
[ovi@ PROD]$ more fetch_audit.yml
—
– hosts: prod_hadoop
tasks:
– name: fetch passwd file
fetch: dest=audit/{{ansible_hostname}}/passwd_file src=/etc/passwd flat=yes
– name: fetch shadow file
sudo: yes
fetch: dest=audit/{{ansible_hostname}}/shadow_file src=/etc/shadow flat=yes
run the ansible playbook
[ovi@DEV]$ ansible-playbook fetch_audit.yml –ask-pass
SSH password:
PLAY [endur_dev] **************************************************************
GATHERING FACTS ***************************************************************
ok: [endora01.uat.my.com]
ok: [endora01.dev.my.com]
TASK: [fetch passwd file] *****************************************************
changed: [endora01.dev.my.com]
changed: [endora01.uat.my.com]
TASK: [fetch shadow file] *****************************************************
changed: [endora01.dev.my.com]
changed: [endora01.uat.my.com]
PLAY RECAP ********************************************************************
cmtoldendora01.dev.bmocm.com : ok=3 changed=2 unreachable=0 failed=0
cmtoluendora01.uat.bmocm.com : ok=3 changed=2 unreachable=0 failed=0
Also you can run that playbook, it’s as simple as:
$ ansible-playbook playbook.yml -i hosts
[ovi@ PROD]$ ansible-playbook tsm_client_install.yml –ask-pass
SSH password:
PLAY [poc] ********************************************************************
GATHERING FACTS ***************************************************************
ok: [10.22.14.172]
TASK: [Copy the file TIVsm-API64-6.4.2-0.x86_64.rpm] **************************
changed: [10.22.14.172]
TASK: [Copy the file gskcrypt64-8.0-14.36.x86_64.rpm] *************************
changed: [10.22.14.172]
TASK: [Copy the file gskssl64-8.0-14.36.x86_64.rpm] ***************************
changed: [10.22.14.172]
TASK: [Copy the file TIVsm-BA-6.4.2-0.x86_64.rpm] *****************************
changed: [10.22.14.172]
TASK: [install rpm gskcrypt64-8.0-14.36.x86_64] *******************************
failed: [10.22.14.172] => {“changed”: true, “cmd”: [“sudo”, “rpm”, “-ivf”, “/tmp/gskcrypt64-8.0-14.36.x86_64.rpm”], “delta”: “0:00:00.003777”, “end”: “2016-03-02 15:59:13.781623”, “rc”: 1, “start”: “2016-03-02 15:59:13.777846”}
stderr: sudo: sorry, you must have a tty to run sudo
FATAL: all hosts have already failed — aborting
PLAY RECAP ********************************************************************
to retry, use: –limit @/home/ovi/tsm_client_install.retry
10.22.14.172 : ok=5 changed=4 unreachable=0 failed=1
fix this issue
#visudo
comment
#Defaults requiretty
Example Fetch
[ansadmin@centos64 ~]$ more fetch.yml
—
– hosts: all
tasks:
– name: fetch passwd file
fetch: dest={{ansible_hostname}}/passwd_file src=/etc/passwd flat=yes
– name: fetch yum.conf file
fetch: dest={{ansible_hostname}}/yum_file src=/etc/yum.conf flat=yes
run playbook
[ansadmin@centos64 ~]$ ansible-playbook fetch.yml –ask-pass
SSH password:
PLAY [all] ********************************************************************
GATHERING FACTS ***************************************************************
ok: [192.168.122.50]
ok: [192.168.122.100]
TASK: [fetch passwd file] *****************************************************
changed: [192.168.122.100]
changed: [192.168.122.50]
TASK: [fetch yum.conf file] ***************************************************
changed: [192.168.122.100]
changed: [192.168.122.50]
PLAY RECAP ********************************************************************
192.168.122.100 : ok=3 changed=2 unreachable=0 failed=0
192.168.122.50 : ok=3 changed=2 unreachable=0 failed=0
HDFS Port Config Parameter
—— Namenode 50070 dfs.http.address
Datanodes 50075 dfs.datanode.http.address
Secondary NameNode 50090 dfs.secondary.http.address
Backup/Checkpoint node 50105 dfs.backup.http.address
Mapreduce Port Config Parameter ——— JobTracker 50030 mapred.job.tracker.http.address
Tasktrackers 50060 mapred.task.tracker.http.address
Docker is a container virtualization technology it offers more efficient way to deploy the application. With Docker, the applications resides inside the container on top of the Linux operating system.
Images
Images on Docker are like the snapshot of a virtual machine
Containers
From images you can create containers, this is the equivalent of creating a VM from a snapshot.
Volumes
Links
Install docker
check your current kernel version
[root@ovi ~]# uname -r
3.10.0-229.el7.x86_64
add docker repo
[root@ovi ~]# tee /etc/yum.repos.d/docker.repo <<-EOF
> [dockerrepo]
> name=Docker Repository
> baseurl=https://yum.dockerproject.org/repo/main/centos/7
> enabled=1
> gpgcheck=1
> gpgkey=https://yum.dockerproject.org/gpg
> EOF
[dockerrepo]
name=Docker Repository
baseurl=https://yum.dockerproject.org/repo/main/centos/7
enabled=1
gpgcheck=1
gpgkey=https://yum.dockerproject.org/gpg
[root@ovi ~]# yum install docker-engine
Loaded plugins: amazon-id, rhui-lb
dockerrepo | 2.9 kB 00:00:00
rhui-REGION-client-config-server-7 | 2.9 kB 00:00:00
rhui-REGION-rhel-server-releases | 3.7 kB 00:00:00
rhui-REGION-rhel-server-rh-common | 3.8 kB 00:00:00
(1/2): dockerrepo/primary_db | 8.2 kB 00:00:00
(2/2): rhui-REGION-rhel-server-releases/7Server/x86_64/primary_db | 18 MB 00:00:01
rhui-REGION-rhel-server-releases/7Server/x86_64/updateinfo | 1.0 MB 00:00:00
Resolving Dependencies
–> Running transaction check
—> Package docker-engine.x86_64 0:1.9.1-1.el7.centos will be installed
–> Processing Dependency: docker-engine-selinux >= 1.9.1-1.el7.centos for package: docker-engine-1.9.1-1.el7.centos.x86_64
–> Running transaction check
—> Package docker-engine-selinux.noarch 0:1.9.1-1.el7.centos will be installed
–> Finished Dependency Resolution
Dependencies Resolved
==========================================================================================================================
Package Arch Version Repository Size
==========================================================================================================================
Installing:
docker-engine x86_64 1.9.1-1.el7.centos dockerrepo 8.2 M
Installing for dependencies:
docker-engine-selinux noarch 1.9.1-1.el7.centos dockerrepo 21 k
Transaction Summary
==========================================================================================================================
Install 1 Package (+1 Dependent package)
Total download size: 8.2 M
Installed size: 36 M
Is this ok [y/d/N]:
…….
Is this ok [y/N]: y
Running transaction check
Running transaction test
Transaction test succeeded
Running transaction
Installing : docker-engine-selinux-1.9.1-1.el7.centos.noarch 1/2
Installing : docker-engine-1.9.1-1.el7.centos.x86_64 2/2
Verifying : docker-engine-selinux-1.9.1-1.el7.centos.noarch 1/2
Verifying : docker-engine-1.9.1-1.el7.centos.x86_64 2/2
Installed:
docker-engine.x86_64 0:1.9.1-1.el7.centos
Dependency Installed:
docker-engine-selinux.noarch 0:1.9.1-1.el7.centos
Complete!
[root@ovi ~]# service docker start
Redirecting to /bin/systemctl start docker.service
check docker version
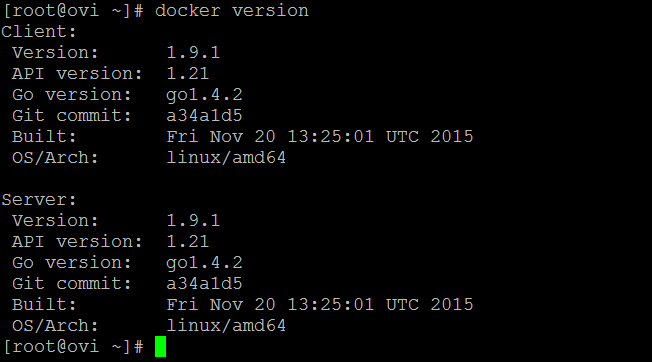
[root@ovi ~]# docker info
Containers: 1
Images: 2
Server Version: 1.9.1
Storage Driver: devicemapper
Pool Name: docker-202:2-9800195-pool
Pool Blocksize: 65.54 kB
Base Device Size: 107.4 GB
Backing Filesystem: xfs
Data file: /dev/loop0
Metadata file: /dev/loop1
Data Space Used: 63.57 MB
Data Space Total: 107.4 GB
Data Space Available: 9.197 GB
Metadata Space Used: 639 kB
Metadata Space Total: 2.147 GB
Metadata Space Available: 2.147 GB
Udev Sync Supported: true
Deferred Removal Enabled: false
Deferred Deletion Enabled: false
Deferred Deleted Device Count: 0
Data loop file: /var/lib/docker/devicemapper/devicemapper/data
Metadata loop file: /var/lib/docker/devicemapper/devicemapper/metadata
Library Version: 1.02.93-RHEL7 (2015-01-28)
Execution Driver: native-0.2
Logging Driver: json-file
Kernel Version: 3.10.0-229.el7.x86_64
Operating System: Red Hat Enterprise Linux Server 7.1 (Maipo)
CPUs: 1
Total Memory: 992.1 MiB
Name: ovi
ID: QK4E:KHS7:F5JP:RKHF:4PVZ:IQVO:4PKQ:AG32:H2TN:J4S3:ZW2N:ZVBD
[root@ovi ~]# docker run hello-world
Unable to find image ‘hello-world:latest’ locally
latest: Pulling from library/hello-world
b901d36b6f2f: Pull complete
0a6ba66e537a: Pull complete
Digest: sha256:8be990ef2aeb16dbcb9271ddfe2610fa6658d13f6dfb8bc72074cc1ca36966a7
Status: Downloaded newer image for hello-world:latest
Hello from Docker.
This message shows that your installation appears to be working correctly.
To generate this message, Docker took the following steps:
1. The Docker client contacted the Docker daemon.
2. The Docker daemon pulled the “hello-world” image from the Docker Hub.
3. The Docker daemon created a new container from that image which runs the
executable that produces the output you are currently reading.
4. The Docker daemon streamed that output to the Docker client, which sent it
to your terminal.
To try something more ambitious, you can run an Ubuntu container with:
$ docker run -it ubuntu bash
Share images, automate workflows, and more with a free Docker Hub account:
https://hub.docker.com
For more examples and ideas, visit:
https://docs.docker.com/userguide/
install docker httpd
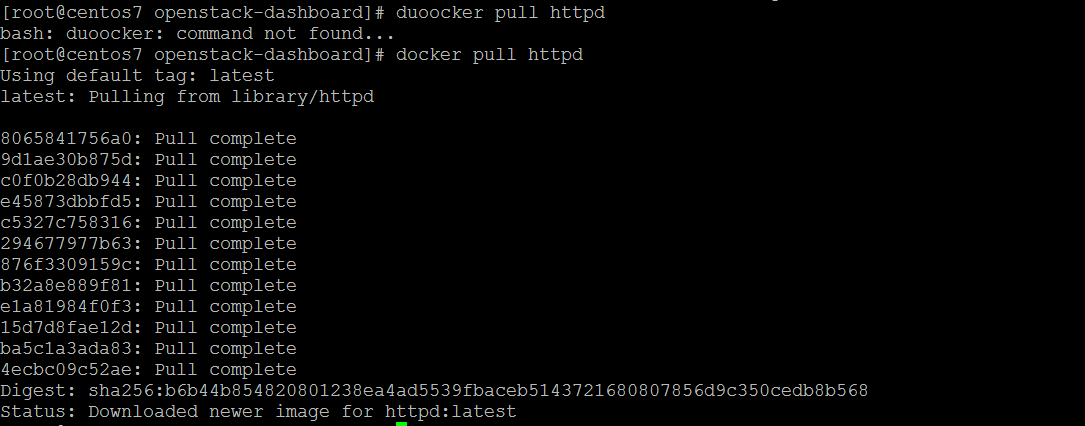
start httpd docker
[root@centos7 ]# docker run -d -p 8081:80 httpd
0a37ac4e6f0c78130b7c6da67730ac560ca41c2bb3bdda33019769668cf87613
[root@centos7 /]# docker run -d -p 8082:80 httpd
3fc891851a2d8c36482c0109f68798063f56cda32f9c034773de0c62bee07353
docker images

Search for docker image
[root@i~]# docker search ansible
NAME DESCRIPTION STARS OFFICIAL AUTOMATED
williamyeh/ansible Docker images for Ansible software, instal… 119 [OK]
ansible/centos7-ansible Ansible on Centos7 100 [OK]
ansible/ubuntu14.04-ansible Ubuntu 14.04 LTS with ansible 86 [OK]
ansible/ansible Images used for the automated testing of A… 69 [OK]
generik/ansible Ansible in a docker on Alpine Linux includ… 12 [OK]
itech/ansible A clean debian container with latest stabl… 6 [OK]
chusiang/ansible-jupyter Run Ansible 2.3 on Jupyter Notebook 4.3 (i… 3 [OK]
ansiblecheck/ansiblecheck A One Stop Solution For Checking Your Ansi… 2 [OK]
weldpua2008/docker-ansible Images ready for Ansible installation 2 [OK]
gesellix/ansible An Ansible image based on Alpine Linux 1 [OK]
solita/ansible-ssh Ansible + an SSH server 1 [OK]
webdevops/ansible Ansible image for CentOS, Ubunty, Debian a… 1 [OK]
gcavalcante8808/ansible Docker Image for Ansible based on debian:j… 1 [OK]
thepax/ansible CentOS7 based Ansible environment 1 [OK]
yabhinav/ansible Ansible Images to develop and test roles. … 0 [OK]
rsysio/ansible ansible and boto for ec2 dynamic inventory… 0 [OK]
flungo/ansible Ansible in a Docker container. 0 [OK]
pschmitt/ansible Simple and lightweight docker image for a… 0 [OK]
corbanr/ansible Debian or Ubuntu Image with Ansible 2.1 0 [OK]
maxird/ansible Ansible 0 [OK]
phase2/ansible Ansible image, to be used by itself or as … 0 [OK]
hsingh9/ansible Docker containers for running ansible play… 0 [OK]
commonms/ansible Docker image for ansible. 0 [OK]
ju2wheels/ansible Various Linux distribution images with Ans… 0 [OK]
jefferyb/ansible An ansible image with git installed 0 [OK]
docker –version
docker search <image>\
Display all running docker containers:
#docker ps
Display all running and stopped containers:
#docker ps -a
View all dockers images available on your system
#docker images
[root@ip-172-126 ~]# docker ps -a
CONTAINER ID IMAGE COMMAND CREATED STATUS PORTS NAMES
f366cecffb5b williamyeh/ansible:ubuntu14.04-onbuild “/bin/bash” 6 weeks ago Exited (0) 13 days ago sleepy_poitras
ba934f38c768 httpd “httpd-foreground” 7 weeks ago Exited (0) 13 days ago lucid_sammet
[root@ip-172-126 ~]# docker restart lucid_sammet
lucid_sammet
[root@ip-172-31-29-126 ~]# docker ps -a
CONTAINER ID IMAGE COMMAND CREATED STATUS PORTS NAMES
f366cecffb5b williamyeh/ansible:ubuntu14.04-onbuild “/bin/bash” 6 weeks ago Exited (0) 13 days ago sleepy_poitras
ba934f38c768 httpd “httpd-foreground” 7 weeks ago Up 2 seconds 0.0.0.0:8081->80/tcp lucid_sammet
[root@ip-172-31-29-126 ~]# docker pull nginx:latest
latest: Pulling from library/nginx
94ed0c431eb5: Pull complete
9406c100a1c3: Pull complete
aa74daafd50c: Pull complete
Digest: sha256:788fa27763db6d69ad3444e8ba72f947df9e7e163bad7c1f5614f8fd27a311c3
Status: Downloaded newer image for nginx:latest
[root@ip-172-31-29-126 ~]# docker run -d nginx:latest
d2d1089eb456dc6e361885b1c1177b657fa7d387a57acc4c3f128c1c09ad3123
[root@ip-172-31-29-126 ~]# docker ps
CONTAINER ID IMAGE COMMAND CREATED STATUS PORTS NAMES
d2d1089eb456 nginx:latest “nginx -g ‘daemon …” 10 seconds ago Up 10 seconds 80/tcp admiring_yonath
ba934f38c768 httpd “httpd-foreground” 7 weeks ago Up 6 hours 0.0.0.0:8081->80/tcp lucid_sammet
[root@ip-172-31-29-126 ~]# docker inspect admiring_yonath
[
{
“Id”: “d2d1089eb456dc6e361885b1c1177b657fa7d387a57acc4c3f128c1c09ad3123”,
“Created”: “2017-08-15T20:41:59.314380453Z”,
“Path”: “nginx”,
“Args”: [
“-g”,
“daemon off;”
],
“State”: {
“Status”: “running”,
“Running”: true,
“Paused”: false,
“Restarting”: false,
“OOMKilled”: false,
“Dead”: false,
[ec2-user@ip-172-126 ~]$ cd ecs-demo-php-simple-app/
[ec2-user@ip-172-126 ecs-demo-php-simple-app]$ ls -l
total 32
-rw-rw-r– 1 ec2-user ec2-user 440 Aug 15 23:28 Dockerfile
-rw-rw-r– 1 ec2-user ec2-user 11325 Aug 15 23:28 LICENSE
-rw-rw-r– 1 ec2-user ec2-user 1208 Aug 15 23:28 NOTICE.md
-rw-rw-r– 1 ec2-user ec2-user 222 Aug 15 23:28 README.md
-rw-rw-r– 1 ec2-user ec2-user 1361 Aug 15 23:28 simple-app-task-def.json
drwxrwxr-x 3 ec2-user ec2-user 4096 Aug 15 23:28 src
[ec2-user@ip-172-31-29-126 ecs-demo-php-simple-app]$ cat Dockerfile
FROM ubuntu:12.04
# Install dependencies
RUN apt-get update -y
RUN apt-get install -y git curl apache2 php5 libapache2-mod-php5 php5-mcrypt php5-mysql
# Install app
RUN rm -rf /var/www/*
ADD src /var/www
# Configure apache
RUN a2enmod rewrite
RUN chown -R www-data:www-data /var/www
ENV APACHE_RUN_USER www-data
ENV APACHE_RUN_GROUP www-data
ENV APACHE_LOG_DIR /var/log/apache2
EXPOSE 80
CMD [“/usr/sbin/apache2”, “-D”, “FOREGROUND”]
[ec2-user@ip-172-31-29-126 ecs-demo-php-simple-app]$ docker build -t my-dockerhub-ovi/amazon-ecs-sample .
[ec2-user@ip-172-126 ecs-demo-php-simple-app]$ docker images
REPOSITORY TAG IMAGE ID CREATED SIZE
my-dockerhub-ovi/amazon-ecs-sample latest ab3480672cf9 24 seconds ago 227 MB
nginx latest b8efb18f159b 2 weeks ago 107 MB
httpd latest b1e597b50dd7 7 weeks ago 177 MB
williamyeh/ansible ubuntu14.04-onbuild 5f19035835ea 7 weeks ago 260 MB
ubuntu latest d355ed3537e9 8 weeks ago 119 MB
ubuntu 12.04 5b117edd0b76 4 months ago 104 MB
BUILD images
Steps to build docker images
#mkdir New_docker_build
#cd New_docker_build
#vim Dockerfile
#docker build -t centos7/apache:v1 .
#docker run -d –name apacheweb centos7/apache:v1
#docker run -it centos7/java8:v1 /bin/bash
CMD vs. RUN
Storage and Volumes
Networking
[root@ip-172-….126 ~]# docker network ls
NETWORK ID NAME DRIVER SCOPE
9014388edc91 bridge bridge local
2dd30778b2b4 host host local
c73567dc5a5e none null local
[root@ip-172–126 ~]# docker network ls –no-trunc
NETWORK ID NAME DRIVER SCOPE
9014388edc91588228540e5a7c33905a62426f4704117ecca4d1a1f9334845c1 bridge bridge local
2dd30778b2b458b45e5e05dd81072c8e34632df61b7b6d7958f1deacaf58bfc7 host host local
c73567dc5a5ed5582af8157b78bf74224f0d01319adfa2cc9a015b446cc96745 none null local
[root@ip-172–126 ~]# docker network inspect bridge
[root@ip-172–126 ~]# docker network inspect host
[
{
“Name”: “host”,
“Id”: “2dd30778b2b458b45e5e05dd81072c8e34632df61b7b6d7958f1deacaf58bfc7”,
“Created”: “2017-06-27T00:30:21.199941311Z”,
“Scope”: “local”,
“Driver”: “host”,
“EnableIPv6”: false,
“IPAM”: {
“Driver”: “default”,
“Options”: null,
“Config”: []
},
“Internal”: false,
“Attachable”: false,
“Containers”: {},
“Options”: {},
“Labels”: {}
}
]
#man docker-network-create
#docker network create –subnet 10.1.0.0/24 –gateway 10.1.0.1 bridge01
#docker network ls
ex : [root@ip-172–126 ~]# docker network create –subnet 10.1.0.0/24 –gateway 10.1.0.1 bridge01
d2fc9a9193ef580fca2cc7001879f41b1612a19ef34b2fcc8fba44b0644658b6
[root@ip-172–126 ~]# docker network ls
NETWORK ID NAME DRIVER SCOPE
9014388edc91 bridge bridge local
d2fc9a9193ef bridge01 bridge local
2dd30778b2b4 host host local
c73567dc5a5e none null local
[root@ip-172–126 ~]# docker network inspect bridge01
[
{
“Name”: “bridge01”,
“Id”: “d2fc9a9193ef580fca2cc7001879f41b1612a19ef34b2fcc8fba44b0644658b6”,
“Created”: “2017-10-17T13:13:18.093830859Z”,
“Scope”: “local”,
“Driver”: “bridge”,
“EnableIPv6”: false,
“IPAM”: {
“Driver”: “default”,
“Options”: {},
“Config”: [
{
“Subnet”: “10.1.0.0/24”,
“Gateway”: “10.1.0.1”
}
]
},
“Internal”: false,
“Attachable”: false,
“Containers”: {},
“Options”: {},
“Labels”: {}
}
]
remove with below command:
#docker network rm bridge01
advance network
#docker network create –subnet 10.1.0.0/16 –gateway 10.1.0.1 –ip-range=10.1.5.0/24 driver=bridge –label=myhost bridge03
#docker run -it –name testnet –net bridge03 ip=10.1.5.100 centos:latest /bin/bash
debug
#docker inspect testnet | grep -i ipaddr
[root@ip-172–126 ~]# docker stats sleepy_poitras
#docker run -itd -p 127.0.0.1:8080:80 nginx:latest
Docker Events
#docker events
#docker events –since ‘1h’
#docker attach ovi
#docker events –filter (container, event, image, label, type, volume, network, daemon)
#docker history ubuntu:latest

Loading docker images
#docker commit nginx nginx:mine
#docker load –input centos.latest.tar.gz
#docker logs name
Docker Link
#docker -run -d –name test-wordpress –link test-mysql:mysql wordpress
docker logs
docker events
docker inspect
Persistent Storage
#docker volume create
#docker volume inspect
Security
Limit Number of active processes
#docker run –pids-limit=64
Control new processes
#docker run –security-opt=no-new-privileges
Turn off ipc
#docker –ipc=false
Disables iptables change
docker –iptables=false
Run docker as read only
docker run –read-only
Volume as read only
docker run -v$(pwd)/secrets:/secrets:ro centos
Clean Up
Once you are done building an image, you can delete it with the docker rmi command:
# docker rmi <tag-name>
or
# docker rmi <image-id>
Docker Swarm
Docker Swarm is native clustering for Docker. It turns a pool of Docker hosts into a single, virtual host.
– export hadoop folder to CIFS/SMB hadoop SMB share
– create a Isilon based Hadoop snapshot
– security with isilon
The HDFS services and logs
#isi hdfs settings view
Thread count :
isi hdfs settings modify –server-threads=auto
Block Size:
For Isilon, you can use the command below to modify its Block Size:
#isi hdfs settings modify –default-block-size=128M
isi services
CREATING DIRECTORIES AND SETTING PERMISSIONS
isi hdfs
isi hdfs -h
For a description of the command’s options, run the following command or see the OneFS Command
#isi hdfs settings –help
run statistics
#isi zone zones list -v
